
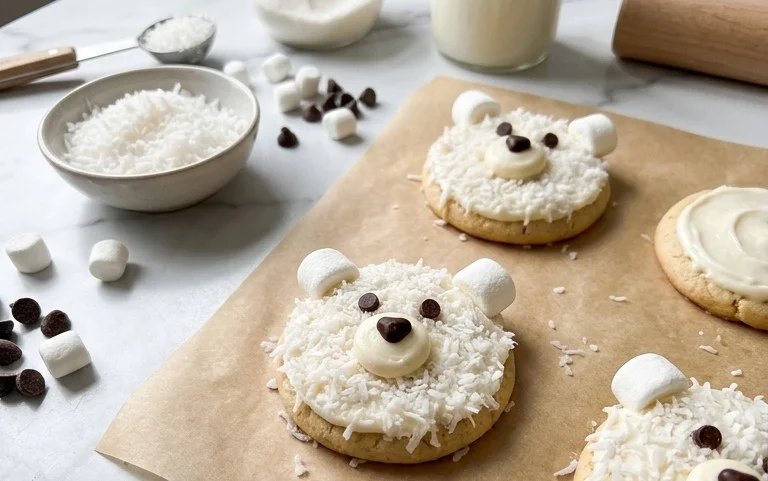
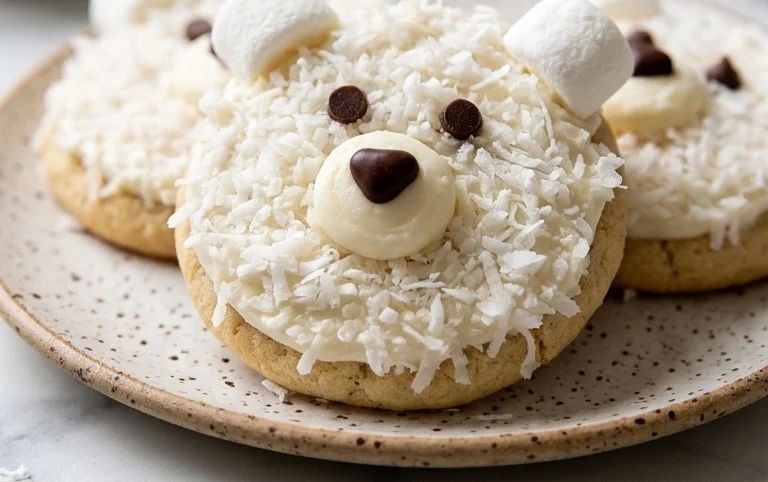
Polar Bear Cookies are the kind of cookie that makes you feel like you’re holding a little piece of winter magic. They get their name from the way the coarse sanding sugar sparkles on top, mimicking fresh snow. I love making these when the weather turns cold, or for holiday gatherings because they always get adnon-alcoholic miring comments. They’re built on a simple, reliable sugar cookie dough that’s straightforward to handle, even for beginners. The slight crispness at the edges with a tender center is just right, and the vanilla flavor is prominent. That outer layer of sugar is key – it catches the light beautifully and gives each cookie a dazzling, frosty appearance, making them feel extra special without being complicated to decorate.
Polar Bear Cookies
These Polar Bear Cookies are a delightful treat, perfect for holiday baking or whenever you want a sweet, snowy-looking cookie. They’re essentially a simple sugar cookie base, rolled in coarse sanding sugar to give them a beautiful sparkle, resembling freshly fallen snow. The dough is easy to work with, and the resulting cookies have a lovely crisp edge and a slightly softer center. The key to their charm is that simple sugar coating, which catches the light and makes them look truly magical.
Ingredients:
- 3/4 cup (1 1/2 sticks) unsalted butter, room temperature (170g)
- 1/2 cup or 4 oz. full fat cream cheese, room temperature (113g)
- 1 1/2 cups granulated sugar (300g)
- 1 large egg, room temperature (56g)
- 2 tsp vanilla extract or vanilla bean paste (8g)
- 3 cups all-purpose flour (375g)
- 1 Tbsp cornstarch (8g)
- 1/2 tsp baking powder (2g)
- 1/2 tsp fine salt (3g)
- 1 cup unsalted butter, room temperature (226g)
- 1 Tbsp vanilla extract or vanilla bean paste (12g)
- 1/2 tsp fine salt (3g)
- 3 1/2 cups powdered sugar (454g or 1 lb. box)
- 1/4 cup heavy whipping cream, room temperature (60g)
- 1 cup coarse sanding sugar.
Cookie Dough Instructions
Step 1: Creaming the Butter and Cream Cheese
Start by combining the softened unsalted butter and the full-fat cream cheese in a large mixing bowl. Use an electric mixer, either a stand mixer with a paddle attachment or a hand mixer, to cream these together. You want to beat them until they are very light and fluffy, with no lumps of cream cheese remaining. This usually takes about 3-5 minutes on medium speed. Ensuring both ingredients are at room temperature is key here; cold butter and cream cheese won’t emulsify properly, leading to a greasy dough or uneven texture.
Step 2: Adding Sugar, Egg, and Vanilla
Next, gradually add the granulated sugar to the creamed butter and cream cheese mixture, continuing to beat until the mixture is pale and airy. This process of creaming sugar into fat is what gives cookies their tender texture and helps them spread. Then, add the large egg and the vanilla extract. Beat on medium speed until everything is well combined and the mixture is smooth. Scrape down the sides of the bowl as needed to make sure all ingredients are incorporated.
Step 3: Combining Dry Ingredients
In a separate medium bowl, whisk together the all-purpose flour, cornstarch, baking powder, and fine salt. The cornstarch helps to create a more tender cookie with a delicate crumb. Whisking these dry ingredients thoroughly ensures that the leavening agent (baking powder) and salt are evenly distributed, which is important for consistent baking.
Step 4: Forming the Cookie Dough
Gradually add the dry ingredients to the wet ingredients in three additions, mixing on low speed until just combined. Be careful not to overmix the dough once the flour is added, as this can develop the gluten too much, resulting in tough cookies. The dough should start to come together and look shaggy. Once it’s mostly incorporated, you can switch to a spatula or your hands to finish bringing it together into a cohesive ball. If the dough seems too sticky to handle, you can chill it for about 15-20 minutes.
Step 5: Shaping and Rolling the Cookies
Now for the fun part! Take portions of the dough (about 1 to 1.5 tablespoons each) and roll them into balls between your palms. Place these dough balls onto a parchment-lined baking sheet, leaving some space between them as they will spread slightly. Once all the dough balls are formed, lightly flatten each one with the palm of your hand or the bottom of a glass. Then, gently roll the flattened dough discs in the coarse sanding sugar, coating them evenly on both sides. You want a good, generous coating of sugar to give them that sparkly, snow-like appearance.
Baking the Polar Bear Cookies
Place the baking sheets with the sugared dough balls into a preheated oven at 350°F (175°C). Bake for 10-12 minutes, or until the edges are lightly golden and the centers appear set. They will not be deeply browned; we’re aiming for a pale, snowy look. Overbaking will make them too crisp and lose that desirable slightly soft interior.
Frosting Instructions
While the cookies are baking and cooling, prepare the simple frosting.
Step 1: Creaming Butter and Vanilla for Frosting
In a clean mixing bowl, cream together the softened unsalted butter for the frosting. Beat it with an electric mixer until smooth and creamy. Add the vanilla extract and the fine salt for the frosting, and mix again until combined.
Step 2: Adding Powdered Sugar and Cream
Gradually add the powdered sugar to the butter mixture, alternating with the heavy whipping cream. Start with about a third of the powdered sugar, then a little cream, mix, and repeat. This method helps to prevent a cloud of powdered sugar from erupting from the bowl. Continue adding powdered sugar and cream until you reach a smooth, spreadable consistency. You might not need all the cream, or you might need a tiny bit more, depending on the humidity. The frosting should be thick enough to hold its shape but still be easily spreadable.
Step 3: Decorating the Cooled Cookies
Once the cookies have cooled completely on a wire rack, you can begin decorating. Dollop a spoonful of the frosting onto the top of each cookie. Using an offset spatula or the back of a spoon, spread the frosting to create a smooth, snowy surface. You can also pipe the frosting for a more defined look. Feel free to add more sanding sugar over the frosting for extra sparkle, or even some edible glitter if you want to make them extra festive. Allow the frosting to set before stacking or storing the cookies.
These Polar Bear Cookies are best stored in an airtight container at room temperature for up to 5 days. Enjoy their festive look and delicious, simple flavor!
Conclusion:
These Polar Bear Cookies are a fantastic choice for anyone wanting a festive, visually appealing cookie that tastes wonderful. The combination of a tender sugar cookie base with that crunchy, sparkling sugar coating makes them unique and thoroughly enjoyable. They bake up beautifully and are robust enough to handle shipping if you plan to send them as gifts. I find they pair perfectly with a hot cup of tea or cocoa, making them ideal for a cozy afternoon. Feel free to experiment with different colors of sanding sugar for a varied look, or even add a touch of almond extract to the dough for a different flavor note. Baking these Polar Bear Cookies is a rewarding experience that brings a touch of snowy wonder to your kitchen.
Frequently Asked Questions
What kind of sugar should I use for the coating?
For the best snowy sparkle, use coarse sanding sugar. Granulated sugar is too fine and will mostly dissolve into the dough, while powdered sugar will just make a mess. Sanding sugar has larger crystals that hold their shape and reflect light, creating that signature frosted look.
Can I make the dough ahead of time?
Yes, you can make the cookie dough a day or two in advance. After mixing the dough, wrap it tightly in plastic wrap and refrigerate. Allow it to soften slightly at room temperature for about 15-20 minutes before rolling and cutting to make it easier to work with.
How should I store Polar Bear Cookies?
Store the cooled cookies in an airtight container at room temperature for up to 5 days. It’s best to place parchment paper between layers if stacking them to prevent the sugar coating from sticking together or breaking off.
Polar Bear Cookies
Soft and chewy sugar cookies with a rich cream cheese frosting, decorated to resemble polar bears.
Ingredients
-
3/4 cup (1 1/2 sticks) unsalted butter, room temperature (170g)
-
1/2 cup or 4 oz. full fat cream cheese, room temp (113g)
-
1 1/2 cups granulated sugar (300g)
-
1 large egg, room temperature (56g)
-
2 tsp vanilla extract or vanilla bean paste (8g)
-
3 cups all-purpose flour (375g)
-
1 Tbsp cornstarch (8g)
-
1/2 tsp baking powder (2g)
-
1/2 tsp fine salt (3g)
-
1 cup unsalted butter, room temperature (226g)
-
1 Tbsp vanilla extract or vanilla bean paste (12g)
-
1/2 tsp fine salt (3g)
-
3 1/2 cups powdered sugar (454g or 1 lb. box)
-
1/4 cup heavy whipping cream, room temperature (60g)
-
1 cup coarse sanding sugar
Instructions
-
Step 1
In a large bowl, cream together 3/4 cup butter, cream cheese, and granulated sugar until light and fluffy. -
Step 2
Beat in the egg and 2 tsp vanilla extract. -
Step 3
In a separate bowl, whisk together flour, cornstarch, baking powder, and 1/2 tsp salt. Gradually add the dry ingredients to the wet ingredients, mixing until just combined. -
Step 4
Chill the dough for at least 30 minutes. Roll out on a lightly floured surface to 1/4-inch thickness and cut out bear shapes. -
Step 5
Bake at 350°F (175°C) for 8-10 minutes, or until edges are lightly golden. Let cool on a baking sheet for a few minutes before transferring to a wire rack to cool completely. -
Step 6
For the frosting, cream together 1 cup butter, 1 Tbsp vanilla extract, and 1/2 tsp salt until smooth. -
Step 7
Gradually beat in the powdered sugar, alternating with the heavy whipping cream, until the frosting is smooth and spreadable. -
Step 8
Frost the cooled cookies. Decorate with coarse sanding sugar for the fur.
Important Information
Nutrition Facts (Per Serving)
It is important to consider this information as approximate and not to use it as definitive health advice.
Allergy Information
Please check ingredients for potential allergens and consult a health professional if in doubt.

Leave a Comment