
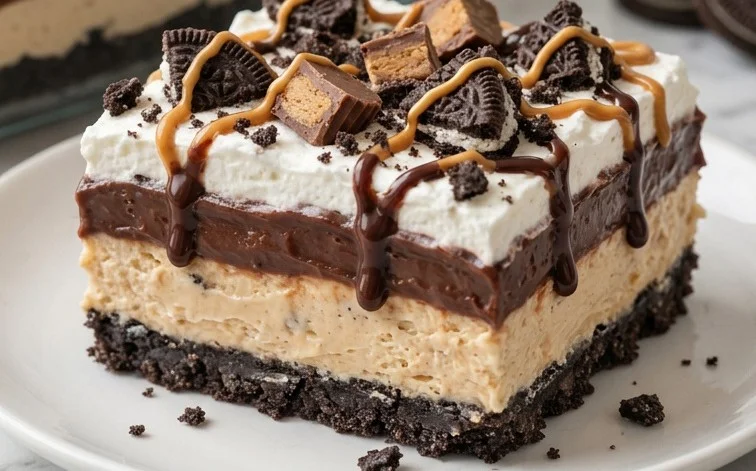
This No Bake Chocolate Peanut Butter Oreo Dessert is one of those treats that always disappears first at any gathering. It perfectly captures the beloved combination of rich chocolate, creamy peanut butter, and the satisfying crunch of Oreos, all without turning on the oven. I find myself making it whenever I need something impressive yet incredibly simple to pull together. The magic happens in the layers: a buttery Oreo crust, a smooth vanilla pudding and cream cheese filling, a luscious peanut butter layer, and finally, a decadent chocolate topping. It’s especially wonderful on a warm day when you don’t want to heat up the kitchen, offering a cool, sweet, and intensely satisfying experience that everyone, from kids to adults, will adore. It’s truly a foolproof dessert that tastes like you spent hours on it.
Ingredients:
- 12 oz milk chocolate chips, divided
- 3 1/2 cups milk
- 1 pkg Oreos (14.3 oz package, chocolate cream recommended)
- 16 oz cream cheese, divided (room temperature)
- 1 box Instant Vanilla Pudding (3.4 oz box)
- 1 cup creamy peanut butter
- 1 box Instant Chocolate Pudding (3.4 oz box)
- 12 oz whipped topping
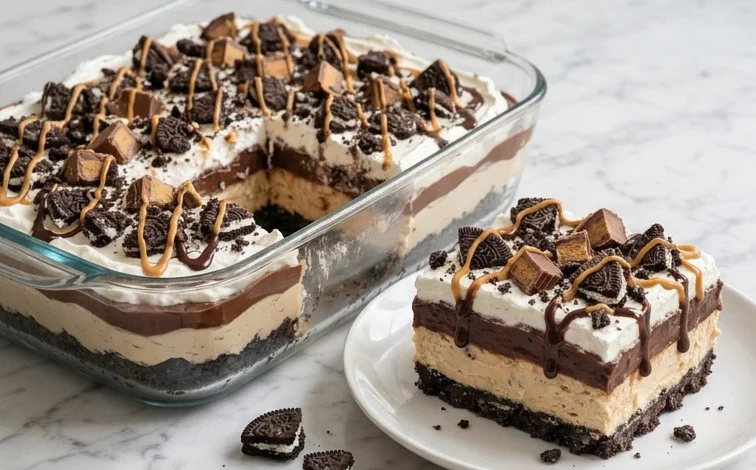
No Bake Chocolate Peanut Butter Oreo Dessert
This no-bake dessert is a true crowd-pleaser, especially if you love the classic combination of chocolate and peanut butter, all brought together with the beloved crunch of Oreos. It’s wonderfully simple to make, requiring no oven time at all, which makes it perfect for those hot summer days or when you just want a quick, satisfying treat. The layers of creamy filling and crushed Oreos create a fantastic texture that’s both rich and satisfying. I often make this for family gatherings, and it’s always the first to disappear.
Ingredients:
- 12 oz milk chocolate chips, divided
- 3 1/2 cups milk
- 1 pkg Oreos (14.3 oz package, I use chocolate cream)
- 16 oz cream cheese, divided (room temperature)
- 1 box Instant Vanilla Pudding (3.4 oz box)
- 1 cup creamy peanut butter
- 1 box Instant Chocolate Pudding (3.4 oz box)
- 12 oz whipped topping
Instructions:
Step 1: Prepare the Oreo Base
First, we need to get our Oreos ready. Take the entire package of Oreos, including the cream filling, and place them into a food processor. Pulse until they are finely crushed. You want them to be like coarse crumbs. If you don’t have a food processor, you can place the Oreos in a large zip-top bag and crush them with a rolling pin until you reach the desired consistency. This crushed Oreo mixture will form the delicious, crunchy base of our dessert. In a medium bowl, mix the crushed Oreos with about 4 tablespoons of melted butter (you’ll need about half of the 12 oz of milk chocolate chips, melted, which will be 6 oz of melted chocolate chips). This binder helps the crumbs hold together. Press this mixture firmly into the bottom of a 9×13 inch baking dish. Make sure to get an even layer across the entire bottom. You can use the bottom of a glass or a measuring cup to help press it down. This layer needs to chill while we prepare the fillings. Place the dish in the refrigerator for at least 15 minutes to firm up.
Step 2: Make the Vanilla Pudding Layer
Now let’s get started on our first creamy layer. In a large bowl, combine the 3 1/2 cups of milk with the contents of the 3.4 oz box of instant vanilla pudding mix. Whisk this together vigorously for about 2 minutes, or until the pudding begins to thicken. It’s important to whisk continuously to avoid lumps. Once it starts to thicken, let it sit for about 5 minutes to fully set. While the vanilla pudding is setting, take half of the softened cream cheese (8 oz) and beat it in a separate bowl until it’s smooth and creamy. You can use a hand mixer or a stand mixer for this. Once the vanilla pudding has set and the cream cheese is smooth, gently fold the whipped topping into the vanilla pudding mixture. Then, carefully fold in the softened cream cheese until everything is well combined and smooth. You don’t want to overmix, just ensure there are no streaks of cream cheese visible.
Step 3: Assemble the First Filling and Oreo Layer
Once the Oreo base has chilled and firmed up, it’s time to add the first layer of filling. Gently spread the vanilla pudding and cream cheese mixture evenly over the chilled Oreo crust. Try to create a smooth, even surface. After spreading the vanilla layer, we’ll add another delicious texture. Take about half of the remaining Oreos (roughly 7-8 cookies) and roughly chop them. You can do this by hand with a knife or pulse them a few times in the food processor. Sprinkle these chopped Oreos over the vanilla pudding layer. This adds little pockets of cookie crunch throughout the dessert.
Step 4: Create the Chocolate Peanut Butter Layer
For our second creamy layer, we’ll combine the rich flavors of chocolate and peanut butter. In a medium bowl, beat the remaining 8 oz of cream cheese until it’s smooth and creamy. Add the 1 cup of creamy peanut butter to the cream cheese and beat until well combined and fluffy. Next, add the contents of the 3.4 oz box of instant chocolate pudding mix. Stir this in until it’s just combined; don’t overmix at this stage. Finally, gently fold in the remaining 12 oz of whipped topping. Be careful not to deflate the whipped topping too much. Fold until it’s all incorporated and you have a smooth, luscious chocolate peanut butter mixture. This layer is incredibly rich and decadent.
Step 5: Finish Assembling and Chilling
Now, carefully spread the chocolate peanut butter mixture evenly over the layer of chopped Oreos and vanilla filling. Again, aim for a smooth, even layer. For the final touch, take the remaining 6 oz of milk chocolate chips and melt them. You can do this in a microwave-safe bowl in 30-second intervals, stirring between each, or use a double boiler. Once melted and smooth, drizzle the melted chocolate over the top of the dessert. You can use a fork or a spoon to create swirls or a random drizzle pattern. After drizzling the chocolate, cover the entire dish tightly with plastic wrap or a lid. Refrigerate the dessert for at least 4 hours, or preferably overnight. This allows all the flavors to meld together and the dessert to set properly, making it easy to slice and serve. The longer it chills, the firmer and more delicious it will become.
When you’re ready to serve, simply cut into squares and enjoy this delightful no-bake treat. It’s wonderful on its own, or you can add a dollop of extra whipped cream or a drizzle of chocolate sauce if you like.
Conclusion:
This No Bake Chocolate Peanut Butter Oreo Dessert truly delivers on flavor and texture with minimal effort. The layers of crushed Oreos, creamy fillings, and rich chocolate topping create a dessert that’s both decadent and incredibly satisfying. It’s a go-to for a reason – it’s simple to make ahead, always a hit with guests, and requires no baking, making it ideal for any occasion, especially when you want to avoid the oven. Serve it chilled after a meal, or as a sweet treat during a party. For variations, you could add a layer of chopped peanuts for extra crunch or drizzle some melted peanut butter over the top before the final chocolate layer sets. You can also swap out the milk chocolate chips for dark chocolate for a more intense chocolate flavor.
Frequently Asked Questions:
Can I make this dessert ahead of time?
Yes, absolutely. This No Bake Chocolate Peanut Butter Oreo Dessert is best made at least a few hours ahead, or even the day before, to allow the flavors to meld and the layers to set properly. It stores well in the refrigerator.
What kind of Oreos work best?
While you can use any flavor of Oreos, the chocolate cream-filled ones tend to give the best flavor and texture for the base and any middle layers, as they complement the chocolate and peanut butter notes. However, regular Oreos work well too.
How long does the dessert stay fresh in the refrigerator?
This dessert will keep well in the refrigerator, covered tightly, for up to 3-4 days. The crust might soften slightly over time, but the flavor remains excellent.
No Bake Chocolate Peanut Butter Oreo Dessert
A simple and delicious no-bake dessert featuring layers of chocolate, peanut butter, and Oreos.
Ingredients
-
12 oz milk chocolate chips, divided
-
3 1/2 cups milk
-
1 pkg Oreos (14.3 oz package, chocolate cream)
-
16 oz cream cheese, room temperature, divided
-
1 box Instant Vanilla Pudding (3.4 oz box)
-
1 cup creamy peanut butter
-
1 box Instant Chocolate Pudding (3.4 oz box)
-
12 oz whipped topping
Instructions
-
Step 1
Crush Oreos into fine crumbs. Press half of the crumbs into the bottom of a 9×13 inch baking dish. -
Step 2
In a large bowl, beat the cream cheese until smooth. Stir in peanut butter. -
Step 3
In a separate bowl, whisk together the milk and instant vanilla pudding. Let sit for 5 minutes. -
Step 4
Add the vanilla pudding mixture and half of the whipped topping to the cream cheese and peanut butter mixture. Beat until well combined. -
Step 5
Spread the cream cheese mixture evenly over the Oreo crust. -
Step 6
In another bowl, whisk together the milk and instant chocolate pudding. Let sit for 5 minutes. Gently spread the chocolate pudding mixture over the cream cheese layer. -
Step 7
Top with the remaining whipped topping. Sprinkle with the remaining Oreo crumbs and milk chocolate chips. -
Step 8
Melt the remaining milk chocolate chips. Drizzle over the top. Chill for at least 2 hours before serving.
Important Information
Nutrition Facts (Per Serving)
It is important to consider this information as approximate and not to use it as definitive health advice.
Allergy Information
Please check ingredients for potential allergens and consult a health professional if in doubt.


Leave a Comment