
Halloween Oreo Cake Bars are my go-to treat when spooky season rolls around. They’re incredibly easy to make, and the combination of rich chocolatey Oreos baked right into a tender vanilla cake is just fantastic. Plus, the Halloween sprinkles make them look as festive as they taste. They’re perfect for parties, school treats, or just a fun weekend baking project. You get all the gooey, crunchy goodness of Oreos in every single bite, transformed into an easy-to-serve bar. Ingredients: 1 (1 pound) box Halloween Oreos 1 (15.2 ounce) box French Vanilla Cake Mix ½ cup whole milk ½ cup Canola Oil 2 large eggs 2 cups Halloween Sprinkles, divided Non-stick baking spray Making the Bars First, let’s get our baking pan ready. This is a crucial step to ensure your bars don’t stick. I like to use a 9×13 inch baking pan for these. Generously spray the entire inside of the pan with a non-stick baking spray. Make sure to get the corners and sides well. You can also line the pan with parchment paper, leaving an overhang on two sides. This makes lifting the entire baked cake out much easier for cutting into bars. If you use parchment, still give the exposed parts of the pan a light spray of baking spray. Next up is preparing the Oreos. For these bars, we want to chop the Halloween Oreos into pieces. You don’t want them to be too fine; aim for chunks that are about half an Oreo or even a little bigger. This way, you’ll get distinct pockets of creamy cookie in every bite. You’ll need about 3 cups of chopped Oreos. Don’t throw away the crumbs that fall off as you chop; they’ll be mixed into the batter for extra flavor and texture. When you’re done chopping, set the Oreo pieces and any loose crumbs aside in a bowl. This step ensures that the Oreos are distributed throughout the cake and don’t all sink to the bottom. Remember to use Halloween-themed Oreos for the full effect, but any chocolate sandwich cookie will work if you can’t find them. Just make sure to chop them into irregular pieces so they don’t all cook down to the same texture. The batter needs to be thick enough to hold the cookie pieces without them sinking too much, so chopping is key.
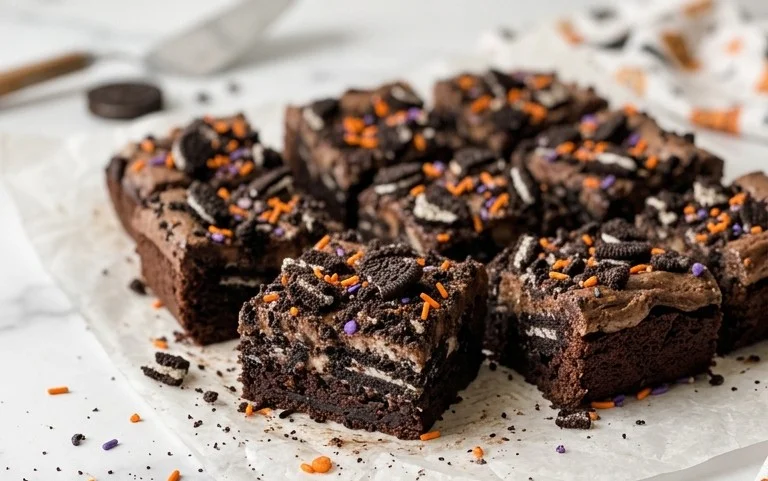
Halloween Oreo Cake Bars
These Halloween Oreo Cake Bars are my go-to treat when spooky season rolls around. They’re incredibly easy to make, and the combination of rich chocolatey Oreos baked right into a tender vanilla cake is just fantastic. Plus, the Halloween sprinkles make them look as festive as they taste. They’re perfect for parties, school treats, or just a fun weekend baking project. You get all the gooey, crunchy goodness of Oreos in every single bite, transformed into an easy-to-serve bar.
Ingredients:
- 1 (1 pound) box Halloween Oreos
- 1 (15.2 ounce) box French Vanilla Cake Mix
- ½ cup whole milk
- ½ cup Canola Oil
- 2 large eggs
- 2 cups Halloween Sprinkles, divided
- Non-stick baking spray
Making the Bars
First, let’s get our baking pan ready. This is a crucial step to ensure your bars don’t stick. I like to use a 9×13 inch baking pan for these. Generously spray the entire inside of the pan with a non-stick baking spray. Make sure to get the corners and sides well. You can also line the pan with parchment paper, leaving an overhang on two sides. This makes lifting the entire baked cake out much easier for cutting into bars. If you use parchment, still give the exposed parts of the pan a light spray of baking spray.
Next up is preparing the Oreos. For these bars, we want to chop the Halloween Oreos into pieces. You don’t want them to be too fine; aim for chunks that are about half an Oreo or even a little bigger. This way, you’ll get distinct pockets of creamy cookie in every bite. You can do this by placing the Oreos in a resealable plastic bag and gently crushing them with a rolling pin or the bottom of a sturdy glass. Alternatively, you can use a knife on a cutting board, but be careful not to crush them into dust. Once chopped, set them aside for now. We also need to reserve about half a cup of the chopped Oreos to sprinkle on top later, so divide your chopped Oreos accordingly.
Now, let’s mix the cake batter. In a large mixing bowl, combine the contents of your French Vanilla Cake Mix. Add the ½ cup of whole milk, ½ cup of canola oil, and the 2 large eggs. Whisk these ingredients together until they are just combined. Be careful not to overmix the batter at this stage. Overmixing can develop the gluten in the flour too much, resulting in a tougher cake. It’s perfectly fine if there are a few small lumps remaining. The goal is a smooth, pourable batter.
After you’ve mixed the wet and dry ingredients for the cake batter, it’s time to incorporate some of the festive elements. Gently fold in 1 ½ cups of your Halloween sprinkles into the batter. Save the remaining ½ cup of sprinkles for topping. Folding is a gentle stirring motion where you scrape down the sides of the bowl and bring the batter up from the bottom, integrating the sprinkles without deflating the batter. You want the sprinkles to be evenly distributed throughout the cake mixture. This is where the visual magic starts to happen, and it will make your bars look incredibly fun.
Once the sprinkles are incorporated into the batter, it’s time to add those chopped Oreos. Carefully fold the majority of your chopped Halloween Oreos (remember, we’re saving about half a cup for the topping) into the batter. Again, use a gentle folding motion to distribute them evenly. You want to ensure you get a good amount of Oreo pieces in the batter without overworking it. Some of the cream filling might come out, and that’s perfectly fine; it just adds to the deliciousness.
Now, pour the batter evenly into your prepared baking pan. Use a spatula to spread it out so it covers the bottom of the pan in a uniform layer. This helps ensure your bars bake evenly. Once the batter is spread, take the reserved chopped Oreos and sprinkle them over the top of the batter. Follow this by scattering the remaining ½ cup of Halloween sprinkles over the top. This double dose of Oreos and sprinkles makes these bars extra special and visually appealing. They’re already looking like a Halloween masterpiece!
Baking and Cooling
Bake the bars in a preheated oven at 350 degrees Fahrenheit (175 degrees Celsius). This usually takes about 25 to 35 minutes. The exact baking time can vary depending on your oven, so keep an eye on them. You’ll know they are done when a toothpick inserted into the center comes out with moist crumbs attached, but no wet batter. If the top starts to brown too quickly before the center is cooked, you can loosely tent the pan with aluminum foil.
Once baked, remove the pan from the oven and let the bars cool completely in the pan on a wire rack. This cooling process is very important. If you try to cut them while they are still warm, they will likely fall apart. Patience here will pay off in neat, delicious bars. Once they are completely cool, you can lift them out of the pan using the parchment paper overhang, or if you didn’t use parchment, carefully cut them directly in the pan. Slice them into squares or rectangles, however you prefer your bars.
These bars are best enjoyed at room temperature. You can store any leftovers in an airtight container at room temperature for up to 3 days. They don’t typically need refrigeration, and keeping them at room temperature ensures they retain their intended texture.
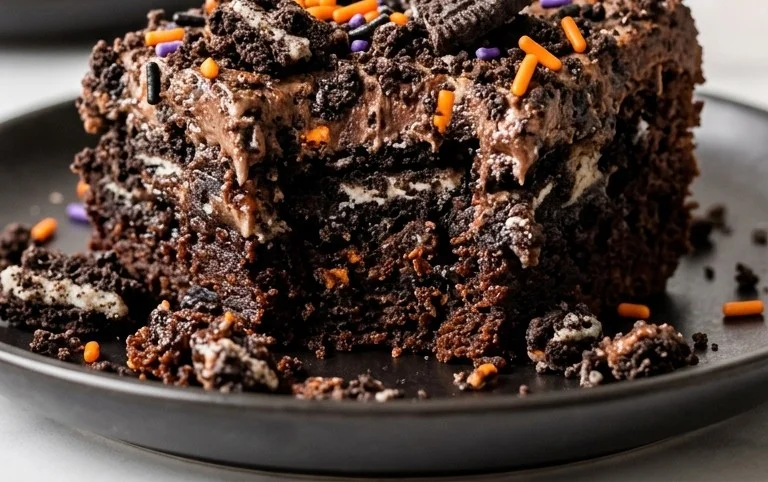
Conclusion:
These Halloween Oreo Cake Bars are a truly fun and festive treat that always disappears fast. The combination of tender vanilla cake and chunks of chocolatey Oreos, plus the festive sprinkles, makes them a hit for any fall gathering or just a weekend baking project. They’re simple to make and deliver a satisfying crunch and chew with every bite. You can serve them as is, or add a drizzle of chocolate icing and extra Halloween sprinkles for an even more decadent finish. They’re fantastic for Halloween parties, bake sales, or just enjoying with a glass of milk.
Variations: For a different flavor profile, try using chocolate cake mix instead of vanilla, or swap out some of the Oreos for other Halloween candies like chopped candy corn or chocolate pieces. You could also experiment with different frosting colors to match your party theme.
Frequently Asked Questions:
Can I make these bars ahead of time?
Yes, you can absolutely make these Halloween Oreo Cake Bars a day or two in advance. Store them in an airtight container at room temperature. They are best enjoyed within 2-3 days of baking.
What if I don’t have Halloween Oreos?
No problem! You can use regular chocolate Oreos, or even mint-flavored Oreos, and still get that delicious cookie-and-cake combination. Just chop them up as directed.
How do I ensure the Oreos don’t sink to the bottom?
Chopping the Oreos into pieces about half an inch or larger helps them distribute more evenly. Making sure your batter is the correct thickness from the cake mix instructions and mixing them in gently also prevents them from sinking too much.
Halloween Oreo Cake Bars
Deliciously spooky cake bars packed with Halloween Oreos and festive sprinkles.
Ingredients
-
1 (1 pound) box Halloween Oreos
-
1 (15.2 ounce) box French Vanilla Cake Mix
-
½ cup whole milk
-
½ cup Canola Oil
-
2 large eggs
-
2 cups Halloween Sprinkles, divided
-
non-stick baking spray
Instructions
-
Step 1
Preheat oven to 350°F (175°C). Grease and flour a 9×13 inch baking pan or line with parchment paper. -
Step 2
Crush the Halloween Oreos into coarse crumbs. Set aside. -
Step 3
In a large bowl, combine the French Vanilla cake mix, milk, canola oil, and eggs. Mix until smooth. -
Step 4
Fold in half of the crushed Halloween Oreos and 1 cup of the Halloween sprinkles into the cake batter. -
Step 5
Pour the batter into the prepared baking pan and spread evenly. -
Step 6
Sprinkle the remaining crushed Oreos and 1 cup of Halloween sprinkles over the top of the batter. -
Step 7
Bake for 25-30 minutes, or until a toothpick inserted into the center comes out clean. -
Step 8
Let cool completely in the pan before cutting into bars.
Important Information
Nutrition Facts (Per Serving)
It is important to consider this information as approximate and not to use it as definitive health advice.
Allergy Information
Please check ingredients for potential allergens and consult a health professional if in doubt.

Leave a Comment