
Pumpkin Oreo Balls start with the classic combination of Oreos and cream cheese, but with a delightful twist: the subtle warmth of pumpkin spice. They’re the kind of no-bake treat that feels incredibly festive, perfect for any autumn gathering or just when you need a little something sweet and comforting. The orange candy melts give them a beautiful, uniform coating that makes them look as good as they taste, and they’re surprisingly easy to pull together, even for a last-minute craving. Making the Base The foundation of these delightful treats is a simple mixture of crushed Oreos and softened cream cheese. It’s important that your cream cheese is truly softened; leaving it on the counter for about an hour before you start should do the trick. If it’s too cold, it will be lumpy and difficult to mix smoothly, which can affect the final texture of your balls. For crushing the Oreos, you have a few options. The easiest way is to toss them into a food processor and pulse until they form fine crumbs. If you don’t have a food processor, you can place the cookies in a sturdy zip-top bag, seal it well, and then go to town with a rolling pin. Aim for fine crumbs, not just broken pieces, as this will help the mixture bind together properly. You want a consistency that will hold its shape when rolled. Once your Oreos are finely crushed, it’s time to incorporate the cream cheese. Add the softened cream cheese to the crushed Oreos in a large bowl. Use a sturdy spoon or a rubber spatula to mix them together until it forms a cohesive dough. Some people like to use their hands for this part, which can be quite effective, just make sure your hands are clean. The mixture should be crumbly but hold together when you press it. This mixture is what you’ll roll into balls, so it needs to be firm enough to shape. Don’t worry if it seems a bit sticky; that’s normal. The key is to ensure everything is well combined before moving to the next step, which is rolling.

Pumpkin Oreo Balls
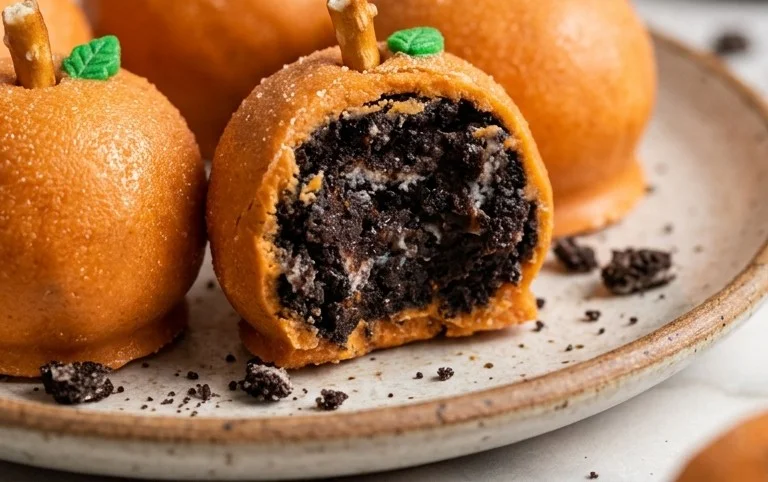
These Pumpkin Oreo Balls start with the classic combination of Oreos and cream cheese, but with a delightful twist: the subtle warmth of pumpkin spice. They’re the kind of no-bake treat that feels incredibly festive, perfect for any autumn gathering or just when you need a little something sweet and comforting. The orange candy melts give them a beautiful, uniform coating that makes them look as good as they taste, and they’re surprisingly easy to pull together, even for a last-minute craving.
Ingredients:
- 36 Oreo cookies
- 8 oz cream cheese (softened)
- 12 oz orange candy melts
Making the Base
The foundation of these delightful treats is a simple mixture of crushed Oreos and softened cream cheese. It’s important that your cream cheese is truly softened; leaving it on the counter for about an hour before you start should do the trick. If it’s too cold, it will be lumpy and difficult to mix smoothly, which can affect the final texture of your balls. For crushing the Oreos, you have a few options. The easiest way is to toss them into a food processor and pulse until they form fine crumbs. If you don’t have a food processor, you can place the cookies in a sturdy zip-top bag, seal it well, and then go to town with a rolling pin. Aim for fine crumbs, not just broken pieces, as this will help the mixture bind together properly. You want a consistency that will hold its shape when rolled.
Once your Oreos are finely crushed, it’s time to incorporate the cream cheese. Add the softened cream cheese directly to the bowl with the Oreo crumbs. Use a sturdy spoon or a spatula to begin mixing. You’ll want to work until everything is well combined and there are no streaks of plain cream cheese visible. At this stage, it might seem a bit shaggy, but keep mixing. The mixture should start to come together and become moldable. If it feels too dry and crumbly, you can add a tiny bit more cream cheese, about a teaspoon at a time, until it holds together. Conversely, if it feels too wet, you might have slightly too soft cream cheese or your Oreos had extra filling, but this is less common. The goal is a dough-like consistency that you can easily shape into balls.
Forming and Chilling the Balls
Now comes the fun part: rolling the mixture into balls. I like to use a small cookie scoop or a tablespoon to get consistently sized portions. This makes sure they all bake (or rather, set) evenly and look uniform when you dip them. Roll each portion between the palms of your hands until you have a smooth, compact ball. They don’t need to be perfectly round, but try to get them as close as you can. Place the rolled balls onto a baking sheet that has been lined with parchment paper or wax paper. This is important to prevent them from sticking. Once all the mixture is rolled into balls, it’s time to chill them. Pop the baking sheet into the refrigerator for at least 30 minutes, or into the freezer for about 15 minutes if you’re in a hurry. This chilling step is crucial because it firms up the cream cheese mixture, making the balls much easier to handle when you dip them in the candy melts. If they are too soft, they might fall apart or the candy coating might not adhere properly.
Melting and Dipping
For the coating, we’re using orange candy melts. These are wonderful because they melt smoothly and set up firm, giving you that professional candy-coated finish without any fuss. To melt them, you can use either the microwave or a double boiler. If using the microwave, place the candy melts in a microwave-safe bowl and heat them in 30-second intervals, stirring well after each interval, until they are completely melted and smooth. Be careful not to overheat them, as they can seize up and become unworkable. If using a double boiler, fill the bottom pot with a small amount of water and bring it to a simmer. Place the candy melts in the top bowl, making sure the bottom of the bowl doesn’t touch the water. Stir constantly until melted and smooth. Once the candy melts are smooth and fluid, it’s time to dip your chilled Oreo balls. You can use a fork or a dipping tool for this. Carefully drop a chilled ball into the melted candy, making sure it’s fully submerged. Gently lift it out, letting any excess candy drip back into the bowl. This is where the chilling really helps – it allows the excess to drip off more cleanly.
Place the dipped balls back onto the parchment-lined baking sheet. If you want to add any decorations, like a drizzle of contrasting candy melt or some sprinkles, do it while the coating is still wet. For a bit of extra flair, you can melt a small amount of white or dark chocolate candy melts and drizzle it over the orange coating with a fork or a piping bag. If you want to stick with the pumpkin theme, you could even use a little bit of green candy melt for a stem-like detail. Once decorated, allow the candy coating to set completely. This usually takes about 15-20 minutes at room temperature, or you can speed it up by placing the baking sheet back in the refrigerator for about 10 minutes. Be patient here; you don’t want to handle them until the coating is firm to the touch.
Storage and Serving
Once your Pumpkin Oreo Balls have set, they are ready to be enjoyed! They are best stored in an airtight container in the refrigerator. Because they contain cream cheese, they don’t do well at room temperature for extended periods. They can be stored in the fridge for up to a week. When you’re ready to serve them, take them out of the refrigerator about 15-20 minutes before you plan to eat them. This allows the cream cheese center to soften up just a bit, making for a more pleasant texture. They are wonderful served on their own as a sweet bite, or you can arrange them on a platter for a festive dessert spread. They make a charming addition to any holiday cookie tray or a fun treat to bring to a potluck. The combination of the chocolate cookie, the creamy center, and the sweet candy coating is truly irresistible.
Conclusion:
These Pumpkin Oreo Balls are a fantastic no-bake dessert that really captures the essence of fall. The combination of chocolatey Oreos, creamy cheese, and warm pumpkin spice is a hit every time. They look beautiful coated in bright orange candy melts, making them a standout on any dessert table. I always make a double batch because they disappear so fast! They are wonderful served chilled, offering a satisfyingly dense and smooth texture. For variations, you could add a pinch of cinnamon or nutmeg to the Oreo mixture before adding the cream cheese for an extra spice kick. You could also try drizzling them with a little dark chocolate after the orange coating has set for a decorative touch. Or, swap the orange candy melts for white chocolate and add a drop of green food coloring for a Halloween theme. When it comes to storage, keep them in an airtight container in the refrigerator for up to a week. They do firm up quite a bit in the fridge, so let them sit at room temperature for about 10-15 minutes before serving if you prefer a softer bite. Everyone loves these Pumpkin Oreo Balls, and they are a perfect treat for bake sales, parties, or just a cozy evening in. Give them a try – you won’t regret it!
FAQs
Can I make these without pumpkin spice?
Yes, absolutely! If you don’t have pumpkin pie spice, you can make your own by combining ground cinnamon, ginger, nutmeg, and cloves. Or, for a simpler version, just omit the spice altogether. They will still be delicious Oreo balls, though they won’t have that distinct pumpkin flavor.
How do I get a smooth coating?
To get a smooth candy melt coating, make sure your candy melts are fully melted and smooth. Use a microwave-safe bowl and melt in 30-second intervals, stirring between each, until smooth. Avoid overheating. You can also melt them gently in a double boiler. Once melted, dip the chilled balls quickly and let the excess drip off before placing them on parchment paper to set.
Pumpkin Oreo Balls
Decadent no-bake balls made with crushed Oreos, cream cheese, and dipped in orange candy melts, perfect for fall celebrations.
Ingredients
-
36 Oreo cookies
-
8 oz cream cheese (softened)
-
12 oz orange candy melts
Instructions
-
Step 1
Crush the Oreo cookies into fine crumbs using a food processor or by placing them in a zip-top bag and crushing with a rolling pin. -
Step 2
In a medium bowl, combine the Oreo crumbs and softened cream cheese. Mix until well combined and a dough-like consistency forms. -
Step 3
Roll the mixture into small balls, about 1 inch in diameter. Place them on a baking sheet lined with parchment paper. -
Step 4
Melt the orange candy melts according to package directions, either in the microwave or using a double boiler. -
Step 5
Dip each Oreo ball into the melted candy melts, ensuring they are fully coated. Use a fork or toothpick to help coat and lift the balls. -
Step 6
Place the coated Oreo balls back onto the parchment-lined baking sheet. Allow the candy melts to set completely, either at room temperature or in the refrigerator.
Important Information
Nutrition Facts (Per Serving)
It is important to consider this information as approximate and not to use it as definitive health advice.
Allergy Information
Please check ingredients for potential allergens and consult a health professional if in doubt.



Leave a Comment