
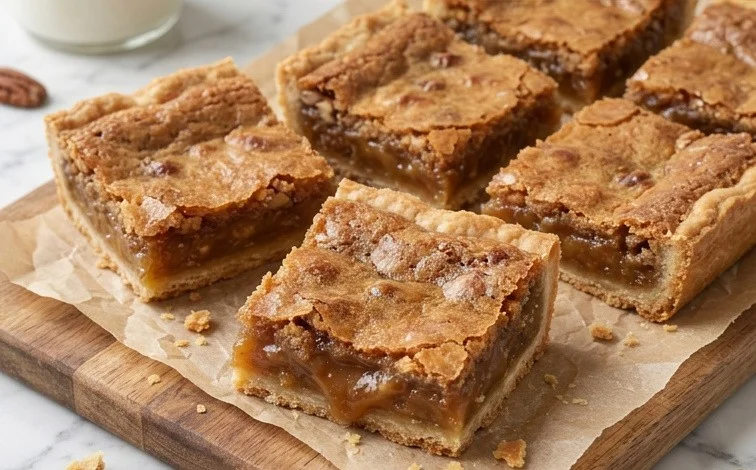
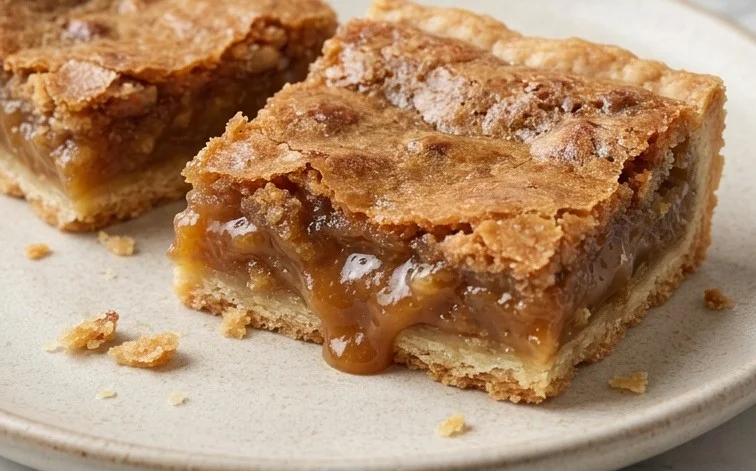
Gooey Classic Butter Tart Squares are my go-to when that craving for a rich, sweet dessert hits. These aren’t your average bars; they capture all the beloved flavors of traditional butter tarts but in a more convenient square format. The base is a simple, crisp, buttery shortbread that holds up beautifully to the decadent filling. What makes these so special is that filling – it bakes into a fudgy, almost caramelized consistency that’s absolutely irresistible. It’s that perfect balance of textures and that deep butterscotch-like flavor that keeps me coming back. They’re a fantastic treat for holiday gatherings, bake sales, or just a Tuesday when you need a little something special. The magic really happens with that simple filling that bakes up into a wonderfully fudgy, almost caramel-like texture. This recipe is straightforward, making delicious gooey butter tart squares accessible even for beginner bakers.
Gooey Classic Butter Tart Squares
The holidays are coming, or maybe you just need a really good treat. These classic butter tart squares are what I whip up when I crave that perfect balance of crisp, buttery crust and a rich, gooey, sweet filling. They’re much easier to make than individual tarts, and they disappear just as quickly. The magic really happens with that simple filling that bakes up into a wonderfully fudgy, almost caramel-like texture.
Ingredients:
- Flour: 1 and ⅓ cup
- Granulated Sugar: ¼ cup
- Salt: ¼ teaspoon
- Cold Butter: ½ cup
- Melted Butter: ½ cup
- Brown Sugar, packed: 2 cups
- Eggs: 4
- Flour: 1 tablespoon
- Vanilla Extract: 1 tablespoon
- White Vinegar: 1 tablespoon
- Salt: ½ teaspoon
- Optional: ½ cup of raisins, walnuts and or pecans.
For the Crust:
To start, we’ll make the buttery base for our squares. This is a simple shortbread-style crust that gets wonderfully crisp when baked. In a medium bowl, whisk together the 1 and ⅓ cups of flour and ¼ cup of granulated sugar along with ¼ teaspoon of salt. Make sure they are well combined. Then, cut in the ½ cup of cold butter. You can do this with a pastry blender, two forks, or your fingertips. The goal is to get the butter into small, pea-sized pieces mixed throughout the flour mixture. It’s important that the butter is cold; this helps create that flaky texture. Once it’s crumbly, press this mixture evenly into the bottom of an 8×8 inch baking pan. I like to use the bottom of a measuring cup or a flat-bottomed glass to get it really compact and smooth.
For the Gooey Filling:
Now for the star of the show, that irresistible gooey filling. In a separate large bowl, combine the ½ cup of melted butter with the 2 cups of packed brown sugar. Whisk them together until they are well combined and smooth. This will form the base of our sweet, rich filling. Next, add in the 4 eggs, one at a time, whisking well after each addition. Don’t worry if the mixture looks a little separated at first; it will come together. After the eggs are incorporated, stir in the 1 tablespoon of flour, 1 tablespoon of vanilla extract, 1 tablespoon of white vinegar, and ½ teaspoon of salt. The vinegar might seem unusual, but it helps to tenderize the filling and adds a subtle tang that balances the sweetness. Whisk everything until it’s smooth and homogenous. If you’re using any of the optional add-ins like raisins, walnuts, or pecans, this is the time to gently fold them into the filling mixture. Make sure they are distributed evenly.
Assembly and Baking:
Pour the gooey filling mixture evenly over the prepared crust in the baking pan. Gently spread it out so it covers the entire surface. Now, place the pan in a preheated oven at 350 degrees Fahrenheit (175 degrees Celsius). The baking time is crucial for achieving that perfect gooey texture without burning the edges. You’ll want to bake the squares for about 35 to 45 minutes. The edges of the filling should look set, and the center might still be a little soft and jiggly. It will continue to set as it cools. If you notice the edges browning too quickly, you can loosely tent the pan with aluminum foil for the last 10-15 minutes of baking.
Cooling and Cutting:
This is perhaps the hardest part – waiting for them to cool! Once they come out of the oven, let the butter tart squares cool completely in the pan on a wire rack. This cooling process is essential for the filling to firm up properly. If you try to cut them while they are still warm, the filling will be too runny and you’ll end up with a messy situation. Once they are fully cooled, usually after a couple of hours, you can use a sharp knife to cut them into squares. For cleaner cuts, you can run your knife under hot water and wipe it dry between each cut.
Serving and Storage:
These gooey classic butter tart squares are best served at room temperature. They are delicious on their own, but you can also serve them with a dollop of whipped cream or a scoop of vanilla ice cream. For storage, keep any leftovers in an airtight container at room temperature for up to 3 days, or in the refrigerator for up to a week. If refrigerating, let them come back to room temperature before serving for the best texture. These are always a hit, whether for a casual get-together or a more formal occasion. Enjoy every rich, gooey bite!
Conclusion:
These Gooey Classic Butter Tart Squares truly deliver on that comforting, indulgent flavor we all love from butter tarts, but with the ease of a bar. The combination of that crisp, buttery crust and the rich, fudgy, caramel-like filling is simply divine. They are a fantastic option when you want a homemade treat that feels special without the fuss of individual tart shells. Whether you’re serving them at a holiday party, a potluck, or just enjoying one with your afternoon tea, they are sure to be a hit. Don’t be afraid to experiment with the optional add-ins like raisins or chopped nuts to personalize them to your liking.
Can I make these ahead of time?
Yes, absolutely. Gooey Classic Butter Tart Squares actually taste even better the day after they are made, allowing the flavors to meld and the filling to set fully. Store them in an airtight container at room temperature for up to 3 days.
What’s the best way to cut them?
For clean cuts, it’s best to let the squares cool completely before slicing. Using a sharp knife and wiping it clean between cuts can also help achieve neater pieces.
Can I freeze these?
Freezing is a great option for longer storage. Wrap the cooled squares tightly in plastic wrap, then in aluminum foil, or place them in a freezer-safe container. They should keep well for up to 2-3 months. Thaw them at room temperature before serving.
Gooey Classic Butter Tart Squares
Deliciously sweet and gooey classic butter tart squares with a buttery shortbread crust and a rich, caramel-like filling.
Ingredients
-
1 and ⅓ cup Flour (for crust)
-
¼ cup Granulated Sugar (for crust)
-
¼ teaspoon Salt (for crust)
-
½ cup Cold Butter (for crust, cubed)
-
½ cup Melted Butter (for filling)
-
2 cups Brown Sugar, packed (for filling)
-
4 Eggs (for filling)
-
1 tablespoon Flour (for filling)
-
1 tablespoon Vanilla Extract (for filling)
-
1 tablespoon White Vinegar (for filling)
-
½ teaspoon Salt (for filling)
-
½ cup raisins, walnuts and or pecans (optional)
Instructions
-
Step 1
Preheat oven to 350°F (175°C). Grease and flour a 9×13 inch baking pan. -
Step 2
For the crust: In a medium bowl, combine 1 and ⅓ cup flour, ¼ cup granulated sugar, and ¼ teaspoon salt. Cut in ½ cup cold butter until mixture resembles coarse crumbs. -
Step 3
Press the crust mixture evenly into the bottom of the prepared baking pan. -
Step 4
For the filling: In a large bowl, whisk together ½ cup melted butter, 2 cups packed brown sugar, 4 eggs, 1 tablespoon flour, 1 tablespoon vanilla extract, 1 tablespoon white vinegar, and ½ teaspoon salt until well combined. -
Step 5
Pour the filling evenly over the crust. If using, scatter optional raisins, walnuts, or pecans over the filling. -
Step 6
Bake for 30-40 minutes, or until the filling is set and the edges are golden brown. The center may still appear slightly gooey. -
Step 7
Let cool completely in the pan before cutting into squares.
Important Information
Nutrition Facts (Per Serving)
It is important to consider this information as approximate and not to use it as definitive health advice.
Allergy Information
Please check ingredients for potential allergens and consult a health professional if in doubt.

Leave a Comment