
Meringue Christmas Trees are a staple in my holiday baking. The sight of these delicate, snowy-white or green-tinted confections always brings a festive spark to the kitchen counter. They have that wonderful contrast: a crisp, slightly crackly shell that gives way to a tender, almost marshmallowy center. They truly look like miniature edible trees plucked from a winter scene. Making them is a calming activity, a chance to focus on creating something beautiful and delicious. I find the process of piping and watching them bake incredibly satisfying. They are surprisingly simple to assemble, making them a fantastic project to do with children during the holiday season, adding a handmade touch to your festive spread that everyone will admire. These little trees are a testament to how beautiful simple ingredients can be.
Ingredients:
- 2 large egg whites (room temperature)
- 1/4 teaspoon cream of tartar
- 100 g granulated sugar
- Green gel food colouring
- Sprinkles
Preparing the Meringue Base
The foundation of any good meringue is perfectly whipped egg whites. It’s essential that your egg whites are at room temperature; this helps them achieve maximum volume. If your eggs are cold, you can warm them slightly by placing them in a bowl of warm water for a few minutes.
Step 1: Whip the Egg Whites
In a scrupulously clean, grease-free bowl, combine the 2 large egg whites and the 1/4 teaspoon of cream of tartar. Begin whipping them on a low speed with an electric mixer. Cream of tartar is a stabilizer that helps the egg whites hold their structure and prevents them from weeping, which is crucial for stable meringues. Continue whipping until the egg whites are foamy and soft peaks form when you lift the whisk. This stage might take a few minutes.
Step 2: Gradually Add Sugar
Once you have soft peaks, gradually start adding the 100 g o
Meringue Christmas Trees
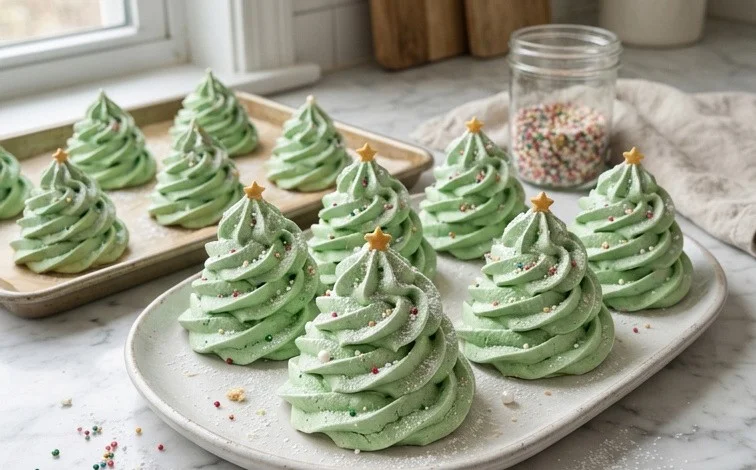
These delicate, airy meringue Christmas trees are a delightful addition to any festive spread. They have a crisp shell that gives way to a slightly chewy center, and the vibrant green color makes them look like tiny edible trees straight from a winter wonderland. They’re surprisingly simple to make, and the process is quite satisfying, like creating edible sculptures. I love making these with my family during the holiday season; they always bring smiles.
Ingredients:
- 2 large egg whites (room temperature)
- 1/4 teaspoon cream of tartar
- 100 g granulated sugar
- Green gel food colouring
- Sprinkles
Preparing the Meringue Base
The foundation of any good meringue is perfectly whipped egg whites. It’s essential that your egg whites are at room temperature; this helps them achieve maximum volume. If your eggs are cold, you can warm them slightly by placing them in a bowl of warm water for a few minutes.
Step 1: Whip the Egg Whites
In a scrupulously clean, grease-free bowl, combine the 2 large egg whites and the 1/4 teaspoon of cream of tartar. Begin whipping them on a low speed with an electric mixer. Cream of tartar is a stabilizer that helps the egg whites hold their structure and prevents them from weeping, which is crucial for stable meringues. Continue whipping until the egg whites are foamy and soft peaks form when you lift the whisk. This stage might take a few minutes.
Step 2: Gradually Add Sugar
Once you have soft peaks, gradually start adding the 100 g of granulated sugar, about a tablespoon at a time, while the mixer is still running on medium-high speed. It’s important to add the sugar slowly. If you add it all at once, it can weigh down the egg whites and prevent them from whipping up properly. Continue whipping until the meringue is glossy and stiff peaks form. Stiff peaks mean that when you lift the whisk, the meringue stands up straight and doesn’t curl over. You should also rub a little meringue between your fingers; it should feel smooth, with no grittiness from undissolved sugar. This stage is key to a stable and sweet meringue.
Adding Color and Shaping the Trees
Now for the fun part – turning our fluffy white meringue into festive green trees!
Step 3: Color the Meringue
Once you have stiff, glossy peaks, it’s time to add the color. Add a few drops of green gel food colouring to the meringue. Gel food colouring is best because it’s concentrated and won’t add excess liquid to the meringue, which could affect its texture. Gently fold the colouring into the meringue using a spatula until it is evenly distributed. Be careful not to overmix at this stage; you want to preserve the airiness of the meringue. Aim for a lovely, festive green color.
Step 4: Pipe the Trees
Transfer the green meringue into a piping bag fitted with a large star tip. If you don’t have a piping bag and tip, you can simply use a sturdy plastic bag with a corner snipped off, or even two spoons. On a baking sheet lined with parchment paper or a silicone baking mat, pipe the meringue into cone shapes to resemble Christmas trees. Start at the base and pipe upwards in a spiral motion, creating layers that give the tree dimension. You can make them as tall or as short as you like. Don’t worry if they aren’t perfectly uniform; a little rustic charm adds to their homemade appeal. Leave a little space between each tree as they will hold their shape well but can spread slightly.
Baking and Decorating
The baking process for meringues is more like drying them out, which results in their signature crispness.
Step 5: Bake the Meringue Trees
Preheat your oven to 110°C (225°F). Bake the meringue trees for about 60 to 75 minutes. The goal is to dry them out slowly without browning them too much. They should feel firm to the touch and lift easily off the parchment paper. If they are still sticky or soft, continue baking for another 10-15 minutes. Once baked, turn off the oven, crack the oven door open slightly (you can prop it with a wooden spoon), and let the meringues cool completely inside the oven. This gradual cooling helps prevent them from cracking.
Step 6: Decorate Your Trees
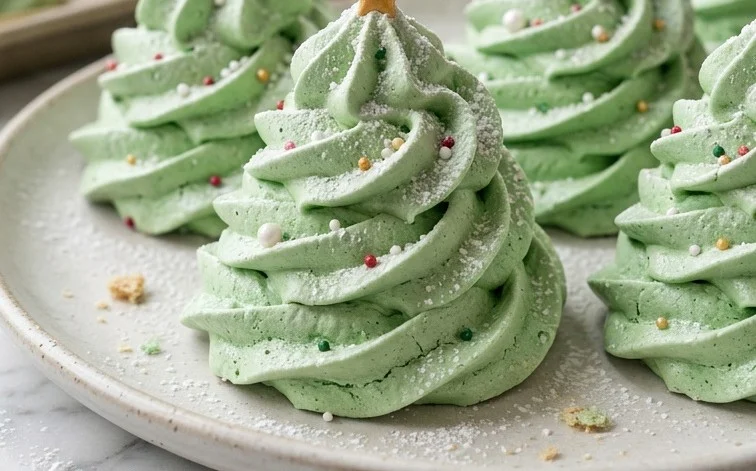
Once the meringue trees are completely cool and crisp, it’s time for the final festive touch: sprinkles! You can use a tiny bit of leftover meringue (or a dab of icing) to act as “glue” for the sprinkles, pressing them gently onto the trees. Alternatively, if you have some leftover meringue mix that you didn’t color, you can pipe tiny dots on the trees and immediately add sprinkles. Get creative with different colored sprinkles to mimic ornaments. You can also add a tiny star sprinkle to the very top of each tree. These decorations make them truly look like miniature Christmas trees ready to adorn your holiday table or be given as sweet edible gifts.
These meringue Christmas trees are best stored in an airtight container at room temperature. They can last for a week or even longer if kept dry, retaining their delightful crunch. Enjoy these little festive delights!
Conclusion:
These Meringue Christmas Trees are a charming addition to any holiday table. Their delicate crispness and sweet, chewy interior make them a delightful treat that’s as beautiful as it is tasty. They bring a touch of homemade magic and are always a conversation starter. I find them so rewarding to make, and the joy they bring to family and friends is immense. They are perfect for filling cookie boxes, decorating a dessert spread, or simply enjoying with a cup of tea during the long winter evenings. Don’t be afraid to experiment with colours and sprinkles to make them uniquely yours. The process itself is quite meditative once you get the hang of it, and the results are truly special.
Frequently Asked Questions:
Why are my meringues weeping?
Meringues can weep if they are under-whipped, if humidity is high, or if the sugar is added too quickly. Make sure to whip the egg whites to stiff peaks before gradually adding the sugar, and bake them in a dry environment if possible. Over-baking can also cause weeping.
Can I make Meringue Christmas Trees ahead of time?
Yes, absolutely. Meringues are best made a day or two in advance. Store them in an airtight container at room temperature, ensuring they are completely cooled. Avoid refrigerating them, as the moisture can make them sticky.
How do I store Meringue Christmas Trees?
Store completely cooled meringues in an airtight container at room temperature. They will stay crisp for up to two weeks if stored properly. Ensure there is no moisture in the container, as this will soften them.
Meringue Christmas Trees
Delightful and festive meringue cookies shaped into charming Christmas trees, perfect for holiday celebrations.
Ingredients
-
2 large egg whites (room temperature)
-
1/4 teaspoon cream of tartar
-
100 g granulated sugar
-
Green gel food colouring
-
Sprinkles
-
1 teaspoon vanilla extract
Instructions
-
Step 1
Preheat oven to 200°F (95°C) and line baking sheets with parchment paper. Prepare a piping bag fitted with a star tip. -
Step 2
In a clean, dry bowl, whisk the egg whites and cream of tartar until soft peaks form. -
Step 3
Gradually add the granulated sugar, one tablespoon at a time, whisking continuously until stiff, glossy peaks form and the sugar is completely dissolved. -
Step 4
Add a few drops of green gel food colouring and vanilla extract. Gently fold until the colour is evenly distributed, being careful not to deflate the meringue. -
Step 5
Spoon the meringue into the prepared piping bag. Pipe cone shapes onto the parchment-lined baking sheets to resemble Christmas trees. You can pipe multiple layers for larger trees. -
Step 6
Decorate the piped trees with sprinkles before baking. Bake for 1 hour, or until the meringues are dry and crisp to the touch. Turn off the oven and let the meringues cool completely inside the oven with the door ajar.
Important Information
Nutrition Facts (Per Serving)
It is important to consider this information as approximate and not to use it as definitive health advice.
Allergy Information
Please check ingredients for potential allergens and consult a health professional if in doubt.
Leave a Comment