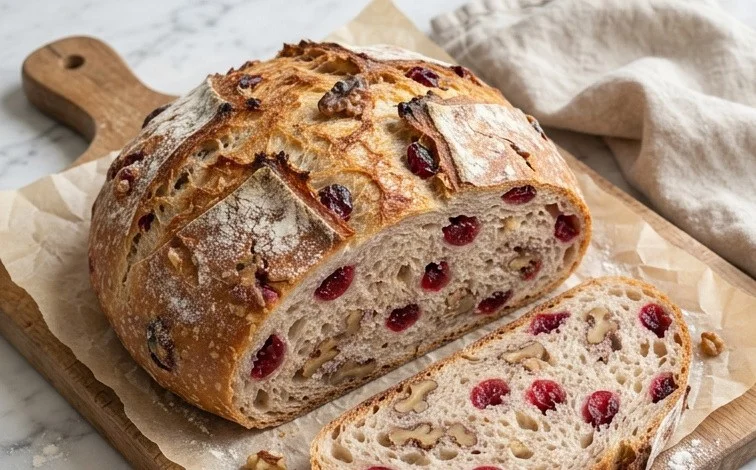
Cranberry Walnut Bread is wonderfully moist, studded with chewy cranberries and crunchy walnuts, and has a delightful subtle sweetness from the honey. The best part? It requires absolutely no kneading. The magic happens as the dough rests and slowly develops its structure and flavor, making it an incredibly forgiving and easy bread to bake, even for beginners. I love to make a loaf on a chilly afternoon, and the aroma that fills the kitchen is simply divine. It’s perfect for breakfast, a snack with a cup of tea, or even as a simple dessert. The straightforward, no-knead method means anyone can achieve a beautiful, crusty loaf with a tender crumb. This recipe focuses on time and patience rather than physical effort, allowing the ingredients to work their magic. You get all the satisfaction of homemade bread without the workout. The combination of tart cranberries and earthy walnuts baked into a soft, slightly sweet loaf is a classic for a reason. Get ready to fill your home with an irresistible scent.
Cranberry Walnut Bread (No-Knead)
This Cranberry Walnut Bread is wonderfully moist, studded with chewy cranberries and crunchy walnuts, and has a delightful subtle sweetness from the honey. The best part? It requires absolutely no kneading. The magic happens as the dough rests and slowly develops its structure and flavor, making it an incredibly forgiving and easy bread to bake, even for beginners. I love to make a loaf on a chilly afternoon, and the aroma that fills the kitchen is simply divine. It’s perfect for breakfast, a snack with a cup of tea, or even as a simple dessert.
Ingredients:
- ½ teaspoon active dry yeast
- 1 ½ cups warm water (warmed to 110 to 115 degrees F)
- 1 teaspoon granulated sugar
- 2 teaspoons Kosher salt
- 3 cups bread flour, plus 2 tablespoons (plus more for surface)
- ¾ cup dried cranberries
- ½ cup dried walnuts, roughly chopped
- 1 tablespoon honey
- 1 tablespoon orange zest
Preparing the Dough
The foundation of any no-knead bread is a simple, wet dough that is allowed to ferment slowly. This process, also known as autolyse and then a long fermentation, develops the gluten structure without any physical manipulation. It’s a hands-off approach that yields a fantastic crumb and crust.
- Activate the Yeast: In a large bowl, combine the warm water, active dry yeast, and granulated sugar. Give it a gentle stir. Let this mixture sit for about 5 to 10 minutes. You should see a foamy layer develop on the surface. This indicates that your yeast is alive and ready to do its work. If you don’t see foam, your yeast might be old or the water temperature was off; it’s best to start again with fresh yeast and the correct water temperature.
- Combine Wet and Dry Ingredients: Once the yeast is foamy, add the Kosher salt, 3 cups of bread flour, the dried cranberries, the chopped walnuts, the honey, and the orange zest to the bowl. Stir everything together with a sturdy spoon or a spatula until just combined. Don’t overmix. The dough will be shaggy and sticky – that’s exactly what you want. It won’t look like traditional bread dough that you can knead; it will be more like a thick batter.
- First Rise (Bulk Fermentation): Cover the bowl tightly with plastic wrap or a damp kitchen towel. Let the dough rise at room temperature for 12 to 18 hours. Yes, it’s a long time, but this is where the magic happens. The long, slow fermentation allows the gluten to develop naturally and the flavors to deepen. You can also refrigerate the dough after about 2 hours of rising at room temperature, and let it ferment in the refrigerator for up to 3 days. This makes it very convenient for planning. You’ll know it’s ready when the dough has doubled in size and is bubbly.
Shaping and Second Rise
After the long fermentation, the dough will be quite airy. We’ll gently shape it to get ready for baking.
- Shape the Dough: Generously flour your work surface and your hands. Gently scrape the dough out of the bowl onto the floured surface. Be careful not to deflate it too much. You’ll want to gently fold the dough onto itself a few times – like folding a letter – to create some surface tension. This helps give the loaf its final shape. Don’t overwork it; just a few gentle folds will do. Shape it into a round or an oblong loaf.
- Second Rise (Proofing): Prepare a piece of parchment paper by lightly flouring it. Place the shaped dough onto the parchment paper. Cover the dough loosely with plastic wrap or a clean kitchen towel and let it rest for another 30 to 60 minutes. This second rise, or proofing, allows the dough to relax and puff up slightly before baking. While it’s proofing, preheat your oven to 450 degrees F (230 degrees C) with a Dutch oven (or a heavy, oven-safe pot with a lid) inside. The preheating process is critical for achieving a good crust.
Baking the Bread
Baking in a preheated Dutch oven is the secret to a beautiful, crusty loaf with a soft, airy interior. The trapped steam created by the lid early in the baking process mimics a professional bread oven.
- Bake the Bread: Once the oven and Dutch oven are fully preheated (this usually takes at least 30 minutes), carefully remove the hot Dutch oven from the oven. Remove the plastic wrap from the dough. Using the parchment paper as handles, gently lower the dough into the hot Dutch oven. Put the lid back on the Dutch oven and carefully place it back into the oven. Bake for 30 minutes with the lid on.
- Finish Baking: After 30 minutes, carefully remove the lid from the Dutch oven. The bread should be pale and puffy. Continue baking for another 15 to 25 minutes, or until the crust is a deep golden brown and the internal temperature of the bread reaches at least 200 degrees F (93 degrees C) when tested with an instant-read thermometer. The exact time will depend on your oven.
Cooling and Serving
Patience is key here! Allowing the bread to cool properly is essential for its texture.
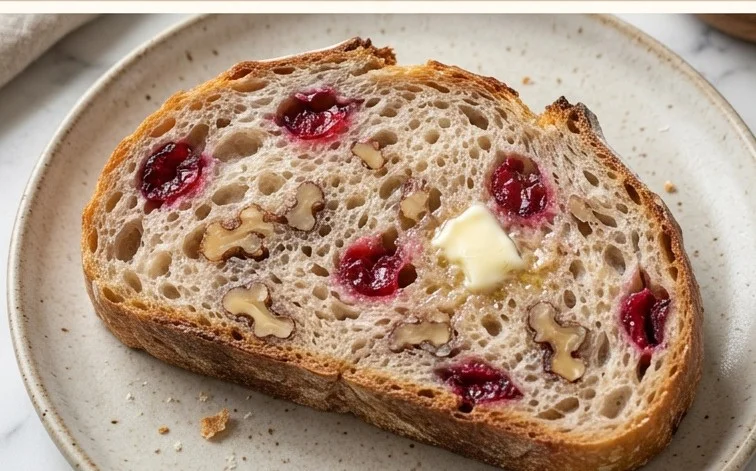
- Cool the Bread: Once baked, carefully remove the bread from the Dutch oven using the parchment paper. Transfer it to a wire rack to cool completely. Resist the urge to slice into it immediately. The bread is still cooking internally as it cools, and slicing too early can result in a gummy texture. Letting it cool for at least 1 hour, or even longer, will allow the crumb to set perfectly. Enjoy slices of this delicious Cranberry Walnut Bread as is, or with a bit of butter. It also makes a wonderful base for a simple cheese board. Store any leftovers in an airtight container at room temperature for up to 3 days.
Conclusion:
This Cranberry Walnut Bread (No-Knead) truly is a joy to make and even better to eat. Its unique texture and satisfying flavor profile come together with an effortless process, making it a go-to recipe for bakers of all levels. The beautiful crust, tender interior, and delightful mix of cranberries and walnuts make it a standout loaf. Whether you serve it warm with butter or as part of a larger meal, it’s sure to be a hit. Don’t be intimidated by baking bread; this no-knead method simplifies everything. Enjoy the process and the incredibly rewarding results!
What can I serve with this bread?
This bread is fantastic on its own, but it also pairs wonderfully with a smear of cream cheese or butter. It makes a lovely accompaniment to roasted meats, salads, or soups. For breakfast, try it toasted with a drizzle of honey or alongside scrambled eggs.
Can I substitute the nuts or fruit?
Absolutely! Pecans work very well instead of walnuts. For the cranberries, you could use dried cherries or raisins, though you might want to reduce the honey slightly as they can be sweeter. Some people also enjoy adding a pinch of cinnamon or nutmeg to the dough for extra warmth.
How should I store this bread?
Once cooled completely, store the Cranberry Walnut Bread at room temperature in an airtight container or bread box for up to 3 days. You can also freeze it, well-wrapped in plastic wrap and then foil, for up to 3 months. Thaw at room temperature or reheat slices gently.
Cranberry Walnut Bread (No-Knead)
A simple and delicious no-knead bread recipe featuring tart cranberries and crunchy walnuts, with a hint of orange zest. Perfect for breakfast or a snack.
Ingredients
-
½ teaspoon active dry yeast
-
1 ½ cups warm water (warmed to 110 to 115 degrees F)
-
1 teaspoon granulated sugar
-
2 teaspoons Kosher salt
-
3 cups bread flour, plus 2 tablespoons
-
¾ cup dried cranberries
-
½ cup dried walnuts, roughly chopped
-
1 tablespoon honey
-
1 tablespoon orange zest
Instructions
-
Step 1
In a large bowl, dissolve yeast and sugar in warm water. Let stand for 5 minutes until foamy. -
Step 2
Stir in salt, flour, dried cranberries, walnuts, honey, and orange zest until just combined. The dough will be shaggy and sticky. -
Step 3
Cover the bowl with plastic wrap and let rise in a warm place for 2 hours, or until doubled in size. -
Step 4
Preheat oven to 450 degrees F (230 degrees C). Place a Dutch oven or oven-safe pot with a lid in the oven while it preheats. -
Step 5
Gently turn the dough out onto a lightly floured surface. Shape into a round loaf. -
Step 6
Carefully remove the hot Dutch oven from the oven. Place the dough inside. Cover with the lid and bake for 30 minutes. -
Step 7
Remove the lid and bake for another 5-10 minutes, or until golden brown and the internal temperature reaches 200-210 degrees F (93-99 degrees C). -
Step 8
Transfer the bread to a wire rack to cool completely before slicing.
Important Information
Nutrition Facts (Per Serving)
It is important to consider this information as approximate and not to use it as definitive health advice.
Allergy Information
Please check ingredients for potential allergens and consult a health professional if in doubt.
Leave a Comment