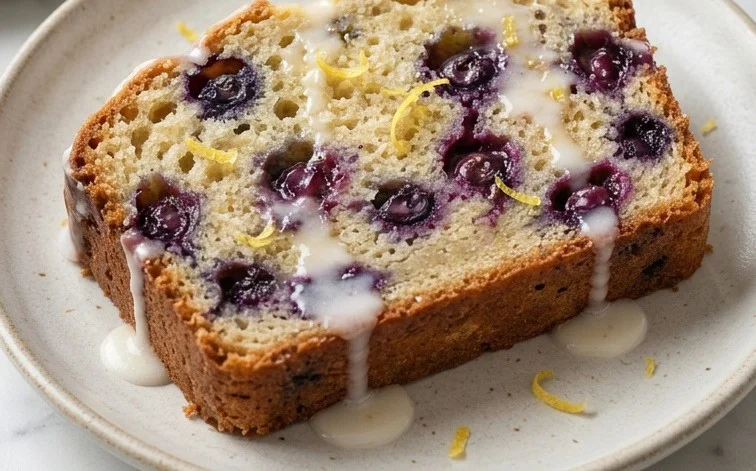
Lemon Blueberry Bread begins with the satisfying weight of flour and the bright zest of a fresh lemon. I love how the citrus cuts through the sweetness, making this loaf feel lighter and more refreshing than your average sweet bread. It’s the kind of bake that fills your home with an incredible aroma on a quiet weekend morning. People adore this bread because it delivers big on flavor without being overly complicated. The blueberries, plump and juicy, create delightful pockets of sweetness throughout the tender, moist crumb, a result of a carefully balanced recipe. This Lemon Blueberry Bread is a go-to for me when I want a homemade treat that feels special but doesn’t require hours in the kitchen.
Ingredients:
3 cups all purpose flour
1 tsp salt
1/2 tsp dry active yeast
1 1/2 cups warm water
1 cup frozen blueberries
1 tbs flour for dusting blueberries
1 lemon zested
Making the Dough
Step 1: Activating the Yeast and Mixing the Base
The first thing we need to do is wake up our dry active yeast. In a large mixing bowl, combine the 1 1/2 cups of warm water with the 1/2 teaspoon of dry active yeast. The water should be warm, not hot – think bathwater temperature. If it’s too hot, it can kill the yeast, and if it’s too cold, it won’t activate properly. Stir it gently and let it sit for about 5 to 10 minutes. You’ll know the yeast is alive and ready when it gets foamy and bubbly on the surface. This foam is the yeast releasing carbon dioxide, which is what will make our bread rise. While the yeast is proofing, measure out your 3 cups of all purpose flour and 1 teaspoon of salt into another clean bowl. Whisk them together to ensure the salt is evenly distributed throughout the flour. This seasoning is impor

Lemon Blueberry Bread
The bright tang of lemon paired with the sweet juiciness of blueberries makes this bread a truly wonderful treat. I love making it on a lazy weekend morning, and the aroma that fills the kitchen is simply amazing. It’s a simple recipe, perfect for anyone who enjoys baking and wants a delicious homemade bread without too much fuss. This bread has a tender crumb and a lovely moist texture, thanks to the blueberries and the careful balance of ingredients.
Ingredients:
- 3 cups all purpose flour
- 1 tsp salt
- 1/2 tsp dry active yeast
- 1 1/2 cups warm water
- 1 cup frozen blueberries
- 1 tbs flour for dusting blueberries
- 1 lemon zested
Making the Dough
Step 1: Activating the Yeast and Mixing the Base
The first thing we need to do is wake up our dry active yeast. In a large mixing bowl, combine the 1 1/2 cups of warm water with the 1/2 teaspoon of dry active yeast. The water should be warm, not hot – think bathwater temperature. If it’s too hot, it can kill the yeast, and if it’s too cold, it won’t activate properly. Stir it gently and let it sit for about 5 to 10 minutes. You’ll know the yeast is alive and ready when it gets foamy and bubbly on the surface. This foam is the yeast releasing carbon dioxide, which is what will make our bread rise. While the yeast is proofing, measure out your 3 cups of all purpose flour and 1 teaspoon of salt into another clean bowl. Whisk them together to ensure the salt is evenly distributed throughout the flour. This seasoning is important for flavor.
Step 2: Combining Wet and Dry Ingredients
Once your yeast mixture is foamy, it’s time to bring everything together. Pour the activated yeast mixture into the bowl with the flour and salt. Add the zest from your lemon at this stage as well. The lemon zest will infuse the entire dough with a wonderful citrusy fragrance and flavor. Now, start mixing. You can use a wooden spoon, a sturdy spatula, or even your hands. Mix until the ingredients just start to come together into a shaggy dough. Don’t worry if it looks a bit rough and sticky at this point; that’s perfectly normal. We’re aiming for a unified mass, but not necessarily a perfectly smooth one yet.
Developing the Dough and Adding Berries
Step 3: Kneading and First Rise
Turn the shaggy dough out onto a lightly floured surface. Now comes the kneading. This process develops the gluten in the flour, which gives bread its structure. Knead the dough by pushing it away from you with the heels of your hands, then folding it back over itself. Rotate the dough and repeat. Continue kneading for about 8 to 10 minutes. The dough will gradually become smoother, more elastic, and less sticky. It should spring back when you gently poke it. Once kneaded, shape the dough into a ball. Lightly grease your mixing bowl with a little oil or cooking spray, place the dough ball inside, and turn it to coat all sides. Cover the bowl tightly with plastic wrap or a damp kitchen towel. Find a warm, draft-free spot for it to rise. This is called the first rise, or bulk fermentation. It usually takes about 1 to 1.5 hours, or until the dough has doubled in size. The exact time will depend on the warmth of your kitchen.
Step 4: Incorporating the Blueberries
While the dough is rising, prepare your blueberries. In a small bowl, toss the 1 cup of frozen blueberries with the 1 tablespoon of flour. This coating of flour helps prevent the blueberries from sinking to the bottom of the bread as it bakes. It also helps absorb some of the excess moisture released from the berries as they thaw. Gently fold the floured blueberries into the risen dough. Be careful not to overmix or deflate the dough too much at this stage; we want to keep all those lovely air bubbles that the yeast created. Just fold them in until they are distributed throughout the dough as evenly as possible.
Shaping and Baking
Step 5: Second Rise and Baking Preparation
Grease a loaf pan or line it with parchment paper. Turn the dough with the blueberries onto a lightly floured surface and gently shape it into a loaf that will fit into your prepared pan. Place the shaped dough into the loaf pan. Now, cover the loaf pan loosely with plastic wrap or a clean kitchen towel and let it rise again in a warm place. This second rise usually takes about 45 minutes to 1 hour, or until the dough has visibly puffed up and risen above the rim of the pan. While the dough is undergoing its second rise, preheat your oven to 375°F (190°C). This preheating is essential for even baking. A properly preheated oven ensures that the bread starts baking immediately and rises properly.
Step 6: Baking the Lemon Blueberry Bread
Once the dough has completed its second rise and the oven is fully preheated, carefully place the loaf pan into the center of the oven. Bake for approximately 35 to 45 minutes. The bread is done when it is golden brown on top and sounds hollow when you tap the bottom. You can also use an instant-read thermometer; the internal temperature should reach around 195-200°F (90-93°C). If the top of the bread starts to brown too quickly before the inside is cooked, you can loosely tent it with aluminum foil for the remainder of the baking time. This prevents the crust from burning while the interior finishes baking.
Step 7: Cooling and Enjoying
Once baked, carefully remove the loaf pan from the oven. Let the bread cool in the pan for about 10 to 15 minutes. This allows it to set up slightly before you remove it. Then, carefully turn the bread out of the pan onto a wire rack to cool completely. Allowing it to cool fully on a wire rack ensures that air circulates around the entire loaf, preventing the bottom from becoming soggy. Resist the urge to slice into it while it’s still warm; letting it cool ensures you get the best texture and prevents it from collapsing. Once completely cooled, slice it with a serrated knife and enjoy your homemade Lemon Blueberry Bread! It’s delicious on its own, or with a smear of butter.
Conclusion:
This Lemon Blueberry Bread is a fantastic recipe because it’s both simple to make and incredibly rewarding. The bright lemon flavor and sweet bursts of blueberry create a perfect balance that’s wonderful any time of day. It’s a versatile loaf that feels special enough for guests but is also perfect for a simple weeknight treat. You end up with a beautifully golden bread with a moist, tender crumb that’s hard to resist. I encourage you to try this recipe; the aroma alone while it bakes is worth it. It’s a keeper for sure.
Frequently Asked Questions:
Can I use fresh blueberries instead of frozen?
Yes, you can use fresh blueberries. If you choose fresh, gently toss them with the tablespoon of flour and add them in Step 3. Be careful not to overmix, as this can cause them to break down too much during baking and make the bread purple. Frozen blueberries are often preferred because they hold their shape better.
How should I store my Lemon Blueberry Bread?
Once completely cooled, store the bread in an airtight container or wrap it well in plastic wrap. It will stay fresh at room temperature for about 3-4 days. If you live in a warm or humid climate, you might want to refrigerate it, though this can sometimes dry out the texture slightly. It also freezes wonderfully.
Can I add other flavors?
Absolutely! A little bit of vanilla extract (about 1 teaspoon) added with the wet ingredients can complement the lemon and blueberry nicely. You could also add a pinch of nutmeg or cardamom to the dry ingredients for a different aromatic profile. Some people like to add a handful of chopped nuts like almonds or walnuts for added texture.
Lemon Blueberry Bread
A delightful and easy-to-make bread bursting with the bright flavors of lemon and sweet blueberries.
Ingredients
-
3 cups all purpose flour
-
1 tsp salt
-
1/2 tsp dry active yeast
-
1 1/2 cups warm water
-
1 cup frozen blueberries
-
1 tbs flour for dusting blueberries
-
1 lemon zested
Instructions
-
Step 1
In a large bowl, whisk together the 3 cups of all purpose flour and 1 tsp of salt. -
Step 2
In a separate small bowl, dissolve the 1/2 tsp dry active yeast in the 1 1/2 cups of warm water. Let it sit for 5 minutes until frothy. -
Step 3
Pour the yeast mixture into the flour mixture and stir until just combined. The dough will be shaggy. -
Step 4
In a small bowl, toss the 1 cup of frozen blueberries with 1 tbs of flour to prevent them from sinking. Gently fold the floured blueberries into the dough. -
Step 5
Stir in the zest of 1 lemon. Cover the bowl with plastic wrap and let it rest in a warm place for about 30 minutes. -
Step 6
Preheat your oven to 375°F (190°C). Grease and flour a loaf pan. -
Step 7
Pour the dough into the prepared loaf pan and bake for 40-45 minutes, or until golden brown and a skewer inserted into the center comes out clean. -
Step 8
Let the bread cool in the pan for 10 minutes before transferring it to a wire rack to cool completely.
Important Information
Nutrition Facts (Per Serving)
It is important to consider this information as approximate and not to use it as definitive health advice.
Allergy Information
Please check ingredients for potential allergens and consult a health professional if in doubt.



Leave a Comment