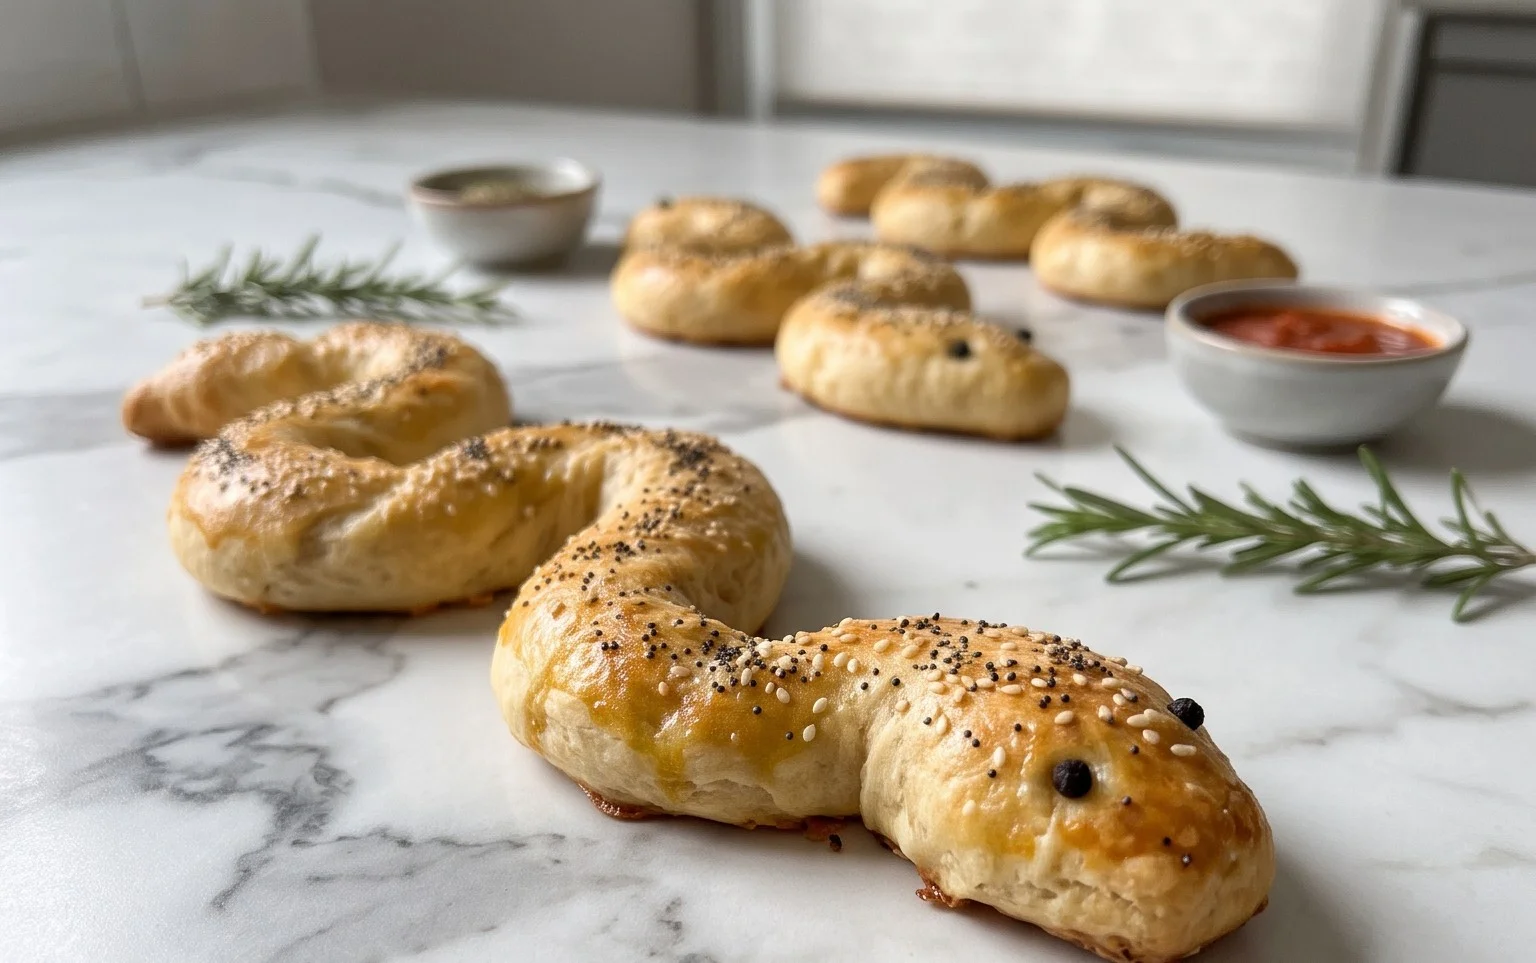
Snake breadsticks are surprisingly serpentine, thanks to a splash of green food coloring mixed into the dough. The idea for these came about when I needed something fun and a little spooky for a Halloween party, but also something that would appeal to my little Harry Potter fans who are obsessed with anything Salazar Slytherin might approve of. The vibrant green color, achieved with food gel, makes them look fun, and the little olive eyes add a touch of character. They’re surprisingly easy to make, and the kids can even get involved in shaping them, which always adds to the fun of party food. The key is to get the dough right – not too sticky, not too dry – and then it’s just a matter of letting your imagination (or your inner serpent) guide you. Making these snake breadsticks will definitely be a hit at your next spooky gathering.
Making the Snake Dough
First, let’s get our dough started. In a medium-sized bowl, combine the dried active yeast with the warm water. You want the water to be warm, but not hot, roughly the temperature of a warm bath. Too hot and you’ll kill the yeast; too cold and it won’t activate properly. Give it a gentle stir and then let it sit for about 5 to 10 minutes. You should see the yeast start to get foamy on top. This means it’s alive and ready to go. If it doesn’t foam, you’ll need to start over with fresh yeast. Once foamy, add the olive oil and stir it in. Now, gradually add the plain flour and salt. Mix it all together with a spoon or your hands until it forms a shaggy dough. Turn the dough out onto a lightly floured surface. Knead the dough for about 8 to 10 minutes. You’re looking for a smooth, elastic dough that springs back when you poke it gently. If it feels too sticky, add a little more flour, about a tablespoon at a time. If it feels too dry and crumbly, add a tiny bit of water, just a teaspoon at a time. Getting the dough consistency right is important for shaping the snakes later.
Ingredients:
- 5 grams (1 tsp) Dried Active Yeast (1x sachet)
- 170 ml (⅔ cup) Warm Water
- 4 tbsp Olive Oil
- 330 grams (2 ⅔ cup) Plain Flour
- 1 tsp Salt
- 2 Olives, chopped small (for the eyes)
- ⅓ Orange Pepper (bell pepper) (for the tongue)
- 6 drops Extra strong food colour gel (we used green)
- 3 tbsp water (to mix food colour with)
- 1 tbsp sesame or nigella seeds (optional)
Snake Breadsticks: A Party Food Perfect for Halloween or Harry Potter Fans
The idea for these snake breadsticks came about when I needed something fun and a little spooky for a Halloween party, but also something that would appeal to my little Harry Potter fans who are obsessed with anything Salazar Slytherin might approve of. The vibrant green colour, achieved with food gel, makes them look surprisingly serpentine, and the little olive eyes add a touch of character. They’re surprisingly easy to make, and the kids can even get involved in shaping them, which always adds to the fun of party food. The key is to get the dough right – not too sticky, not too dry – and then it’s just a matter of letting your imagination (or your inner serpent) guide you.
Making the Snake Dough
First, let’s get our dough started. In a medium-sized bowl, combine the dried active yeast with the warm water. You want the water to be warm, but not hot, roughly the temperature of a warm bath. Too hot and you’ll kill the yeast; too cold and it won’t activate properly. Give it a gentle stir and then let it sit for about 5 to 10 minutes. You should see it start to get foamy and bubbly on top – that’s the yeast waking up and doing its thing. If it doesn’t foam, your yeast might be old or the water was the wrong temperature, and you’ll need to start again.
Once the yeast is happily bubbling, add the olive oil to the mixture and give it another quick stir. Now it’s time for the dry ingredients. In a separate, larger bowl, whisk together the plain flour and the salt. Make a well in the centre of the flour mixture. Pour the wet yeast mixture into the well. Now, you can start bringing it all together. Use a wooden spoon or a spatula at first to mix the ingredients until they just start to form a shaggy dough.
Kneading and Colouring the Dough
When the dough is too thick to stir with a spoon, turn it out onto a lightly floured surface. This is where your hands come in! Knead the dough for about 8 to 10 minutes. This is a really important step for developing the gluten in the flour, which will give your breadsticks their lovely chewy texture. You’re looking for a smooth, elastic dough that springs back when you gently press it with your finger. If it’s too sticky, add a tiny bit more flour, a tablespoon at a time. If it’s too dry and crumbly, add a tiny bit of water, again, a tablespoon at a time. It’s a bit of a balancing act, but you’ll get there.
Once you have a beautifully smooth dough, it’s time for the magic colour. In a small bowl, mix the extra strong green food colouring gel with the 3 tablespoons of water. Stir it until it’s well combined. Now, divide your dough into two roughly equal portions. Add about half of the green liquid to one portion of dough and start kneading it in. Keep kneading until the colour is evenly distributed. Repeat with the other portion of dough and the remaining green liquid. You want a lovely, opaque green colour throughout the dough. It might take a few minutes of kneading for the colour to fully incorporate, especially with gel colours.
Shaping the Snakes
Now for the fun part – shaping! Take one portion of the green dough and roll it into a long, thin snake shape on a lightly floured surface. You can make them as long or as short as you like, depending on how big you want your breadsticks to be. Aim for a consistent thickness, perhaps about 1 to 1.5 cm in diameter. You can make them perfectly straight or give them a slight wiggle, like a real snake. For the head, gently flatten one end and then shape it into a slightly wider, rounded head.
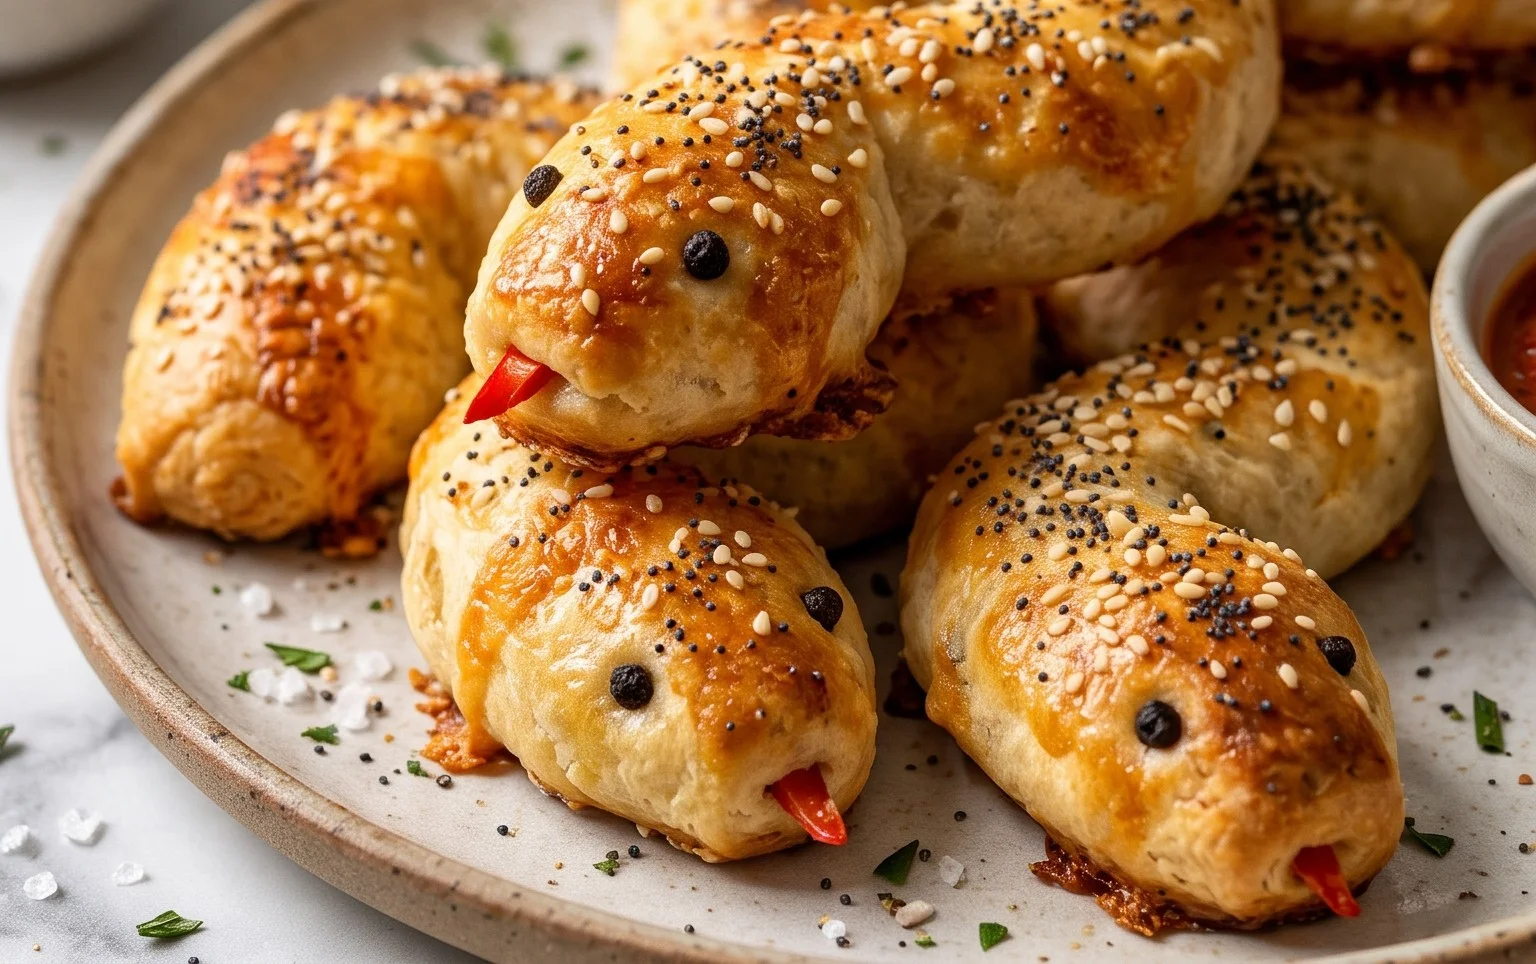
Once you have your snake shape, you can add the details. Carefully press the small chopped olive pieces into the head to make the eyes. For the tongue, take a tiny piece of the orange bell pepper and cut it into a thin, forked strip. Gently press one end of the pepper strip into the head where the mouth would be. If you like, you can use a knife to make a little slit for the tongue to stick out of. Repeat this process with the rest of the dough until you have as many snake breadsticks as you want.
Baking Your Serpent Snacks
Preheat your oven to 200 degrees Celsius (180 degrees Celsius fan/Gas Mark 6). Line a couple of baking trays with parchment paper. Carefully transfer your shaped snake breadsticks onto the prepared baking trays, leaving a little space between each one. If you’re using sesame or nigella seeds, sprinkle them over the snakes now. They add a lovely visual touch and a subtle flavour.
Bake the breadsticks for about 15 to 20 minutes, or until they are golden brown on the bottom and firm to the touch. The exact baking time will depend on the thickness of your snakes and your oven. Keep an eye on them towards the end of the baking time to make sure they don’t burn. Once they are baked, remove them from the oven and let them cool on the baking trays for a few minutes before transferring them to a wire rack to cool completely. They are delicious served warm or at room temperature. These make a fantastic addition to any Halloween spread or a wizarding-themed party. Enjoy!
Conclusion:
These snake breadsticks are a fantastic addition to any party spread, especially for Halloween or Harry Potter themed events. They are visually striking, fun to make, and most importantly, they taste great. The simple yeast dough is satisfyingly chewy, and the subtle olive eyes add a playful touch that kids and adults alike will enjoy. They’re a real conversation starter and disappear quickly from the plate. Don’t be afraid to get creative with the shaping – longer, curvier snakes or even coiled ones are all fun variations. They’re a great way to add some spooky or magical flair to your food without being overly complicated. Enjoy making these memorable treats!
Frequently Asked Questions:
Can I make the dough ahead of time?
Yes, you can make the dough up to a day in advance. After kneading, place the dough in a lightly oiled bowl, cover it tightly with plastic wrap, and refrigerate. Let it sit at room temperature for about 30 minutes to an hour before shaping, as cold dough is harder to work with.
What other toppings can I use besides sesame or nigella seeds?
For a different look or flavor, you could try poppy seeds, a sprinkle of coarse salt, or even a light brushing of garlic butter on top after baking for extra flavor. If you’re aiming for a more monstrous look, tiny slivers of red bell pepper could make for alternative, fiery eyes.
How should I store leftover snake breadsticks?
Store any leftover snake breadsticks in an airtight container at room temperature for up to 2 days, or in the refrigerator for up to 4 days. Reheat them briefly in a warm oven or toaster oven to restore some crispness.
Snake Breadsticks – Party Food Halloween or Harry Potter
Fun and spooky snake-shaped breadsticks perfect for Halloween or Harry Potter-themed parties. Easy to make and a hit with kids and adults alike.
Ingredients
-
{‘@type’: ‘Ingredient’, ‘name’: ‘Dried Active Yeast’, ‘amount’: ‘5’, ‘unitCode’: ‘GRM’, ‘alternateName’: ‘1 tsp (1x sachet)’}
-
{‘@type’: ‘Ingredient’, ‘name’: ‘Warm Water’, ‘amount’: ‘170’, ‘unitCode’: ‘ML’, ‘alternateName’: ‘⅔ cup’}
-
{‘@type’: ‘Ingredient’, ‘name’: ‘Olive Oil’, ‘amount’: ‘4’, ‘unitCode’: ‘TBSP’}
-
{‘@type’: ‘Ingredient’, ‘name’: ‘Plain Flour’, ‘amount’: ‘330’, ‘unitCode’: ‘GRM’, ‘alternateName’: ‘2 ⅔ cup’}
-
{‘@type’: ‘Ingredient’, ‘name’: ‘Salt’, ‘amount’: ‘1’, ‘unitCode’: ‘TSP’}
-
{‘@type’: ‘Ingredient’, ‘name’: ‘Green Food Colour Gel’, ‘amount’: ‘6’, ‘unitCode’: ‘DRP’, ‘alternateName’: ‘Extra strong’}
-
{‘@type’: ‘Ingredient’, ‘name’: ‘Water (for food colour)’, ‘amount’: ‘3’, ‘unitCode’: ‘TBSP’}
-
{‘@type’: ‘Ingredient’, ‘name’: ‘Olives, chopped small’, ‘amount’: ‘2’, ‘unitCode’: ‘UNT’, ‘alternateName’: ‘for the eyes’}
-
{‘@type’: ‘Ingredient’, ‘name’: ‘Orange Bell Pepper’, ‘amount’: ‘⅓’, ‘unitCode’: ‘UNT’, ‘alternateName’: ‘for the tongue’}
-
{‘@type’: ‘Ingredient’, ‘name’: ‘Sesame or Nigella Seeds (optional)’, ‘amount’: ‘1’, ‘unitCode’: ‘TBSP’}
Instructions
-
Step 1
In a bowl, mix the dried active yeast with the warm water and a pinch of flour. Let it sit for 5-10 minutes until foamy. -
Step 2
Add the olive oil, salt, and remaining flour to the yeast mixture. Mix and knead for 5-7 minutes until a smooth dough forms. If the dough is too sticky, add a little more flour. -
Step 3
In a small bowl, mix the extra strong green food colour gel with 3 tbsp water until fully combined. Add this coloured water to the dough and knead until the dough is evenly green. -
Step 4
Divide the dough into portions and roll each portion into a long, thin snake shape. You can make the snakes as long or as short as you like. Bend the end to create a head. -
Step 5
Place the snake breadsticks on a baking sheet lined with parchment paper. Press two chopped olives into the head of each snake for eyes. Cut a small slit in the head and insert a thin strip of orange bell pepper for the tongue. -
Step 6
Optional: Sprinkle with sesame or nigella seeds for added texture. Bake in a preheated oven at 200°C (400°F) for 15-20 minutes, or until golden brown and cooked through.
Important Information
Nutrition Facts (Per Serving)
It is important to consider this information as approximate and not to use it as definitive health advice.
Allergy Information
Please check ingredients for potential allergens and consult a health professional if in doubt.

Leave a Comment