
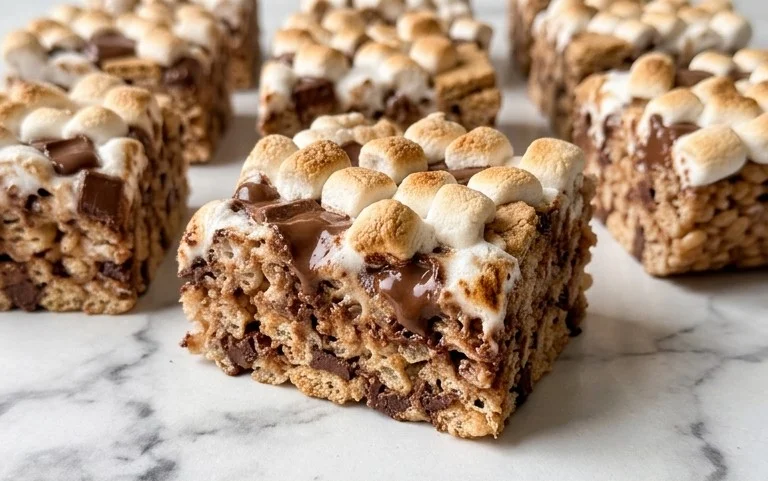
S’mores Krispie Bars are a quick way to get that campfire taste without the mess. You know how much everyone loves s’mores – the gooey marshmallow, the melted chocolate, the graham cracker crunch. We’ve taken all that goodness and put it into a chewy bar that you can make in minutes, no fire pit required. I love making these for parties because they’re always a huge hit, and honestly, they’re just as good for an after-school treat when a craving hits. They capture that distinct s’mores flavor profile, but with a fun twist that’s easier to manage, especially with kids around. This recipe combines those classic elements into a satisfying, no-bake dessert that feels both nostalgic and new. It’s a simple way to bring a bit of outdoor fun indoors.
Ingredients:
- 6½ cups golden grahams cereal
- 4 tablespoons butter (I use salted, but unsalted works too; just add a pinch of salt if using unsalted)
- 7 cups mini marshmallows (divided into two 3.5 cup portions)
- 3 bars (1.55 oz each) Hershey’s milk chocolate bars
S’mores Krispie Bars
These S’mores Krispie Bars take the classic campfire treat and turn it into an easy, no-bake dessert that’s perfect for parties, after-school snacks, or just when a craving strikes. We’re layering those familiar graham cracker crunch, gooey marshmallow, and melted chocolate into a chewy bar that’s incredibly satisfying. It’s like a s’more, but without the sticky fingers and the need for a fire pit.
Making the Base
First, you need to prepare your pan. I like to use a 9×13 inch baking dish for these bars. To make sure they don’t stick and are easy to remove, grease the pan generously with butter or non-stick cooking spray. You can also line it with parchment paper, leaving an overhang on the sides, which makes lifting the whole slab out a breeze. This little trick saves a lot of frustration later when you’re trying to cut perfect bars.
The base of these bars starts with melting butter in a large pot or Dutch oven over low to medium heat. You want enough space in the pot to comfortably stir in the cereal and marshmallows later, so don’t skimp on the pot size. Once the butter is completely melted, add one portion of the mini marshmallows—that’s 3.5 cups of the total 7 cups. Stir them constantly until they are fully melted and smooth. Keep the heat low; you don’t want to scorch the marshmallows, which can give them an unpleasant taste and make them tough. Melting them slowly ensures a nice, even consistency that will bind everything together beautifully.
Once the marshmallows are melted and smooth, remove the pot from the heat. This is important because the residual heat will continue to melt any remaining bits, and adding the cereal when the mixture is slightly cooler helps prevent it from becoming too hard and crunchy. Now, it’s time to add the 6½ cups of Golden Grahams cereal. Gently fold the cereal into the melted marshmallow mixture until it’s all evenly coated. You want to coat every piece of cereal without crushing it. A rubber spatula works well for this, allowing you to scoop and fold rather than mash.
Layering the S’mores Goodness
After the cereal is coated, quickly and evenly press the mixture into your prepared baking dish. It’s helpful to lightly grease your hands or the back of a spoon with butter or cooking spray to prevent sticking. You want a firm, even layer without pressing so hard that you compact the cereal too much. This even pressure helps create bars that hold their shape well. Work quickly, as the marshmallow mixture starts to set as it cools.
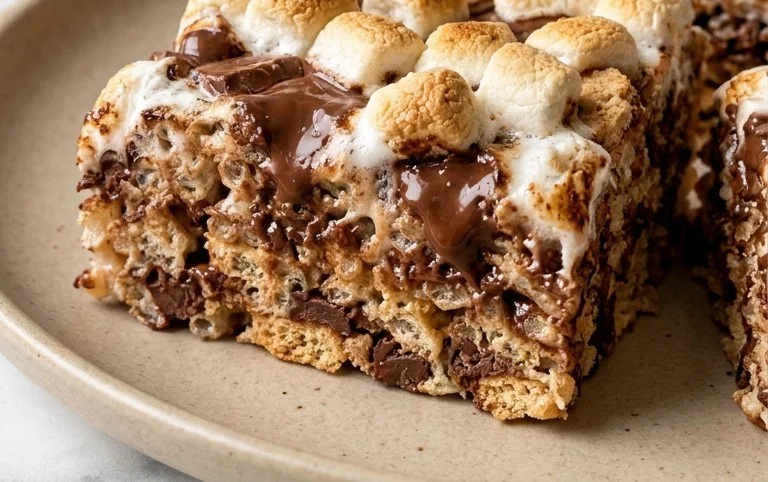
Now for the chocolate! Break the 3 Hershey’s milk chocolate bars into individual squares. Evenly scatter these chocolate squares over the warm cereal mixture. The heat from the bars will begin to melt the chocolate, creating delicious pockets of melted chocolate throughout. Don’t worry if they don’t melt completely at this stage; they’ll melt more when we add the final marshmallow layer. Try to distribute them as evenly as possible so each bite gets some chocolate goodness.
The final marshmallow layer is what really makes these bars scream “s’mores.” Take the remaining 3.5 cups of mini marshmallows and scatter them evenly over the layer of chocolate. Again, the residual heat from the cereal mixture will start to soften these marshmallows. You can gently press them down with the back of your spatula, but don’t overdo it. The goal is to have a layer of marshmallows that will get wonderfully gooey and slightly toasted when you briefly place them under a broiler or in a hot oven.
Finishing Touches
To achieve that signature toasted marshmallow look and flavor, you have a couple of options. The quickest way is to briefly place the pan under a preheated broiler on high heat for about 30 seconds to 1 minute, watching it VERY closely. You want the marshmallows to puff up and get lightly golden brown, not burnt. Alternatively, you can place the pan in a preheated oven at 350°F (175°C) for about 3-5 minutes, again keeping a close eye on them. The broiler is generally faster and gives a more direct toast.
Once the marshmallows are lightly toasted, remove the pan from the heat source. Let the bars cool completely in the pan on a wire rack. This cooling period is essential. It allows the marshmallows and chocolate to set, ensuring that your bars will hold their shape when you cut them. Resist the urge to cut them while they are warm; you’ll end up with a messy, sticky situation. Patience here is key to achieving clean, neat bars.
After the bars have cooled for at least an hour, you can lift the entire slab out of the pan using the parchment paper overhangs, or carefully cut them directly in the pan. Use a sharp knife, and if it starts sticking, wipe it clean and re-grease it between cuts. I like to cut mine into squares or rectangles, about 2 inches by 3 inches, but you can make them any size you prefer. These bars are best enjoyed at room temperature.
Conclusion:
These S’mores Krispie Bars are proof that you don’t need a campfire to enjoy your favorite treats. They bring together the beloved flavors of graham crackers, marshmallows, and chocolate in a convenient, chewy bar form. It’s a fantastic no-bake option for any occasion, from busy weeknights to large gatherings. I find they’re best served at room temperature, so they have that perfect chewy texture. You can cut them into squares or even fun shapes for kids. If you want to change things up, try adding a handful of chocolate chips into the marshmallow mixture or a sprinkle of sea salt on top of the chocolate layer for a little contrast.
Frequently Asked Questions:
Can I make S’mores Krispie Bars ahead of time?
Yes, you absolutely can. These bars hold up well for a few days. It’s best to store them in an airtight container at room temperature once they’ve cooled and set. Avoid refrigerating them, as this can make the marshmallows and chocolate too hard. They are a great option for making a day or two in advance of an event.
What kind of chocolate works best?
Hershey’s milk chocolate bars are classic for a reason, providing that nostalgic s’mores flavor. However, you can use other types of chocolate. Chocolate chips (milk, semi-sweet, or dark) will also work, though they might melt slightly differently. Some people like to use chopped chocolate bars from other brands, or even chocolate wafers. The key is to use a chocolate that melts well and has a flavor you enjoy.
S’mores Krispie Bars
A delightful no-bake treat combining the classic flavors of s’mores with the crispy texture of rice krispie treats. Perfect for parties or a fun family dessert.
Ingredients
-
6½ cups golden grahams cereal
-
4 tablespoons butter
-
4 cups mini marshmallows
-
3 cups mini marshmallows
-
3 bars (1.55 oz each) Hershey’s milk chocolate bars
Instructions
-
Step 1
Grease a 9×13 inch baking pan. Lightly grease a rubber spatula. -
Step 2
In a large microwave-safe bowl, melt the butter on high power in 30-second intervals, stirring in between, until completely melted. -
Step 3
Add 4 cups of mini marshmallows to the melted butter and microwave on high for 1 minute, stirring until marshmallows are mostly melted. Stir in remaining 3 cups of marshmallows until smooth. -
Step 4
Add the golden grahams cereal to the marshmallow mixture and stir until well combined and coated. -
Step 5
Break the Hershey’s milk chocolate bars into pieces and gently fold them into the cereal mixture. Try not to stir too much to keep the chocolate chunks visible. -
Step 6
Press the mixture evenly into the prepared baking pan using the greased spatula. Do not press too hard, as this will make the bars tough. -
Step 7
Let cool for at least 30 minutes before cutting into bars.
Important Information
Nutrition Facts (Per Serving)
It is important to consider this information as approximate and not to use it as definitive health advice.
Allergy Information
Please check ingredients for potential allergens and consult a health professional if in doubt.

Leave a Comment