
Peppermint bark is a classic holiday treat, and making it at home is surprisingly simple. The crisp crunch of peppermint meets the smooth sweetness of chocolate, creating a delightful contrast that’s perfect for gifting or enjoying yourself. I love making big batches of this during the holiday season because it stores so well and is always a crowd-pleaser. The key is using good quality chocolate and being patient as it sets. This recipe delivers that perfect snap and melt-in-your-mouth sensation that peppermint bark is known for. You’ll find it’s much more satisfying to create this treat with your own hands, knowing exactly what goes into it. The vibrant red and white shards look beautiful on a dessert platter or tucked into holiday tins. It’s a simple project that yields professional-looking results, making it ideal for both beginners and experienced bakers looking for a festive addition to their repertoire. This peppermint bark recipe is a holiday staple for a reason, bringing joy with every bite.
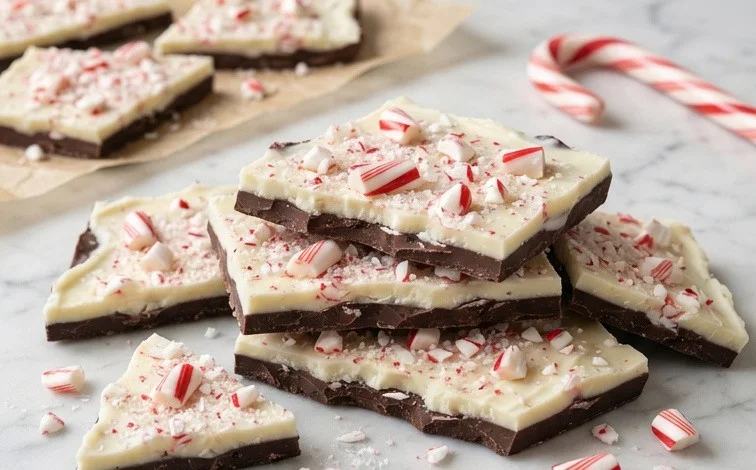
Peppermint Bark
Peppermint bark is a classic holiday treat, and making it at home is surprisingly simple. The crisp crunch of peppermint meets the smooth sweetness of chocolate, creating a delightful contrast that’s perfect for gifting or enjoying yourself. I love making big batches of this during the holiday season because it stores so well and is always a crowd-pleaser. The key is using good quality chocolate and being patient as it sets.
Ingredients:
- 18 ounces dark chocolate chips (you can substitute semi-sweet or milk chocolate chips if you prefer a sweeter bark)
- 18 ounces white chocolate chips
- 1/2 cup crushed candy canes or hard peppermint candies
Instructions:
1. Prepare Your Workspace and Pans: Before you even start melting chocolate, get everything ready. Line a large baking sheet (about 13×18 inches is ideal) with parchment paper. Make sure the parchment paper covers the entire surface and extends up the sides a bit. This will make removing and breaking the bark so much easier. I like to use two layers of parchment just to be extra sure nothing sticks, especially if I’m working in a warm kitchen. Also, have your crushed candy canes ready to go. If you’re crushing your own, you can do this by placing them in a sturdy zip-top bag and gently but firmly hitting them with a rolling pin or the flat side of a heavy pan. You want pieces ranging from fine dust to about pea-sized chunks for good texture.
2. Melt the Dark Chocolate: In a medium, microwave-safe bowl, add the 18 ounces of dark chocolate chips. Melt them in the microwave in 30-second intervals, stirring thoroughly after each interval. It’s really important not to overheat the chocolate, as it can seize up and become difficult to work with. Once the chocolate is mostly melted and smooth, continue stirring until all the remaining chips have melted and you have a glossy, smooth chocolate. Alternatively, you can melt the chocolate using a double boiler. Fill a saucepan with about an inch of water and bring it to a simmer. Place a heatproof bowl over the saucepan, making sure the bottom of the bowl doesn’t touch the water. Add the chocolate chips to the bowl and stir until melted and smooth. Once melted, remove the bowl from the heat and stir until completely smooth.
3. Spread the Dark Chocolate Layer: Pour the melted dark chocolate onto the prepared baking sheet. Use a spatula to spread it into an even layer, about 1/4 inch thick. You want the layer to be consistent in thickness so the bark breaks evenly. It doesn’t need to go all the way to the edges of the baking sheet, but aim for a large, rectangular surface. Gently tap the baking sheet on the counter a few times to help the chocolate settle and remove any air bubbles. Place the baking sheet in the refrigerator for about 15-20 minutes, or until the dark chocolate is firm to the touch but not completely hardened. It should be solid enough to support the white chocolate layer without the two mixing.
4. Melt and Spread the White Chocolate Layer: While the dark chocolate is chilling, melt the 18 ounces of white chocolate chips using the same method as the dark chocolate (microwave in 30-second intervals or a double boiler). White chocolate can be a little more finicky than dark chocolate, so stir gently and don’t rush the process. Once the white chocolate is completely melted and smooth, pour it evenly over the firm layer of dark chocolate. Again, use your spatula to spread it into an even layer. Try to get the white chocolate as close to the edges of the dark chocolate as possible, but don’t worry if it’s not perfect. The rustic look is part of the charm of homemade bark.
5. Add the Peppermint Topping: Immediately after spreading the white chocolate, sprinkle the 1/2 cup of crushed candy canes evenly over the top. Press them down gently with your hands or the back of a spoon so they adhere to the white chocolate. This is your chance to get creative – you can do a light dusting or a generous coating, depending on your preference. The sooner you sprinkle the candy canes, the better they will stick to the melting white chocolate. Once everything is spread and sprinkled, place the baking sheet back into the refrigerator and let the peppermint bark chill for at least 1 hour, or until completely set and firm. It’s important to let it set fully; otherwise, it will be difficult to break into neat pieces.
6. Break and Store the Bark: Once the bark is completely firm, carefully lift the parchment paper off the baking sheet. You can break the bark into pieces by hand, or if you want more uniform pieces, you can use a large knife to score it first and then snap the lines. The edges might be a bit jagged, and that’s perfectly fine. Store the peppermint bark in an airtight container at room temperature, or in the refrigerator if your kitchen is very warm. It should stay fresh for a couple of weeks. If you’re storing it in the refrigerator, you might want to place a layer of parchment paper between layers of bark to prevent sticking. This bark makes fantastic edible gifts, so consider breaking it into smaller pieces and packaging it up for friends and family.
Conclusion:
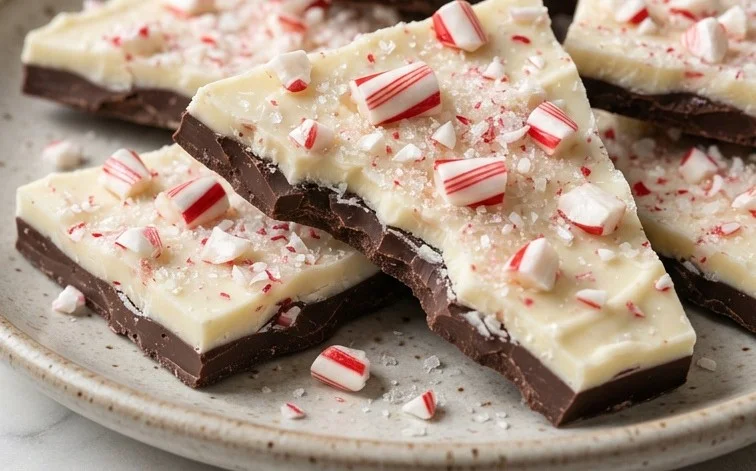
This peppermint bark recipe truly embodies the spirit of holiday baking – it’s simple to make, looks impressive, and tastes absolutely wonderful. The satisfying crunch of the chocolate combined with the cool burst of peppermint is a festive combination that everyone enjoys. It stores beautifully in an airtight container, making it a fantastic make-ahead treat for parties or last-minute gifts. You can also get creative with variations. Consider adding a sprinkle of edible glitter for extra sparkle, or mixing in some finely chopped nuts like pistachios for added texture and flavor. Another idea is to use different colored chocolate chips or swirls for a more visually striking bark. We find it pairs wonderfully with a hot cup of cocoa or a strong coffee. It’s a joy to make and even more of a joy to share. This peppermint bark recipe is sure to become a holiday favorite in your home.
Frequently Asked Questions:
Can I use milk chocolate instead of dark chocolate for the base?
Absolutely. While dark chocolate offers a nice contrast to the sweetness, milk chocolate works perfectly well too. If you prefer a sweeter bark overall, milk or semi-sweet chocolate chips are excellent substitutes for the dark chocolate layer. Just be sure to melt it carefully, as milk chocolate can sometimes be more prone to scorching.
How should I store my peppermint bark?
Store the peppermint bark in an airtight container at cool room temperature. If your kitchen gets very warm, it’s best to store it in the refrigerator. Layering sheets of parchment paper between pieces of bark will help prevent them from sticking together. It should stay fresh for up to two weeks.
What’s the best way to crush candy canes?
The easiest method is to place the candy canes in a sturdy zip-top bag. Seal it tightly, removing as much air as possible. Then, use a rolling pin, the flat side of a heavy pan, or even a meat mallet to gently but firmly crush them. You’ll want a mix of fine powder and small chunks for the best texture and visual appeal.
Peppermint Bark Recipe
A classic holiday treat, this peppermint bark is easy to make with just a few ingredients and is perfect for gifting or enjoying yourself.
Ingredients
-
18 ounces dark chocolate chips
-
18 ounces white chocolate chips
-
1/2 cup crushed candy canes
Instructions
-
Step 1
Line a baking sheet with parchment paper. -
Step 2
Melt the dark chocolate chips in a microwave-safe bowl in 30-second intervals, stirring between each, until smooth. Alternatively, melt using a double boiler. -
Step 3
Pour the melted dark chocolate onto the prepared baking sheet and spread evenly into a thin layer, about 1/4 inch thick. -
Step 4
Melt the white chocolate chips in a separate microwave-safe bowl using the same method as the dark chocolate. -
Step 5
Pour the melted white chocolate over the dark chocolate layer and spread evenly. Immediately sprinkle the crushed candy canes over the white chocolate. -
Step 6
Allow the bark to set completely at room temperature or in the refrigerator for about 1-2 hours. -
Step 7
Once set, break the peppermint bark into pieces.
Important Information
Nutrition Facts (Per Serving)
It is important to consider this information as approximate and not to use it as definitive health advice.
Allergy Information
Please check ingredients for potential allergens and consult a health professional if in doubt.



Leave a Comment