
Funfetti cookies are sunshine in edible form. They are soft, chewy, and packed with the cheerful little flecks of color that make them perfect for birthdays, holidays, or just a Tuesday that needs a little sparkle. The beauty of this recipe is its simplicity, relying on pantry staples with the addition of sprinkles for that signature festive look and a hint of fun flavor. I like to make a big batch of these because they disappear quickly. The texture is wonderfully tender, and they hold their shape well after baking, preventing them from spreading too thin. Ingredients: 2 ½ cups (300g) all-purpose flour, ½ teaspoon baking soda, ½ teaspoon fine salt, 1 cup (227 g) unsalted butter, softened to room temperature, ⅔ cup (130g) granulated sugar, ¾ cup (85g) powdered sugar, 1 large egg, 1 teaspoon pure vanilla extract, ½ cup sprinkles (or up to 2/3 cup). Mixing the Dry Ingredients: First things first, let’s get our dry ingredients ready. In a medium bowl, whisk together the 2 ½ cups (300g) all-purpose flour, ½ teaspoon baking soda, and ½ teaspoon fine salt. Whisking these together ensures that the leavening agent (baking soda) and salt are evenly distributed throughout the flour. This is a small but important step that helps prevent pockets of salt or baking soda in your finished cookies, ensuring a consistent flavor and rise. Set this bowl aside for now. Creaming the Butter and Sugars: In a large bowl, or the bowl of a stand mixer fitted with the paddle attachm

Funfetti Cookie Recipe
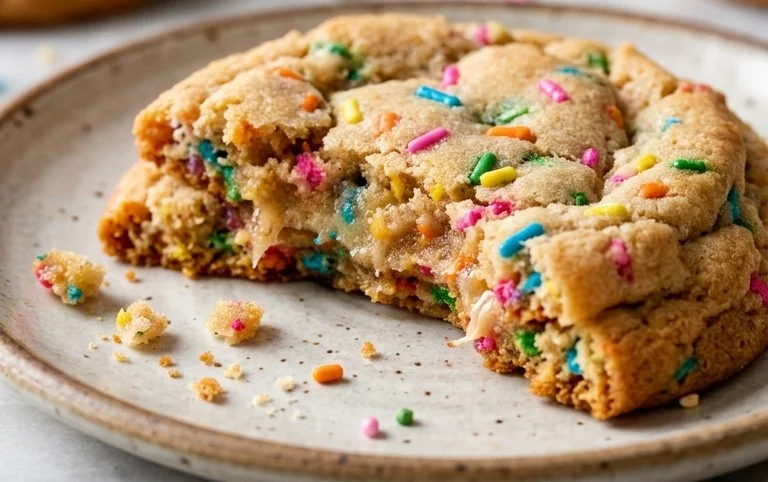
These funfetti cookies are sunshine in edible form. They are soft, chewy, and packed with the cheerful little flecks of color that make them perfect for birthdays, holidays, or just a Tuesday that needs a little sparkle. The beauty of this recipe is its simplicity, relying on pantry staples with the addition of sprinkles for that signature festive look and a hint of fun flavor. I like to make a big batch of these because they disappear quickly. The texture is wonderfully tender, and they hold their shape well after baking, preventing them from spreading too thin.
Ingredients:
- 2 ½ cups (300g) all-purpose flour
- ½ teaspoon baking soda
- ½ teaspoon fine salt
- 1 cup (227 g) unsalted butter, softened to room temperature
- ⅔ cup (130g) granulated sugar
- ¾ cup (85g) powdered sugar
- 1 large egg
- 1 teaspoon pure vanilla extract
- ½ cup sprinkles (or up to 2/3 cup)
Mixing the Dry Ingredients
First things first, let’s get our dry ingredients ready. In a medium bowl, whisk together the 2 ½ cups (300g) all-purpose flour, ½ teaspoon baking soda, and ½ teaspoon fine salt. Whisking these together ensures that the leavening agent (baking soda) and salt are evenly distributed throughout the flour. This is a small but important step that helps prevent pockets of salt or baking soda in your finished cookies, ensuring a consistent flavor and rise. Set this bowl aside for now.
Creaming the Butter and Sugars
In a large bowl, or the bowl of a stand mixer fitted with the paddle attachment, cream together the 1 cup (227g) unsalted butter, which should be nicely softened but not melted, with the ⅔ cup (130g) granulated sugar and ¾ cup (85g) powdered sugar. Beat these together on medium speed until the mixture is light and fluffy, pale yellow in color, and has increased in volume. This creaming process incorporates air into the dough, which is essential for achieving a tender cookie with a good texture. Scrape down the sides and bottom of the bowl a couple of times during this process to make sure everything is incorporated evenly. This usually takes about 3-5 minutes.
Adding the Wet Ingredients
Once the butter and sugar mixture is light and fluffy, it’s time to add the wet ingredients. Crack in the 1 large egg and add the 1 teaspoon pure vanilla extract. Beat again on medium speed until just combined. Be careful not to overmix at this stage. Overmixing the egg can lead to tough cookies. Scrape down the bowl again to ensure the egg and vanilla are fully incorporated into the creamed mixture.
Incorporating the Dry Ingredients and Sprinkles
Now, gradually add the dry ingredients mixture to the wet ingredients. Start by adding about one-third of the flour mixture at a time, mixing on low speed until just combined after each addition. Continue this until all the flour mixture has been added and is incorporated into the dough. You don’t want to see any dry streaks of flour. Once the dough is mostly combined, it’s time for the best part: the sprinkles! Add your ½ cup of sprinkles (or up to 2/3 cup if you’re feeling extra festive). Mix on low speed for just a few more seconds until the sprinkles are evenly distributed throughout the dough. You want to see those colorful flecks throughout the cookie. Again, avoid overmixing at this stage, as it can affect the texture and can also cause some of the dye from the sprinkles to bleed into the dough.
Chilling the Dough
This step is often overlooked, but chilling the dough is key to cookies that hold their shape and have a better texture. Cover the bowl tightly with plastic wrap and refrigerate the dough for at least 30 minutes, or up to 2 days. Chilling allows the flour to hydrate and the fats to firm up, preventing the cookies from spreading too much in the oven. If you’re short on time, 30 minutes in the freezer can also work in a pinch.
Baking the Cookies
When you’re ready to bake, preheat your oven to 375°F (190°C). Line baking sheets with parchment paper or silicone baking mats. This helps prevent sticking and makes cleanup a breeze. Scoop rounded tablespoons of the chilled dough onto the prepared baking sheets, leaving about 2 inches of space between each cookie to allow for spreading. You can use a cookie scoop for consistent sizing. Gently flatten the tops of the dough balls slightly with your palm or the bottom of a glass. This helps them bake more evenly. Bake for 8-10 minutes, or until the edges are set and lightly golden brown, but the centers still look slightly soft. They will continue to cook slightly on the baking sheet after they come out of the oven.
Cooling and Enjoying
Let the cookies cool on the baking sheets for 5 minutes before transferring them to a wire rack to cool completely. This allows them to set up properly. If you try to move them too soon, they might break. Once completely cool, you can store them in an airtight container at room temperature for up to 3-4 days. These funfetti cookies are delicious on their own, or you can even dip them in a simple glaze or serve them with a scoop of ice cream.
Conclusion:
Making these funfetti cookies is always a good idea. They bring instant cheer with their colorful sprinkles and deliver that perfect balance of soft, chewy texture and sweet vanilla flavor. They are simple enough for a weeknight treat but special enough for any celebration. Don’t be afraid to adjust the amount of sprinkles – more is often better when you want that full funfetti effect! Serve them with a glass of cold milk, coffee, or tea. They also make fantastic additions to cookie platters for parties or bake sales. For a variation, try using different shaped sprinkles or even adding a little lemon zest to the dough for a brighter flavor. Store any leftovers in an airtight container at room temperature for up to 3 days. You’ll find they are hard to resist! I hope you enjoy making and eating this funfetti cookie recipe as much as I do.
Frequently Asked Questions:
Can I make these cookies ahead of time?
Yes, you can definitely make the dough ahead of time. Once the dough is made, wrap it tightly in plastic wrap and refrigerate for up to 3 days. When you’re ready to bake, let the dough sit at room temperature for about 15-20 minutes until it’s slightly softened and scoopable. You can also freeze the dough balls for up to 3 months. Just bake them straight from the freezer, adding a few extra minutes to the baking time.
What kind of sprinkles should I use for funfetti cookies?
For the best visual appeal and texture, use jimmies (the rod-shaped sprinkles) or confetti sprinkles. These hold their color and shape well during baking. Avoid nonpareils (the tiny ball-shaped sprinkles) as they can bleed their color into the dough, making it look muddy, and they don’t provide as much texture. The quantity can be adjusted; start with ½ cup and add more if you love a super colorful cookie.
Why are my funfetti cookies spreading too much?
Spreading can happen if your butter is too soft or melted, or if you use too much sugar. Make sure your butter is softened to room temperature, not warm or greasy. Measure your flour correctly – spoon it into the measuring cup and level it off, don’t scoop directly from the bag. Also, chilling the dough for at least 30 minutes before baking can significantly help prevent excessive spreading.
Funfetti Cookie Recipe
A delightful and colorful classic funfetti cookie recipe, perfect for celebrations or just a sweet treat.
Ingredients
-
2 ½ cups (300g) all-purpose flour
-
½ teaspoon baking soda
-
½ teaspoon fine salt
-
1 cup (227 g) unsalted butter, softened
-
⅔ cup (130g) granulated sugar
-
¾ cup (85g) powdered sugar
-
1 large egg
-
1 teaspoon pure vanilla extract
-
½ cup sprinkles
Instructions
-
Step 1
Preheat oven to 350°F (175°C). Line baking sheets with parchment paper. -
Step 2
In a medium bowl, whisk together the flour, baking soda, and salt. -
Step 3
In a large bowl, cream together the softened butter, granulated sugar, and powdered sugar until light and fluffy. -
Step 4
Beat in the egg and vanilla extract until well combined. -
Step 5
Gradually add the dry ingredients to the wet ingredients, mixing until just combined. Stir in the sprinkles. -
Step 6
Drop rounded tablespoons of dough onto the prepared baking sheets. -
Step 7
Bake for 8-10 minutes, or until the edges are lightly golden. Do not overbake. -
Step 8
Let cookies cool on the baking sheets for a few minutes before transferring them to a wire rack to cool completely.
Important Information
Nutrition Facts (Per Serving)
It is important to consider this information as approximate and not to use it as definitive health advice.
Allergy Information
Please check ingredients for potential allergens and consult a health professional if in doubt.


Leave a Comment