
Gooey Classic Butter Tart Squares have a special place in many Canadian hearts, and for good reason. That perfectly flaky crust giving way to a rich, caramelized, and wonderfully gooey filling is simply irresistible. Making them as squares is a fantastic shortcut, perfect for bake sales, potlucks, or just when you want that classic butter tart flavour without the fuss of individual tart shells. This recipe delivers that signature chewiness and sweetness, with the added bonus of being incredibly easy to share. The magic really happens with the filling – it’s a simple combination of everyday ingredients that transforms into something truly special when baked. Ingredients: For the Crust: 1 and ⅓ cups Flour ¼ cup Granulated Sugar ¼ teaspoon Salt ½ cup Cold Butter, cut into small cubes For the Filling: ½ cup Melted Butter 2 cups Brown Sugar, packed 4 Large Eggs 1 tablespoon Flour 1 tablespoon Vanilla Extract 1 tablespoon White Vinegar ½ teaspoon Salt Optional: ½ cup of raisins, chopped walnuts, and/or chopped pecans Instructions: Prepare the Crust: In a medium bowl, whisk together the 1 and ⅓ cups of flour and ¼ teaspoon of salt. Add the ½ cup of cold, cubed butter to the flour mixture. Using a pastry blender, your fingertips, or a food processor, cut the butter into the flour until the mixture resembles coarse crumbs with some pea-sized pieces of butter remaining. This is important for a tender crust; don’t overwork it. Add ¼ cup of granulated sugar and mix briefly to combine. Press this mixture evenly into the bottom of an 8×8 inch baking pan. You want a firm, even layer. Bake the crust for 10-12 minutes at 350°F (175°C) until it’s just lightly golden. This pre-baking step helps prevent a soggy bottom. Let the crust cool slightly while you prepare the filling.
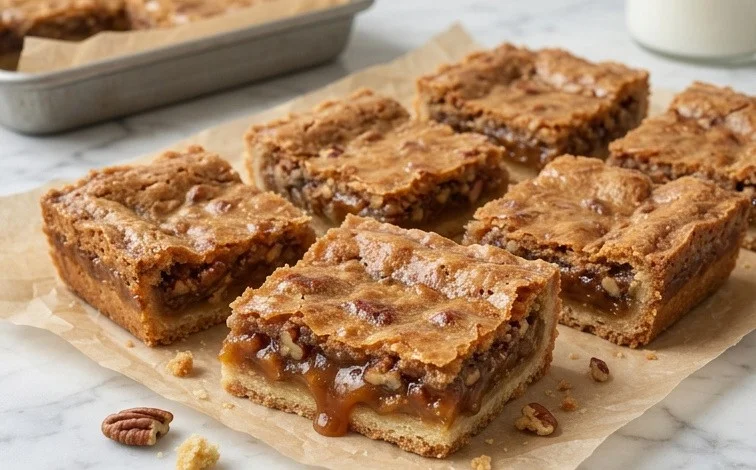
Gooey Classic Butter Tart Squares
Butter tarts have a special place in many Canadian hearts, and for good reason. That perfectly flaky crust giving way to a rich, caramelized, and wonderfully gooey filling is simply irresistible. Making them as squares is a fantastic shortcut, perfect for bake sales, potlucks, or just when you want that classic butter tart flavour without the fuss of individual tart shells. This recipe delivers that signature chewiness and sweetness, with the added bonus of being incredibly easy to share. The magic really happens with the filling – it’s a simple combination of everyday ingredients that transforms into something truly special when baked.
Ingredients:
- For the Crust:
- 1 and ⅓ cups Flour
- ¼ cup Granulated Sugar
- ¼ teaspoon Salt
- ½ cup Cold Butter, cut into small cubes
- For the Filling:
- ½ cup Melted Butter
- 2 cups Brown Sugar, packed
- 4 Large Eggs
- 1 tablespoon Flour
- 1 tablespoon Vanilla Extract
- 1 tablespoon White Vinegar
- ½ teaspoon Salt
- Optional: ½ cup of raisins, chopped walnuts, and/or chopped pecans
Instructions:
-
Prepare the Crust:
In a medium bowl, whisk together the 1 and ⅓ cups of flour and ¼ teaspoon of salt. Add the ½ cup of cold, cubed butter to the flour mixture. Using a pastry blender, your fingertips, or a food processor, cut the butter into the flour until the mixture resembles coarse crumbs with some pea-sized pieces of butter remaining. This is important for a tender crust; don’t overwork it. Add ¼ cup of granulated sugar and mix briefly to combine. Press this mixture evenly into the bottom of an ungreased 8×8 inch baking pan. You want a solid, even layer covering the entire base of the pan. This will form the foundation for your delicious butter tart squares. -
Mix the Filling:
In a separate large bowl, whisk together the ½ cup of melted butter and the 2 cups of packed brown sugar until well combined and smooth. It’s important to pack the brown sugar to ensure you have the correct amount of sweetness and moisture. Then, add the 4 large eggs, one at a time, whisking well after each addition until the mixture is thoroughly incorporated. Next, whisk in the 1 tablespoon of flour, 1 tablespoon of vanilla extract, 1 tablespoon of white vinegar, and ½ teaspoon of salt. The white vinegar might seem unusual, but it adds a slight tang that balances the sweetness and helps to achieve that characteristic gooey texture without making the filling taste vinegary. Whisk until everything is smooth and emulsified. If you’re using any optional add-ins like raisins, walnuts, or pecans, gently stir them into the filling mixture now. Distribute them evenly so you get a good mix in every bite. -
Assemble and Bake:
Carefully pour the prepared filling mixture over the crust in the baking pan. Gently spread it out with a spatula or the back of a spoon to ensure it covers the crust evenly. Be careful not to disturb the crust layer too much. Place the baking pan into a preheated oven at 350°F (175°C). Bake for 30 to 40 minutes, or until the edges of the filling are set and the center is still slightly jiggly. A slight wobble is what you’re looking for; it indicates that perfect gooeyness. If the edges start to brown too quickly, you can loosely tent the pan with aluminum foil. Overbaking will result in a firmer, more cake-like filling, so keep an eye on it during the last 10 minutes of baking. -
Cooling and Cutting:
Once baked, remove the pan from the oven and place it on a wire rack to cool completely. This is a critical step for achieving clean cuts and allowing the gooey filling to set properly. Resist the urge to cut into them while they are hot; the filling will be too liquid. Allow at least 1 to 2 hours for them to cool down in the pan. Once fully cooled, you can then cut them into squares. Use a sharp knife dipped in hot water and wiped dry between cuts for the neatest results. You can cut them into whatever size you prefer, from smaller, bite-sized pieces to larger, more substantial squares. -
Serving and Storage:
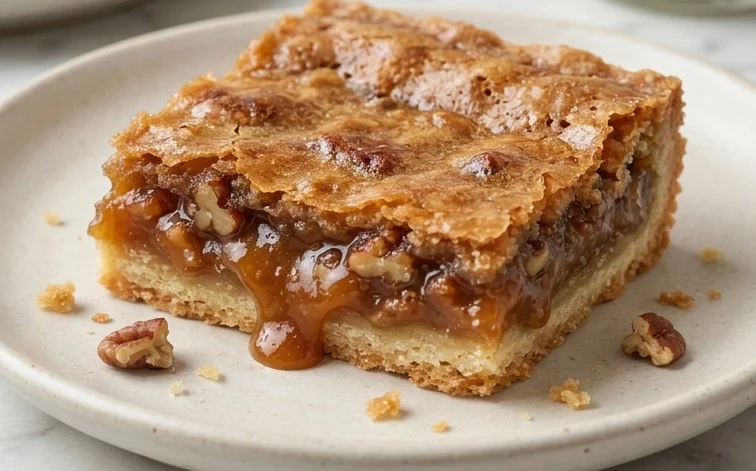
These Gooey Classic Butter Tart Squares are best enjoyed at room temperature. They are wonderfully delicious on their own, but you can also serve them with a cup of tea or coffee. For storage, keep any leftover squares in an airtight container at room temperature for up to 3 days. If you find they become a little too firm after a day or two, you can gently warm them in the microwave for a few seconds to bring back some of that gooey texture. They also freeze well if you want to make a larger batch; wrap individual squares tightly in plastic wrap and then place them in a freezer-safe container or bag. Thaw them at room temperature before serving.
Conclusion:
These Gooey Classic Butter Tart Squares are a joy to make and even more of a joy to eat. They capture all the beloved flavour of traditional butter tarts but in a much more convenient format. The contrast between the slightly crumbly, buttery crust and the rich, chewy, caramel-like filling is what makes them so addictive. They’re perfect for sharing at any gathering, from casual get-togethers to more formal events, and always disappear quickly.
For serving, they’re wonderful on their own, perhaps with a cup of tea or coffee. You can also serve them slightly warm, which makes the filling extra gooey. If you like extra texture or flavour in your butter tarts, the optional add-ins like raisins, chopped walnuts, or pecans can be stirred into the filling mixture before baking. Just make sure they are evenly distributed.
If you find yourself with leftovers, which is rare, store them in an airtight container at room temperature for up to 3 days. They tend to get even chewier as they sit.
FAQ
Can I make these ahead of time?
Yes, absolutely. These squares are great made a day in advance. The flavours meld and the texture often improves overnight. Just be sure to store them in an airtight container at room temperature.
What if I don’t have white vinegar?
The white vinegar is there to add a touch of tang and help with the texture of the filling, but if you don’t have it, you can substitute it with apple cider vinegar or even a squeeze of lemon juice. The flavour profile will change very slightly, but it will still be delicious.
How do I ensure the filling is gooey and not dry?
The key is not to overbake the squares. Keep an eye on them during the last few minutes. The filling should still look slightly wet or jiggly in the center when you take them out of the oven; it will continue to set as it cools. Also, ensure you’ve packed your brown sugar correctly and are using the full amount of melted butter.
Can I freeze Gooey Classic Butter Tart Squares?
They freeze reasonably well, although the texture might change slightly upon thawing. Cut them into squares and wrap them individually in plastic wrap, then place them in a freezer-safe container or bag. Thaw them at room temperature for a few hours before serving.
Gooey Classic Butter Tart Squares
A delicious and easy-to-make version of classic butter tarts in a convenient square format, featuring a rich, gooey filling.
Ingredients
-
1 and ⅓ cup Flour
-
¼ cup Granulated Sugar
-
¼ teaspoon Salt
-
½ cup Cold Butter, cut into cubes
-
½ cup Melted Butter
-
2 cups Brown Sugar, packed
-
4 Eggs
-
1 tablespoon Flour
-
1 tablespoon Vanilla Extract
-
1 tablespoon White Vinegar
-
½ teaspoon Salt
-
½ cup raisins, walnuts and or pecans (optional)
Instructions
-
Step 1
Preheat oven to 350°F (175°C). Lightly grease a 9×13 inch baking pan. -
Step 2
For the crust: In a medium bowl, combine 1 and ⅓ cup flour, ¼ cup granulated sugar, and ¼ teaspoon salt. Cut in ½ cup cold butter using a pastry blender or your fingertips until the mixture resembles coarse crumbs. -
Step 3
Press the crust mixture evenly into the bottom of the prepared baking pan. Bake for 10-12 minutes, until lightly golden. -
Step 4
While the crust bakes, prepare the filling: In a large bowl, whisk together ½ cup melted butter, 2 cups packed brown sugar, 4 eggs, 1 tablespoon flour, 1 tablespoon vanilla extract, 1 tablespoon white vinegar, and ½ teaspoon salt until well combined. Stir in optional raisins, walnuts, or pecans if using. -
Step 5
Pour the filling evenly over the hot, pre-baked crust. -
Step 6
Bake for 25-30 minutes, or until the edges are set and the center is still slightly gooey. Do not overbake. -
Step 7
Let cool completely in the pan on a wire rack before cutting into squares.
Important Information
Nutrition Facts (Per Serving)
It is important to consider this information as approximate and not to use it as definitive health advice.
Allergy Information
Please check ingredients for potential allergens and consult a health professional if in doubt.


Leave a Comment