
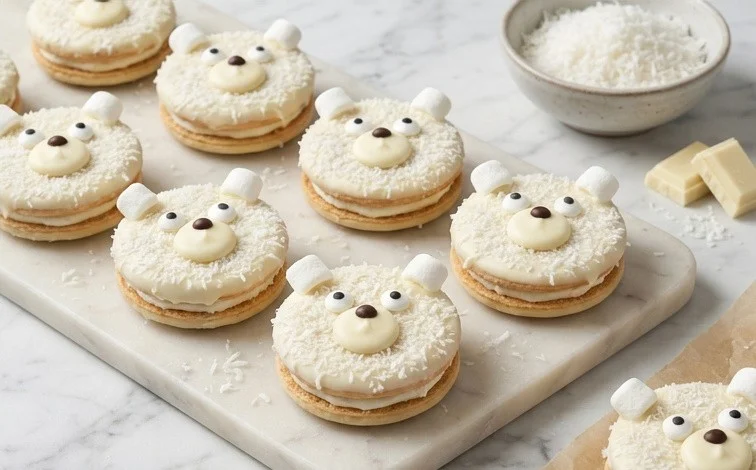
Polar Bear Cookies are a charming addition to any holiday cookie plate, especially when the weather outside is frightful. These cookies aren’t just adorable with their simple polar bear faces, they’re also incredibly tender and buttery, with a satisfyingly soft bite. The secret to their melt-in-your-mouth texture lies in the combination of butter and cream cheese in the dough, creating a rich flavor that’s not overly sweet. We add cornstarch to ensure they have just the right amount of crispness around the edges while remaining delightfully soft in the center. Making Polar Bear Cookies involves two doughs: one for the main cookie body and a smaller batch for the ears, nose, and eyes, which you’ll see comes together with a few simple steps after the main dough is chilled. You’ll love the process as much as the final, huggable result.
The Dough and Its Magic
The dough itself is a tender, buttery shortbread style, with a subtle tang from the cream cheese that keeps it from being too sweet. The addition of cornstarch helps create a wonderfully crisp yet melt-in-your-mouth texture. We’ll make two batches of dough, one for the main cookie body and another slightly different one for the polar bear’s features. Cream the Butter and Cream Cheese: In a large bowl, use an electric mixer to beat the 3/4 cup of softened unsalted butter and the 1/2 cup of softened cream cheese together until they are light and fluffy. This usually takes about 2-3 minutes on medium speed. It’s important that both are truly at room temperature for them to emulsify properly, creating a smooth base for your cookies. Add Sugar, Egg, and Vanilla: Gradually add the granulated sugar to the butter and cream cheese mixture, beating until well combined and slightly lighter in color, about another 2 minutes. Beat in the large egg until just incorporated, then stir in the vanilla extract. Don’t overmix at this stage; we want to keep the dough tender.
Dry Ingredients and Chilling
In a separate medium bowl, whisk together the all-purpose flour, cornstarch, baking powder, and salt. Slowly add the dry ingredients to the wet ingredients, mixing on low speed until just combined. The dough will be soft. Divide the dough in half. Wrap each half tightly in plastic wrap and flatten into a disk. Refrigerate for at least 1 hour, or until firm enough to handle. This chilling step is essential to prevent the cookies from spreading too much during baking and makes the dough easier to shape.
Ingredients:
- 3/4 cup (1 1/2 sticks) unsalted butter, room temperature (170g)
- 1/2 cup or 4 oz. full fat cream cheese, room temp (113g)
- 1 1/2 cups granulated sugar (300g)
- 1 large egg, room temperature (56g)
- 2 tsp vanilla extract or vanilla bean paste (8g)
- 3 cups all-purpose flour (375g)
- 1 Tbsp cornstarch (8g)
- 1/2 tsp baking powder (2g)
- 1/2 tsp fine salt (3g)
- 1 cup unsalted butter, room temperature (226g)
- 1 Tbsp vanilla extract or vanilla bean paste (12g)
- 1/2 tsp fine salt (3g)
- 3 1/2 cups powdered sugar (454g or 1 lb. box)
- 1/4 cup heavy whipping cream, room temperature (60g)
- 1 cup coarse sanding sugar
Polar Bear Cookie Dough
These polar bear cookies are a delightful treat, perfect for any occasion that calls for a touch of whimsy. The dough itself is a tender, buttery shortbread style, with a subtle tang from the cream cheese that keeps it from being too sweet. The addition of cornstarch helps create a wonderfully crisp yet melt-in-your-mouth texture. We’ll make two batches of dough, one for the main cookie body and another slightly different one for the polar bear’s features.
- Cream the Butter and Cream Cheese: In a large bowl, use an electric mixer to beat the 3/4 cup of softened unsalted butter and the 1/2 cup of softened cream cheese together until they are light and fluffy. This usually takes about 2-3 minutes on medium speed. It’s important that both are truly at room temperature for them to emulsify properly, creating a smooth base for your cookies.
- Add Sugar, Egg, and Vanilla: Gradually add the 1 1/2 cups of granulated sugar to the butter and cream cheese mixture, beating well after each addition until fully incorporated and the mixture is pale and creamy. Scrape down the sides of the bowl as needed. Next, add the large egg and beat until just combined. Don’t overmix at this stage. Stir in the 2 teaspoons of vanilla extract or vanilla bean paste.
- Combine Dry Ingredients: In a separate medium bowl, whisk together the 3 cups of all-purpose flour, 1 tablespoon of cornstarch, 1/2 teaspoon of baking powder, and 1/2 teaspoon of fine salt. Whisking them together ensures that the leavening agents and salt are evenly distributed throughout the flour, which leads to more consistent cookies.
- Form the Main Dough: Gradually add the dry ingredients to the wet ingredients, mixing on low speed or by hand until just combined. The dough will be quite soft at this stage. It’s important not to overwork the dough once the flour is added, as this can develop the gluten too much and result in tough cookies. Divide this dough into two portions – one slightly larger for the main cookie body, and a smaller portion to which we will add a bit more flour later for the polar bear features. Wrap both portions tightly in plastic wrap and refrigerate for at least 1 hour, or until firm enough to handle. Chilling the dough is essential for easy shaping and to prevent the cookies from spreading too much during baking.
Shaping the Polar Bears
This is where the magic happens and our cookies start to take their adorable polar bear shape. The dough will be firm enough to work with after chilling. Take your time with this step, and don’t worry if your first few aren’t perfect; they’ll still taste delicious!
- Prepare the Feature Dough: While the main dough chills, take the smaller portion of dough you set aside and add about 1/4 cup more all-purpose flour to it. Work the flour in with your hands or a spatula until it forms a slightly firmer dough that’s still pliable. This will be used for the polar bear’s ears and snout. Keep this portion chilled.
- Shape the Bodies and Heads: Preheat your oven to 350°F (175°C) and line baking sheets with parchment paper. Take the larger portion of chilled dough. For each cookie, roll about 2 tablespoons of dough into a ball for the body. Then, take about 1 tablespoon of dough and shape it into an oval for the head. Place the head onto the body, gently pressing to secure. You can create a slight indentation at the top of the head for the ears.
- Add Ears and Snouts: For the ears, pinch off very small pieces of the feature dough (about the size of a pea) and roll them into tiny balls, then flatten them slightly into little discs. Attach two of these to the top of the polar bear’s head. For the snout, take another tiny piece of feature dough, roll it into a small oval, and attach it to the front of the head, slightly below the center. You can gently press the tip of a small knife or a toothpick into the snout to create a little nostril definition. If the dough gets too soft, pop it back in the refrigerator for a few minutes.
- Chill and Bake: Once all your polar bears are shaped, place the prepared baking sheets in the refrigerator for another 15-20 minutes. This further chilling helps ensure the cookies maintain their shape during baking. Bake for 10-12 minutes, or until the edges are lightly golden and the centers are set. They should not be deeply browned. Let them cool on the baking sheet for 5 minutes before transferring them to a wire rack to cool completely.
Polar Bear Icing (Frosting)
This simple buttercream-style frosting provides a smooth, white coating that really makes our polar bears pop. It’s sweet and creamy and the perfect canvas for edible details if you choose to add them.
- Prepare the Frosting: In a clean bowl, beat the 1 cup of softened unsalted butter until creamy. Add the 1 tablespoon of vanilla extract and 1/2 teaspoon of fine salt and beat again to combine.
- Add Powdered Sugar and Cream: Gradually add the 3 1/2 cups of powdered sugar, alternating with the 1/4 cup of heavy whipping cream. Start and end with the powdered sugar. Beat on low speed until the sugar is incorporated, then increase the speed to medium-high and beat for 2-3 minutes until the frosting is light, fluffy, and smooth. If the frosting is too thick, add a tiny bit more cream, a teaspoon at a time. If it’s too thin, add a bit more powdered sugar.
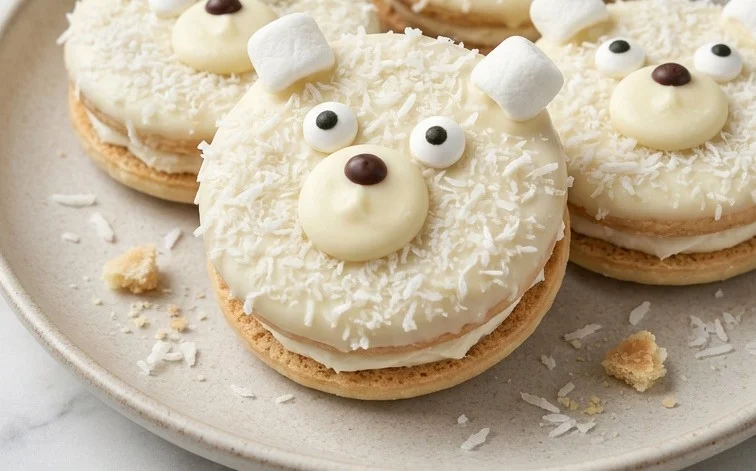
- Decorate Your Polar Bears: Once the cookies are completely cool, use an offset spatula or a butter knife to spread a thin, even layer of the white frosting over the bodies and heads of your polar bears. Don’t worry about making it perfectly smooth; a slightly textured finish can add to the cozy polar bear look.
- Add the Sanding Sugar: While the frosting is still wet, generously sprinkle the 1 cup of coarse sanding sugar over the frosted cookies. The sanding sugar gives a lovely sparkle and mimics the look of snow. Gently press the sugar down into the frosting so it adheres well. You can also just coat sections if you prefer.
These polar bear cookies are best enjoyed within a few days. Store them in an airtight container at room temperature. You can also freeze unfrosted, baked cookies for longer storage. Enjoy your sweet, snowy creations!
Conclusion:
These Polar Bear Cookies are more than just a fun bake; they’re a delightful way to bring a smile to anyone’s face. The tender, buttery dough with its hint of cream cheese makes them incredibly enjoyable to eat, and their charming design ensures they are a hit at any gathering. They bake up beautifully, maintaining their shape and that cute polar bear look. These cookies are perfect for winter birthdays, holiday parties, or just a sweet treat on a cozy afternoon. You can easily customize the decorations with a little edible marker or some carefully placed sprinkles to give each bear a unique personality.
Serving Suggestions:
Serve these Polar Bear Cookies alongside a warm mug of hot chocolate or a glass of cold milk. They are also wonderful additions to a dessert table for any winter-themed event or a child’s birthday party. Their size makes them ideal for little hands, and their sweet flavor appeals to all ages.
Variations:
For a different flavor profile, try adding a touch of almond extract along with the vanilla. You can also experiment with different colored sanding sugar for the polar bear’s nose or eyes, or even use small chocolate chips. If you don’t have sanding sugar, regular granulated sugar works, though it won’t have the same sparkle.
FAQs:
Why are my cookies spreading too much?
This often happens if the butter and cream cheese aren’t cold enough when shaping, or if the dough wasn’t chilled sufficiently. Make sure your dough is firm before you start rolling and cutting. Chilling the cut-out cookies for another 10-15 minutes on the baking sheet before they go into the oven can also help prevent spreading.
Can I make the dough ahead of time?
Yes, absolutely. The Polar Bear Cookie dough can be made up to 2 days in advance and kept refrigerated in an airtight container. Just let it sit at room temperature for about 10-15 minutes before you plan to shape it, so it’s easier to work with.
How should I store these cookies?
Store cooled cookies in an airtight container at room temperature for up to 3-4 days. You can place parchment paper between layers to prevent sticking. They also freeze well; wrap them tightly.
Polar Bear Cookies
Classic sugar cookies with a sweet, creamy vanilla frosting, perfect for any occasion.
Ingredients
-
3/4 cup (1 1/2 sticks) unsalted butter, room temperature (170g)
-
1/2 cup or 4 oz. full fat cream cheese, room temp (113g)
-
1 1/2 cups granulated sugar (300g)
-
1 large egg, room temperature (56g)
-
2 tsp vanilla extract or vanilla bean paste (8g)
-
3 cups all-purpose flour (375g)
-
1 Tbsp cornstarch (8g)
-
1/2 tsp baking powder (2g)
-
1/2 tsp fine salt (3g)
-
1 cup unsalted butter, room temperature (226g)
-
1 Tbsp vanilla extract or vanilla bean paste (12g)
-
1/2 tsp fine salt (3g)
-
3 1/2 cups powdered sugar (454g or 1 lb. box)
-
1/4 cup heavy whipping cream, room temperature (60g)
-
1 cup coarse sanding sugar
Instructions
-
Step 1
Cream together the softened butter, cream cheese, and granulated sugar until light and fluffy. -
Step 2
Beat in the egg and vanilla extract until well combined. -
Step 3
In a separate bowl, whisk together the flour, cornstarch, baking powder, and salt. -
Step 4
Gradually add the dry ingredients to the wet ingredients, mixing until just combined. Do not overmix. -
Step 5
Divide the dough in half, flatten into discs, wrap in plastic wrap, and refrigerate for at least 1 hour. -
Step 6
Preheat oven to 350°F (175°C). Line baking sheets with parchment paper. -
Step 7
Roll out the chilled dough to about 1/4 inch thickness and cut out desired shapes. -
Step 8
Place cookies on prepared baking sheets and bake for 8-10 minutes, or until edges are lightly golden. -
Step 9
Let cookies cool on the baking sheet for a few minutes before transferring to a wire rack to cool completely. -
Step 10
To make the frosting, beat together the softened butter and vanilla extract until smooth. -
Step 11
Gradually add the powdered sugar and heavy whipping cream, beating until the frosting is smooth and spreadable. -
Step 12
Frost the cooled cookies and immediately sprinkle with coarse sanding sugar.
Important Information
Nutrition Facts (Per Serving)
It is important to consider this information as approximate and not to use it as definitive health advice.
Allergy Information
Please check ingredients for potential allergens and consult a health professional if in doubt.


Leave a Comment