
Peanut Butter Spider Cookies are the kind of Halloween treat that makes kids squeal with delight and adults secretly sneak one (or two!) after the little ones are in bed. These aren’t just cookies; they’re edible art that practically begs to be part of your spooky celebrations. The magic happens with a soft, chewy peanut butter cookie base, the kind that melts in your mouth. Then, we transform them into friendly little spiders using just a few simple candies. It’s that perfect balance of familiar, comforting peanut butter flavor and festive Halloween fun that people absolutely love. They come together quickly enough that you won’t spend your whole afternoon in the kitchen, leaving more time for pumpkin carving and costume debates.
What makes these Peanut Butter Spider Cookies special?
It’s the combination of that classic, craveable peanut butter cookie texture with the whimsical spider decoration. They look impressive, but the decorating is so straightforward that even younger bakers can help. We use mini peanut butter cups for the spider’s body and strategically placed chocolate chips and candy eyes to bring our little arachnids to life. You get all the satisfying chewiness of a great peanut butter cookie, plus a fun, festive look that’s unmistakably Halloween. It’s a no-fuss way to create a memorable treat that’s as fun to make as it is to eat.
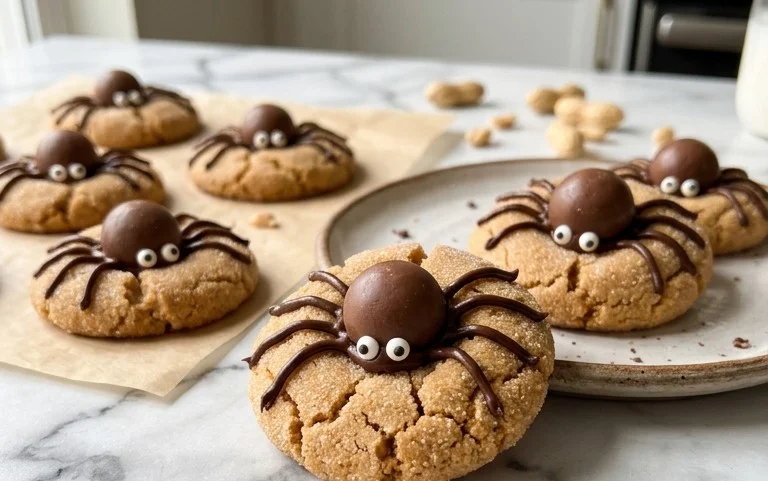
Peanut Butter Spider Cookies
These Peanut Butter Spider Cookies are a fun and surprisingly easy Halloween treat. The peanut butter cookie base is soft and chewy, and the “spider” elements are simple to assemble with store-bought candies. They’re perfect for bake sales, school parties, or just a spooky afternoon snack.
Ingredients:
- ½ cup (113g) unsalted butter, softened to room temperature (one stick)
- ½ cup (107g) packed light brown sugar
- ⅓ cup (66g) granulated sugar
- ¾ cup (201g) creamy peanut butter (use a conventional peanut butter like Jif or Skippy; natural peanut butter can be too oily and won’t incorporate as well)
- 1 large egg
- 1 tsp vanilla extract
- 1 ½ cups (180g) all-purpose flour
- 1 tsp baking soda
- ½ tsp baking powder
- ½ tsp salt
- Additional granulated sugar for rolling the cookie dough balls
- Mini Reese’s Peanut Butter Cups (you’ll need one for each cookie, plus a few extra in case of snacking!)
- ½ cup (85g) semi-sweet chocolate chips
- ½ tsp neutral oil (like vegetable or canola oil)
- Candy eyeballs (plenty to make sure each spider has its two eyes)
Cooking Instructions:
1. Creaming the Butter and Sugars
Start by creaming together the softened unsalted butter, packed light brown sugar, and granulated sugar in a large bowl. You can use a stand mixer with a paddle attachment or a hand mixer. Beat on medium speed until the mixture is light and fluffy, usually about 2 to 3 minutes. This process incorporates air into the dough, which helps create a tender cookie. Make sure your butter isn’t melted, just soft enough that you can easily indent it with your finger.
2. Adding Wet Ingredients
Next, add the creamy peanut butter to the butter and sugar mixture. Beat until well combined. Then, add the large egg and the vanilla extract. Mix on low speed until everything is just incorporated. Don’t overmix at this stage. Scrape down the sides of the bowl as needed to ensure all ingredients are thoroughly mixed.
3. Combining Dry Ingredients and Forming Dough
In a separate medium bowl, whisk together the all-purpose flour, baking soda, baking powder, and salt. This ensures that the leavening agents and salt are evenly distributed throughout the flour, which is important for consistent cookie rise and flavor. Gradually add the dry ingredients to the wet ingredients, mixing on low speed until just combined. The dough will be thick and slightly sticky. Be careful not to overmix once the flour is added, as this can lead to tough cookies.
4. Chilling and Shaping the Cookies
Cover the bowl with plastic wrap and chill the dough in the refrigerator for at least 30 minutes, or up to 2 days. Chilling the dough makes it easier to handle and prevents the cookies from spreading too much during baking. Once chilled, scoop rounded tablespoons of dough and roll them into balls. Roll each ball in the additional granulated sugar until evenly coated. Place the dough balls about 2 inches apart on baking sheets lined with parchment paper.
5. Baking the Cookie Bases
Preheat your oven to 350°F (175°C). Bake the cookie dough balls for 10 to 12 minutes, or until the edges are lightly golden and the centers appear set but still slightly soft. Don’t overbake them, as they will continue to cook slightly as they cool on the baking sheet. Let the cookies cool on the baking sheet for 5 minutes before transferring them to a wire rack to cool completely. While the cookies are cooling, you can prepare the “spider” decorations.
6. Assembling the Spiders
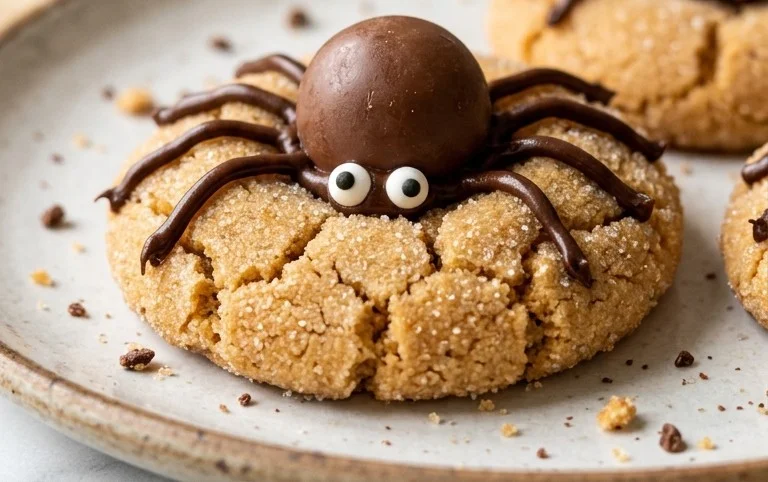
Once the cookies are completely cool, it’s time to transform them into spooky spiders! Gently press one Mini Reese’s Peanut Butter Cup into the center of each cookie. The peanut butter cup will act as the spider’s body. For the spider’s legs and eyes, you’ll need melted chocolate. In a small microwave-safe bowl, combine the semi-sweet chocolate chips and the neutral oil. Microwave in 30-second intervals, stirring between each interval, until the chocolate is smooth and fully melted. Be careful not to overheat the chocolate. Use a toothpick or a small spoon to draw eight legs radiating out from the peanut butter cup onto the cookie. You can make them thin and wispy or a bit more pronounced. Immediately after drawing the legs, use a tiny dab of the melted chocolate to adhere two candy eyeballs to the top of the peanut butter cup, just above the legs. You might need to hold them in place for a few seconds until the chocolate sets.
7. Setting and Storing Your Spiders
Allow the melted chocolate to set completely before stacking or storing the cookies. This usually takes about 15 to 30 minutes at room temperature, or you can speed it up by placing them in the refrigerator for a few minutes. Store the finished Peanut Butter Spider Cookies in an airtight container at room temperature for up to 3 days. They are best enjoyed within the first couple of days for optimal chewiness.
Conclusion:
So there you have it – Peanut Butter Spider Cookies that are as fun to assemble as they are to devour. They’re proof that you don’t need complicated techniques to create a showstopper for Halloween. The simple, delightful peanut butter cookie base paired with the adorable spider decoration makes them a guaranteed hit at any party or as a special after-school treat. Remember to have extra mini peanut butter cups on hand, because they are notoriously snackable throughout the whole process! Don’t be afraid to let kids take the lead on decorating; their unique spider creations are part of the charm. Whether you’re baking for a school event, a family gathering, or just for fun, these cookies are sure to bring smiles.
Serving Suggestions and Variations:
Serve these cookies on a platter with other Halloween treats for a spooky dessert table. They also make great additions to bake sale assortments. For variations, try using different colored candy eyeballs for a more colorful spider, or even small pretzel twists for legs if you don’t have enough chocolate chips. You could also mix in some festive sprinkles into the cookie dough itself before baking for an extra pop of color and crunch. If mini peanut butter cups are hard to find, large peanut butter cups cut into sections can also work.
Frequently Asked Questions:
Can I make the cookie dough ahead of time?
Yes, you can definitely make the cookie dough a day in advance. Wrap it tightly in plastic wrap and store it in the refrigerator. When you’re ready to bake, let the dough sit at room temperature for about 15-20 minutes to soften slightly, which will make it easier to scoop and roll.
My spiders’ eyes fell off. How can I prevent this?
Ensure the chocolate chips used for the body are still slightly warm when you press the candy eyes into them. The warmth helps the eyes stick. If your chocolate chips have cooled completely, you can re-melt a small amount of chocolate chips with a tiny bit of oil and use that as ‘glue’ for the candy eyes.
Can I use natural peanut butter?
It’s best to stick with conventional, processed peanut butter like Jif or Skippy. Natural peanut butter tends to be oilier and can make the cookies spread too much and become greasy, affecting both texture and how well the spider decorations adhere.
Peanut Butter Spider Cookies
Spooky and delicious peanut butter cookies decorated to look like spiders, perfect for Halloween or any fun occasion.
Ingredients
-
½ cup (113g) unsalted butter, room temperature
-
½ cup (107g) brown sugar
-
⅓ cup (66g) granulated sugar
-
¾ cup (201g) creamy peanut butter
-
1 large egg
-
1 tsp vanilla extract
-
1 ½ cups (180g) all purpose flour
-
1 tsp baking soda
-
½ tsp baking powder
-
½ tsp salt
-
Granulated sugar, for rolling
-
Mini Reese’s Peanut Butter Cups
-
½ cup (85g) semi-sweet chocolate chips
-
½ tsp neutral oil
-
Candy eye balls
Instructions
-
Step 1
Preheat oven to 350°F (175°C). Line baking sheets with parchment paper. -
Step 2
In a large bowl, cream together the room temperature butter, brown sugar, and granulated sugar until light and fluffy. -
Step 3
Beat in the creamy peanut butter, then the large egg and vanilla extract until well combined. -
Step 4
In a separate bowl, whisk together the all-purpose flour, baking soda, baking powder, and salt. -
Step 5
Gradually add the dry ingredients to the wet ingredients, mixing until just combined. Do not overmix. -
Step 6
Roll dough into 1-inch balls. Roll each ball in granulated sugar and place on the prepared baking sheets. -
Step 7
Bake for 10-12 minutes, or until edges are lightly golden. -
Step 8
While cookies are baking, melt semi-sweet chocolate chips with neutral oil in a microwave-safe bowl in 30-second intervals, stirring until smooth. Place in a piping bag or a small plastic bag with a corner snipped off. -
Step 9
Once cookies are out of the oven, immediately press one Mini Reese’s Peanut Butter Cup into the center of each cookie. Allow to cool on the baking sheet for a few minutes before transferring to a wire rack to cool completely. -
Step 10
Once cookies are completely cool, use melted chocolate to attach two candy eye balls to the Reese’s cup to create the spider’s face. Use melted chocolate to pipe eight legs around the Reese’s cup onto the cookie.
Important Information
Nutrition Facts (Per Serving)
It is important to consider this information as approximate and not to use it as definitive health advice.
Allergy Information
Please check ingredients for potential allergens and consult a health professional if in doubt.



Leave a Comment