
Peanut Butter Cup Spider Cookies are a fantastic treat, especially when Halloween rolls around, but honestly, they’re great anytime you need a little sweet fun. The base of this cookie is pure peanut butter bliss—soft, chewy, and wonderfully peanutty. What makes these cookies really special is the surprise you find right in the center. As soon as the cookies come out of the oven, you press a full-size peanut butter cup into the warm dough. This creates an incredible molten, gooey chocolate and peanut butter filling that’s pure magic. Then, we add a spooky touch with chocolate legs, turning them into little spiders. It’s a simple concept, but the result is always a showstopper that disappears from the plate before you can even blink. These cookies are a guaranteed hit for parties or just a sweet afternoon snack.
Instructions:
Cream the Butter and Sugars: In a large mixing bowl, beat the softened butter with the granulated sugar and packed brown sugar until the mixture is light and fluffy. This usually takes about 2 to 3 minutes with an electric mixer on medium speed. Make sure your butter is truly softened – if it’s too cold, it won’t cream properly, and if it’s melted, your cookies will spread too much. Scrape down the sides of the bowl as needed to ensure everything is well incorporated. The fluffy texture of this base is key to a good cookie.
Add Peanut Butter and Egg: To the creamed butter and sugar mixture, add the peanut butter. Beat until it’s well combined. Then, add the large egg and the vanilla bean paste (or extract). Mix again until everything is smooth and fully incorporated. If your peanut butter is very stiff, you might need to mix a bit longer here to get it smooth.
Combine Dry Ingredients: In a separate medium bowl, whisk together the all-purpose flour, baking soda, baking powder, and kosher salt. Whisking them together helps distribute the leavening agents evenly, which means your cookies will rise consistently.
Mix Wet and Dry: Gradually add the dry ingredients to the wet ingredients in the large bowl. Mix on low speed just until the flour streaks disappear. Be careful not to overmix at this stage; overmixing can develop the gluten in the flour, leading to tougher cookies. The dough will be quite thick.
Chill the Dough (Optional but Recommended): For best results and easier handling, cover the bowl with plastic wrap and chill the dough in the refrigerator for at least 30 minutes. This helps the flavors meld and prevents the cookies from spreading too much during baking.
Prepare for Baking: Preheat your oven to 350°F (175°C). Line baking sheets with parchment paper or silicone baking mats. This prevents sticking and makes cleanup a breeze.
Form the Cookies and Add Peanut Butter Cups: Scoop rounded tablespoons of cookie dough and roll them into balls. Place the dough balls onto the prepared baking sheets, leaving about 2 inches between them as they will spread. Gently press one unwrapped peanut butter cup into the center of each dough ball. The dough should mostly surround the peanut butter cup.
Bake: Bake for 9 to 12 minutes, or until the edges are lightly golden brown and the centers look slightly underbaked. The peanut butter cups should be melted and gooey. Don’t overbake, or the cookies will become dry.
Add Spider Legs: While the cookies are still warm on the baking sheets, quickly melt the milk chocolate chips in a microwave-safe bowl in 30-second intervals, stirring in between, until smooth. Transfer the melted chocolate to a small piping bag or a zip-top bag with a tiny corner snipped off. Pipe eight thin lines of chocolate around the peanut butter cup on each cookie to resemble spider legs. Work quickly as the cookies are warm.
Cool: Let the cookies cool on the baking sheets for about 5 minutes before transferring them to a wire rack to cool completely. The peanut butter cups will continue to set slightly as they cool.
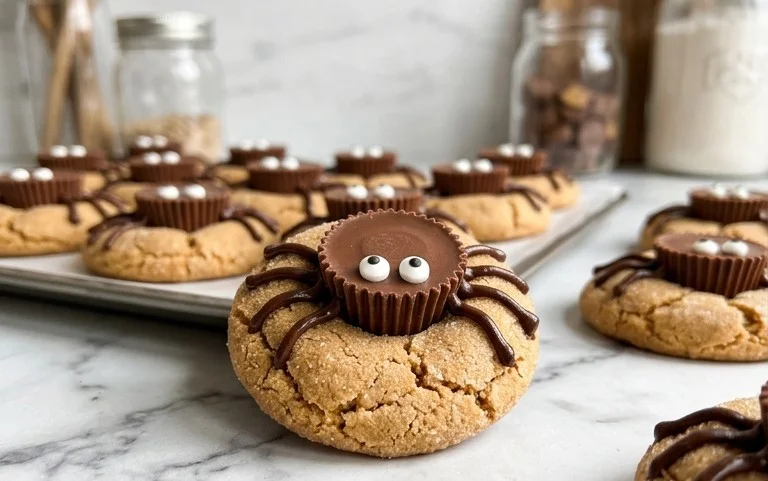
Peanut Butter Cup Spider Cookies
These Peanut Butter Cup Spider Cookies are a fun, festive treat perfect for Halloween or any time you want a cute, peanut butter-forward cookie with a chocolatey surprise inside. The cookie itself is a soft, chewy peanut butter base, and the real magic happens when you press a peanut butter cup into the warm cookie dough, creating a molten, gooey center. We then get a little spooky by adding chocolate spider legs. It’s a simple recipe that yields impressive results and always disappears fast.
Ingredients:
- 1/2 cup butter (1 stick), softened to room temperature
- 3/4 cup granulated sugar
- 1/4 cup packed brown sugar
- 1 cup creamy peanut butter
- 1 large egg
- 1 1/2 teaspoons vanilla bean paste (or pure vanilla extract)
- 1 1/2 cups all-purpose flour, spooned and leveled
- 1 teaspoon baking soda
- 1/2 teaspoon baking powder
- 1/4 teaspoon kosher salt
- 1/4 cup milk chocolate chips or finely chopped milk chocolate (for spider legs)
- 8 full-size peanut butter cups, unwrapped
Instructions:
- Cream the Butter and Sugars: In a large mixing bowl, beat the softened butter with the granulated sugar and packed brown sugar until the mixture is light and fluffy. This usually takes about 2 to 3 minutes with an electric mixer on medium speed. Make sure your butter is truly softened – if it’s too cold, it won’t cream properly, and if it’s melted, your cookies will spread too much. Scrape down the sides of the bowl as needed to ensure everything is well incorporated. The fluffy texture here is key for a tender cookie.
- Add Wet Ingredients: Beat in the creamy peanut butter until well combined with the butter and sugar mixture. Then, add the large egg and the vanilla bean paste (or extract). Mix on low speed until just combined, being careful not to overmix at this stage. The dough might look a little broken at first, but keep mixing until it comes together smoothly. The vanilla bean paste adds little flecks and a more intense vanilla flavor, but regular vanilla extract works just fine.
- Combine Dry Ingredients: In a separate medium bowl, whisk together the flour, baking soda, baking powder, and kosher salt. Whisking ensures that the leavening agents and salt are evenly distributed throughout the flour, which helps the cookies bake evenly. If you don’t have kosher salt, you can use about 1/8 teaspoon of table salt, but be aware that table salt is more potent by volume.
- Form the Cookie Dough: Gradually add the dry ingredients to the wet ingredients, mixing on low speed until just combined. Stop mixing as soon as you no longer see streaks of flour. Overmixing the flour can develop the gluten too much, resulting in tougher cookies. The dough will be thick and a little sticky.
- Prepare for Baking and Add Peanut Butter Cups: Preheat your oven to 350°F (175°C). Line baking sheets with parchment paper or silicone baking mats. This prevents sticking and makes cleanup a breeze. Scoop rounded tablespoons of dough and roll them into balls. Place about 2 inches apart on the prepared baking sheets. Take one unwrapped peanut butter cup and gently press it straight down into the center of each cookie dough ball, pushing it about halfway in. You want the top of the peanut butter cup to be roughly level with the surface of the dough. The heat of the cookie will melt the chocolate and peanut butter inside, creating that irresistible gooey center.
- Bake the Cookies: Bake for 10-12 minutes, or until the edges of the cookies are set and lightly golden brown. The centers might still look a little soft. This is exactly what you want for a chewy cookie. Don’t overbake them! As the cookies cool on the baking sheet, they will continue to cook from the residual heat. Let the cookies cool on the baking sheets for 5-10 minutes before carefully transferring them to a wire rack to cool completely. This allows them to firm up enough to be moved without falling apart.
- Create the Spider Legs: While the cookies are cooling, melt the milk chocolate chips or chopped chocolate. You can do this in a microwave-safe bowl in 30-second intervals, stirring between each, or use a double boiler. Once melted and smooth, transfer the chocolate to a small piping bag or a zip-top bag with a tiny corner snipped off. Once the cookies have cooled slightly and are still a bit warm (which helps the chocolate stick), pipe thin lines of melted chocolate from the edge of the cookie, creating eight spindly spider legs that extend outwards. You can also use a toothpick to draw the legs on. Let the chocolate set completely before serving or storing.
These cookies are best enjoyed within a few days. Store them in an airtight container at room temperature. If you want to make them ahead, you can freeze the unbaked cookie dough balls with the peanut butter cups pressed in. Just bake them from frozen, adding a few extra minutes to the baking time. Enjoy your spooky, peanut buttery creations!

Conclusion:
These Peanut Butter Cup Spider Cookies are a guaranteed hit, whether you’re baking for a Halloween party or just want to brighten up an ordinary day. The combination of soft peanut butter cookie, molten peanut butter cup center, and those fun chocolate spider legs makes them irresistible. They’re a simple recipe that delivers big on flavor and festive appeal, and they always vanish quickly!
Serving Suggestions: These cookies are fantastic on their own with a cold glass of milk. They also pair wonderfully with coffee or hot chocolate. For a party, arrange them on a platter with other Halloween treats for a spooky spread.
Variations: If you don’t have full-size peanut butter cups, you can use mini peanut butter cups; just press a few into the dough. You could also use dark chocolate peanut butter cups for a different flavor profile. For the spider legs, if you don’t want to pipe the chocolate, you can melt the chocolate and drizzle it over the top, or even use black icing gel pens.
Frequently Asked Questions:
Can I make these cookies ahead of time?
Yes, you can definitely make the dough ahead of time. Cover the dough tightly and refrigerate for up to 3 days. You might need to let it sit at room temperature for about 15-20 minutes to make it easier to scoop. Bake as directed, and add the peanut butter cups and chocolate legs just before serving for the best gooey center.
Why did my cookies spread too much?
Cookies often spread too much if the butter was too warm or melted, or if the dough wasn’t chilled. Make sure your butter is softened but not melted. Chilling the dough for at least 30 minutes helps firm it up, which controls spread and makes it easier to handle. Also, ensure you’re measuring your flour correctly by spooning it into the cup and leveling it off, rather than scooping directly from the bag, which can lead to too much flour.
How do I store the Peanut Butter Cup Spider Cookies?
Store completely cooled cookies in an airtight container at room temperature for up to 3-4 days. If you live in a warm climate or it’s very humid, you might want to add a small piece of bread in the container to help keep them soft, though this isn’t usually necessary. Avoid refrigerating them, as this can make the cookies hard.
Peanut Butter Cup Spider Cookies
Spooky and delicious peanut butter cookies topped with peanut butter cups and chocolate spider legs, perfect for Halloween.
Ingredients
-
1/2 cup butter (1 stick (room temp))
-
3/4 cup granulated sugar
-
1/4 cup brown sugar (packed)
-
1 cup creamy peanut butter
-
1 large egg
-
1 1/2 teaspoons vanilla bean paste (or extract)
-
1 1/2 cups flour (spooned and leveled)
-
1 teaspoon baking soda
-
1/2 teaspoon baking powder
-
1/4 teaspoon kosher salt
-
1/4 cup milk chocolate (melted for spider legs)
-
8 peanut butter cups (full size)
Instructions
-
Step 1
Preheat oven to 375°F (190°C). Line baking sheets with parchment paper. -
Step 2
In a large bowl, cream together the softened butter, granulated sugar, and brown sugar until light and fluffy. -
Step 3
Beat in the peanut butter, then the egg and vanilla bean paste until well combined. -
Step 4
In a separate medium bowl, whisk together the flour, baking soda, baking powder, and salt. -
Step 5
Gradually add the dry ingredients to the wet ingredients, mixing until just combined. Do not overmix. -
Step 6
Roll dough into balls and place on prepared baking sheets. Press the top of each cookie down slightly and place half of a peanut butter cup into the center of each cookie. Slightly press the peanut butter cup into the dough. -
Step 7
Bake for 9-11 minutes, or until edges are lightly golden. The centers may still look soft. -
Step 8
Immediately after removing from the oven, gently press the remaining half of the peanut butter cup onto the warmed cookie, allowing it to melt slightly into the cookie. -
Step 9
Melt the milk chocolate. Transfer to a small piping bag or a zip-top bag with a corner snipped off. Pipe eight “legs” coming out from the peanut butter cups on each cookie to resemble a spider. Let cool completely before serving.
Important Information
Nutrition Facts (Per Serving)
It is important to consider this information as approximate and not to use it as definitive health advice.
Allergy Information
Please check ingredients for potential allergens and consult a health professional if in doubt.


Leave a Comment