
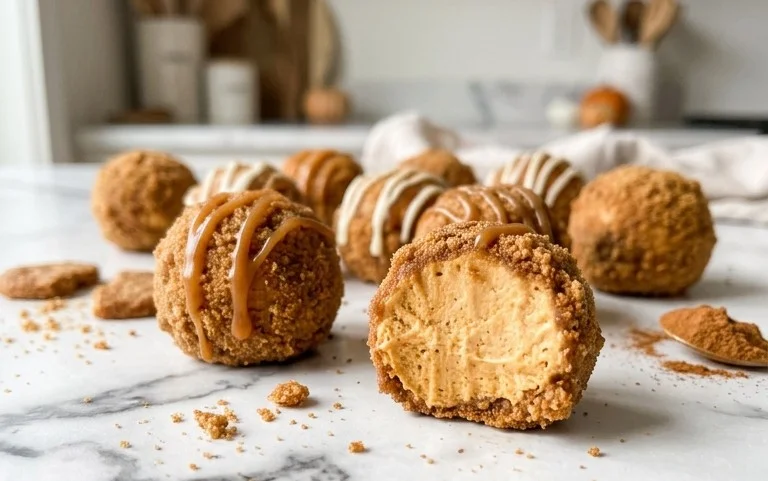
These Pumpkin Cheesecake Truffles are like biting into a tiny, decadent slice of pumpkin pie, but with the smooth, creamy richness of cheesecake, all rolled into a portable, bite-sized treat. They’re perfect for autumn gatherings, holiday cookie trays, or just when you’re craving something sweet and spiced. The best part is they don’t require any baking, making them a fantastic option when you want a dessert without turning on the oven. The flavor is warm and comforting, and the texture is wonderfully smooth and satisfying.
Ingredients:
- 1 tablespoon butter
- 4 ounces cream cheese, softened at room temperature
- 1/2 cup canned pumpkin puree
- 1 (14-ounce) can sweetened condensed milk
- 1 1/2 teaspoons pumpkin pie spice
- 1/2 cup graham cracker crumbs
- 1/3 cup white chocolate chips
- Orange food coloring (or red and yellow food colorings), as needed, optional
- Granulated sugar, as needed, for rolling
- Chocolate chips, for topping
Instructions:
Step 1: Creating the Cheesecake Base
First things first, we need to get our cream cheese nice and soft. Leaving it on the counter for about an hour before you start should do the trick. It should be yielding to the touch but not melted. In a medium bowl, beat the softened cream cheese with the tablespoon of butter until it’s completely smooth and creamy. You don’t want any lumps here, so take your time with this step. A hand mixer works wonderfully for this, but a sturdy whisk and some elbow grease will also get the job done.
Pumpkin Cheesecake Truffles
These Pumpkin Cheesecake Truffles are like biting into a tiny, decadent slice of pumpkin pie, but with the smooth, creamy richness of cheesecake, all rolled into a portable, bite-sized treat. They’re perfect for autumn gatherings, holiday cookie trays, or just when you’re craving something sweet and spiced. The best part is they don’t require any baking, making them a fantastic option when you want a dessert without turning on the oven. The flavor is warm and comforting, and the texture is wonderfully smooth and satisfying.
Ingredients:
- 1 tablespoon butter
- 4 ounces cream cheese, softened at room temperature
- 1/2 cup canned pumpkin puree
- 1 (14-ounce) can sweetened condensed milk
- 1 1/2 teaspoons pumpkin pie spice
- 1/2 cup graham cracker crumbs
- 1/3 cup white chocolate chips
- Orange food coloring (or red and yellow food colorings), as needed, optional
- Granulated sugar, as needed, for rolling
- Chocolate chips, for topping
Instructions:
Step 1: Creating the Cheesecake Base
First things first, we need to get our cream cheese nice and soft. Leaving it on the counter for about an hour before you start should do the trick. It should be yielding to the touch but not melted. In a medium bowl, beat the softened cream cheese with the tablespoon of butter until it’s completely smooth and creamy. You don’t want any lumps here, so take your time with this step. A hand mixer works wonderfully for this, but a sturdy whisk and some elbow grease will also get the job done. Once smooth, add the 1/2 cup of canned pumpkin puree to the bowl. Make sure you’re using pumpkin puree and not pumpkin pie filling, as the latter contains added sugars and spices that will alter the flavor and texture of your truffles.
Step 2: Adding Sweetness and Spice
Now, it’s time to introduce the sweetness and that quintessential fall flavor. Pour in the entire 14-ounce can of sweetened condensed milk into the cream cheese and pumpkin mixture. This condensed milk is what gives our truffles their luscious, fudgy texture. Next, measure out 1 1/2 teaspoons of pumpkin pie spice. If you don’t have pre-mixed pumpkin pie spice, you can easily make your own by combining 1 teaspoon cinnamon, 1/4 teaspoon ground ginger, 1/4 teaspoon ground nutmeg, and 1/8 teaspoon ground cloves. Add this to the bowl. Stir everything together until it’s thoroughly combined and you have a thick, uniform batter. It should look like a very smooth, rich pumpkin pie filling.
Step 3: Incorporating the Graham Cracker Crumbs
This is where our truffle mixture starts to gain structure. Add the 1/2 cup of graham cracker crumbs to the bowl. These crumbs will absorb some of the moisture and help bind the mixture together, making it firm enough to roll into balls. Stir them in thoroughly. The mixture will become much thicker and start to resemble a firm dough. If it feels a little too wet to handle, you can add another tablespoon or two of graham cracker crumbs, but be careful not to add too much, or your truffles might become dry. You’re aiming for a consistency that’s moldable but not sticky. It’s often easiest to mix this part with a sturdy spoon or spatula, or even your hands once it’s cooled slightly.
Step 4: Chilling and Shaping the Truffles
Once everything is well combined, cover the bowl tightly with plastic wrap. Place the bowl in the refrigerator for at least 1-2 hours, or until the mixture is firm enough to scoop and roll. This chilling step is essential. If the mixture is too soft, it will be difficult to shape into neat balls. When it’s firm, you can begin rolling. Take a tablespoon of the mixture and roll it between your palms to form a smooth ball. If the mixture is still a little sticky, you can lightly dust your hands with a bit more graham cracker crumbs or a tiny amount of granulated sugar. Place the rolled truffles onto a baking sheet lined with parchment paper. Continue this process until all the mixture is used up. This recipe will yield approximately 20-25 truffles, depending on their size.
Step 5: Decorating and Finishing Touches
Now for the fun part – making them look as good as they taste! If you want your truffles to have a vibrant orange hue, you can gently knead a few drops of orange food coloring into the chilled mixture before rolling, or mix it in after you’ve rolled the balls, using a food-safe glove. Alternatively, use a combination of red and yellow food coloring to achieve your desired shade of orange. For a simple yet elegant finish, melt the 1/3 cup of white chocolate chips. You can do this in a microwave-safe bowl in 30-second intervals, stirring between each, or use a double boiler. Once melted and smooth, you can either drizzle the white chocolate over the truffles using a fork or dip the bottoms of the truffles into the melted chocolate. For an extra touch, you can sprinkle some chocolate chips over the wet chocolate drizzle for added texture and flavor. You can also roll the finished truffles in granulated sugar for a sparkly finish, or leave them plain. Allow the chocolate to set completely before serving or storing.
Step 6: Storage and Serving Suggestions
Once your Pumpkin Cheesecake Truffles are decorated and the chocolate has set, they are ready to be enjoyed! For the best texture and flavor, store them in an airtight container in the refrigerator for up to a week. They’re delicious served chilled, but you can let them sit at room temperature for about 10-15 minutes before serving if you prefer a slightly softer truffle. These make a wonderful addition to any dessert spread, or they can be packaged in small treat bags for a lovely homemade gift. They pair wonderfully with a cup of coffee or a warm spiced cider. If you find the mixture too crumbly to roll, try adding a teaspoon of melted butter or a tablespoon of milk to help bind it together.
Conclusion:
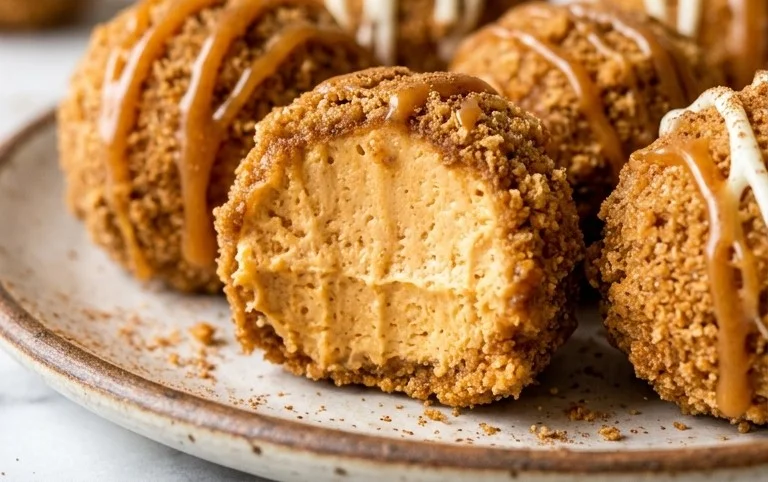
These Pumpkin Cheesecake Truffles are a truly delightful no-bake treat that captures the essence of fall in every bite. Their creamy, smooth texture and warm spice combination make them a hit for any occasion, especially when you want something special without heating up the kitchen. They’re wonderfully versatile, too, allowing for creative decorating and personal touches. Whether you’re bringing them to a potluck, adding them to a dessert spread, or simply enjoying one with your afternoon coffee, these little bites are sure to impress.
Frequently Asked Questions:
Can I make these without pumpkin pie spice?
Yes, absolutely. If you don’t have pumpkin pie spice, you can create your own blend by combining 1 teaspoon cinnamon, 1/2 teaspoon ginger, 1/4 teaspoon nutmeg, and a pinch of cloves. Adjust the amounts to your preference.
How should I store the truffles?
Store the truffles in an airtight container in the refrigerator for up to 3-4 days. They are best served chilled or at room temperature after about 15-20 minutes out of the fridge.
Can I use a different type of cookie crumbs?
Certainly. While graham crackers provide a classic flavor, you could also use crushed vanilla wafers, shortbread cookies, or even gingersnap cookies for a different spice profile.
Pumpkin Cheesecake Truffles
Delicious no-bake pumpkin cheesecake truffles coated in white chocolate and topped with chocolate chips. Perfect for fall gatherings.
Ingredients
-
1 tablespoon butter
-
4 ounces cream cheese, softened at room temperature
-
1/2 cup canned pumpkin puree
-
1 (14-ounce) can sweetened condensed milk
-
1 1/2 teaspoons pumpkin pie spice
-
1/2 cup graham cracker crumbs
-
1/3 cup white chocolate chips
-
Orange food coloring (or red and yellow food colorings), as needed, optional
-
Granulated sugar, as needed, for rolling
-
Chocolate chips, for topping
Instructions
-
Step 1
In a medium bowl, cream together the softened cream cheese and butter until smooth. -
Step 2
Stir in the canned pumpkin puree, sweetened condensed milk, and pumpkin pie spice until well combined. -
Step 3
Fold in the graham cracker crumbs. If using, add orange food coloring a few drops at a time until desired color is reached. -
Step 4
Chill the mixture in the refrigerator for at least 1 hour, or until firm enough to roll into balls. -
Step 5
Roll the chilled mixture into 1-inch balls. If desired, roll the balls in granulated sugar for a sparkle. -
Step 6
Melt the white chocolate chips according to package directions. Dip each truffle into the melted white chocolate, allowing excess to drip off. -
Step 7
Place the coated truffles on a parchment-lined baking sheet. Drizzle with melted chocolate chips for topping before the white chocolate sets. -
Step 8
Refrigerate the truffles until the chocolate coating is firm.
Important Information
Nutrition Facts (Per Serving)
It is important to consider this information as approximate and not to use it as definitive health advice.
Allergy Information
Please check ingredients for potential allergens and consult a health professional if in doubt.


Leave a Comment