
Little Debbie Christmas Tree Cake Balls bring the joy of a beloved holiday treat into a portable, bite-sized form. These festive orbs capture the essence of the iconic Christmas Tree Cakes, with their soft cake and creamy filling encased in a smooth candy shell. They are a wonderful project to do with children during the holiday season, and they’re quick enough to assemble when you need an impressive dessert on short notice. The charm of these cake balls lies in their simplicity and the nostalgic flavor that everyone recognizes. Making them involves a few straightforward steps, but paying attention to details, especially when melting the coatings, ensures the best results. Get ready to transform those cheerful green cakes into an even more delightful holiday confection that’s sure to be a hit at any gathering.
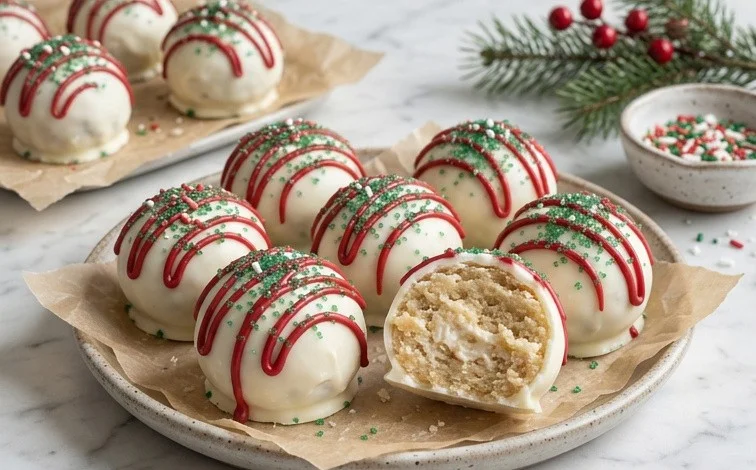
Ingredients:
- 10 Little Debbie Christmas Tree Cakes (these are the star, so make sure you have two boxes)
- 8 ounces cream cheese, softened (let this sit out on the counter for about an hour so it’s easy to mix)
- 16 ounces vanilla almond bark (this is for coating, so get a good quality brand you like)
- 1 cup red candy melts (for drizzling and decorating)
- Green sugar sprinkles (for that festive, Christmas tree sparkle)
Making Your Christmas Tree Cake Balls
These little treats capture the magic of Little Debbie Christmas Tree Cakes in a delightful, bite-sized package. The creamy filling and sweet cake combine with a crisp candy coating for a perfect holiday indulgence. They are wonderfully simple to make, making them a fantastic project to do with kids or to whip up quickly when unexpected guests arrive. The key is to work methodically, especially when dealing with melting the candy coatings.
Step 1: Crushing the Christmas Tree Cakes
First, we need to break down those iconic Christmas Tree Cakes into a fine crumb. You can do this a couple of ways. One method is to place the cakes, frosting and all, into a zip-top bag. Gently bash them with a rolling pin until you have a fine, powdery consistency. You don’t want any big chunks left. Another option is to use a food processor, pulsing until the cakes are finely ground. This should create about 3 cups of cake crumbs. It’s important to get them as fine as possible so the cream cheese can bind them together smoothly. Make sure to scrape down the sides of the food processor if you use one, to ensure everything is uniformly crushed.
Step 2: Combining Cake Crumbs and Cream Cheese
Once your Christmas Tree Cakes are beautifully crushed, it’s time to introduce the cream cheese. Take your softened cream cheese and add it to the bowl with the cake crumbs. Using a sturdy spoon or your hands (clean hands work best here!), mix the cream cheese and cake crumbs together until they are thoroughly combined. The mixture should form a dough-like consistency that holds together when you squeeze it. If the mixture feels too dry and crumbly and won’t hold its shape, you might need to add another tablespoon or two of softened cream cheese. Conversely, if it feels too wet, you can add a few more finely crushed cake crumbs. You’re aiming for a texture that’s easy to roll into balls without being sticky.
Step 3: Rolling the Cake Balls
Now comes the fun part of shaping. Take about one tablespoon of the cake and cream cheese mixture at a time. Roll it between your palms to form a smooth, compact ball, roughly 1 inch in diameter. You can make them a little smaller or larger, but try to keep them consistent in size for even coating and baking (though these aren’t technically baked, consistent size helps with presentation). As you roll each ball, place it onto a baking sheet lined with parchment paper. Make sure you have enough space between the balls, as they might slightly expand. This step requires a bit of patience, especially if you’re making a large batch. If the mixture starts to stick to your hands, you can lightly dust them with a bit of powdered sugar or even a tiny amount of extra cake crumbs.
Step 4: Melting and Dipping the Cake Balls
This is where the magic of coating happens. You’ll need to melt your vanilla almond bark and red candy melts. The best way to do this is in separate microwave-safe bowls. Microwave the vanilla almond bark in 30-second intervals, stirring well after each interval, until it’s smooth and fully melted. Do the same for the red candy melts. Be careful not to overheat them, as candy melts can seize up if they get too hot. Once melted, dip each cake ball into the vanilla almond bark, using a toothpick or a dipping fork to coat it completely. Allow any excess coating to drip back into the bowl. Place the coated cake ball back onto the parchment-lined baking sheet. It’s helpful to have a slightly larger batch of vanilla almond bark melted than you think you’ll need, as you’ll use this for the base coating of all your cake balls.
Step 5: Decorating Your Christmas Tree Cake Balls
While the vanilla almond bark coating is still wet, it’s time to add those festive touches. Take your melted red candy melts and put them into a piping bag or a zip-top bag with a small corner snipped off. Drizzle the red candy melts in a decorative pattern over the vanilla-coated cake balls, mimicking the look of Christmas tree lights or garland. Immediately after drizzling the red candy melts, sprinkle the green sugar sprinkles generously over the wet candy. This will help the sprinkles stick. You can also add more red candy melt dots or even small edible ornaments if you have them. Allow the cake balls to set completely at room temperature. If your kitchen is very warm, you might need to pop them in the refrigerator for a few minutes to firm up the coating, but avoid leaving them in the fridge for too long, as this can sometimes cause the coating to develop a dull, chalky appearance. Once fully set, they are ready to be enjoyed or stored.
Conclusion:
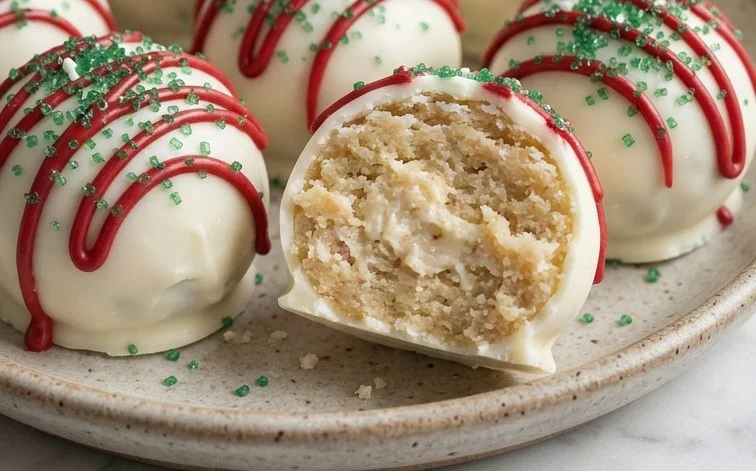
These Little Debbie Christmas Tree Cake Balls are a delightful way to enjoy a classic holiday flavor in a new, fun format. They’re surprisingly simple to make, making them a perfect activity for family baking sessions or a last-minute dessert that always impresses. The combination of soft, cakey goodness and a crisp candy coating is truly irresistible, and their festive appearance makes them ideal for any holiday celebration. Don’t be afraid to get creative with decorations.
Serving Suggestions: Arrange them on a platter for a holiday dessert table, package them in small boxes or bags as edible gifts, or serve them alongside hot chocolate on a cozy winter evening.
Variations: While the classic green is wonderful, feel free to experiment with different colored candy melts for the coating, or add edible glitter for extra sparkle. You could also try rolling some in crushed peppermint candies or finely chopped nuts for added texture.
Frequently Asked Questions:
How should I store the Christmas Tree Cake Balls?
Store them in an airtight container in the refrigerator for up to a week. Let them sit at room temperature for about 15-20 minutes before serving for the best texture.
Can I use a different type of cake?
You certainly can, but the Christmas Tree Cakes provide the signature flavor and texture. If you must substitute, consider another soft, snack-sized cake with a complementary flavor profile.
What’s the best way to ensure the candy coating is smooth?
Melt the almond bark and candy melts slowly over low heat or in the microwave in short intervals, stirring frequently. Avoid overheating, which can cause the coating to become thick and difficult to work with.
Little Debbie Christmas Tree Cake Balls
Deliciously festive no-bake cake balls made with iconic Little Debbie Christmas Tree Cakes, cream cheese, and a sweet candy coating, decorated with green sprinkles.
Ingredients
-
10 Little Debbie Christmas Tree Cakes (2 boxes)
-
8 ounces cream cheese (softened)
-
16 ounces vanilla almond bark
-
1 cup red candy melts
-
green sugar sprinkles
Instructions
-
Step 1
Crumble the Little Debbie Christmas Tree Cakes into a large bowl, removing any excess frosting if desired. -
Step 2
Add the softened cream cheese to the crumbled cakes and mix thoroughly until well combined and a dough-like consistency is achieved. -
Step 3
Roll the mixture into small balls, about 1 inch in diameter, and place them on a parchment-lined baking sheet. -
Step 4
Chill the cake balls in the refrigerator for at least 30 minutes to firm up. -
Step 5
Melt the vanilla almond bark according to package directions, then dip each chilled cake ball into the melted almond bark, ensuring it is fully coated. -
Step 6
Place the coated cake balls back on the parchment-lined baking sheet and allow the almond bark to set. -
Step 7
Melt the red candy melts according to package directions and drizzle over the set cake balls. -
Step 8
Immediately sprinkle the red candy melts with green sugar sprinkles before the candy sets.
Important Information
Nutrition Facts (Per Serving)
It is important to consider this information as approximate and not to use it as definitive health advice.
Allergy Information
Please check ingredients for potential allergens and consult a health professional if in doubt.


Leave a Comment