
Christmas pretzel rods are a simple yet incredibly satisfying Christmas treat. The salty crunch of the pretzel combined with sweet, smooth candy coating and a shower of colorful sprinkles is a classic combination that always brings smiles. They’re perfect for cookie platters, edible gifts, or just a fun afternoon project with the family. These festive pretzel rods start with good quality pretzel rods as your base. Then, you’ll select your favorite candy coatings – milk chocolate, white chocolate, or even colored vanilla almond bark work wonderfully. The real fun comes with the decorating, where an assortment of sprinkles, from classic confetti to themed holiday shapes and crushed peppermint, transforms them into edible art. Preparing your workstation properly is key because melted candy coating can set quickly. Line a baking sheet with parchment paper for easy cleanup and have all your toppings in small bowls, ready for dipping. A tall, narrow glass is ideal for melting each candy coating color, making it simple to dip the pretzel rods evenly.
Christmas Pretzel Rods Recipe
These festive pretzel rods are a simple yet incredibly satisfying Christmas treat. The salty crunch of the pretzel combined with sweet, smooth candy coating and a shower of colorful sprinkles is a classic combination that always brings smiles. They’re perfect for cookie platters, edible gifts, or just a fun afternoon project with the family.
Ingredients:
- Pretzel rods
- Brown candy coating (milk chocolate morsels, or chocolate almond bark)
- White candy coating (white chocolate morsels, or vanilla almond bark)
- Green candy coating
- Red candy coating
- Assorted sprinkles:
- Confetti Holly Mix
- Wilton Holiday Nonpareils
- Wilton Christmas Snowflake Sprinkles
- Crushed peppermint.
Preparing Your Workstation
Before you begin melting your candy coatings, it’s important to set up your workspace for success. You’ll want to have everything ready to go, as melted candy coating can set quickly. Line a baking sheet or a large tray with parchment paper or wax paper. This will prevent the coated pretzel rods from sticking and make cleanup a breeze. Have your assorted sprinkles and crushed peppermint ready in small bowls or ramekins so you can easily dip or sprinkle them onto the candy-coated pretzels. It’s also helpful to have a tall, narrow glass or a microwave-safe measuring cup for melting each color of candy coating. This makes it easier to dip the pretzel rods evenly.
Melting the Candy Coatings
The key to smooth, dippable candy coating is proper melting. You can melt your brown, white, green, and red candy coatings separately using either a microwave or a double boiler.
If you’re using a microwave, place one color of candy coating in a microwave-safe container. Microwave on 50% power for 30-second intervals, stirring well after each interval. Continue this until the coating is mostly melted, then stir until it’s completely smooth. Be patient; overheating can cause the candy to seize up and become unusable.
For a double boiler, fill the bottom pot with about an inch or two of water and bring it to a simmer. Place the candy coating in the top pot, ensuring the bottom of the top pot does not touch the simmering water. Stir constantly until the coating is smooth and melted. Remove the top pot from the heat before dipping.
It’s important to work with one color at a time, as some candy coatings can get thick and difficult to manage if left out for too long. Keep the melted coating warm by placing the container in a larger bowl of warm water (not hot) if needed, but avoid letting water get into the melted candy.
Dipping the Pretzel Rods
Once your candy coatings are melted and smooth, it’s time for the fun part – dipping! Take a pretzel rod and carefully dip about two-thirds to three-quarters of it into the melted candy coating. You can hold the pretzel rod by the uncoated end. Gently rotate the pretzel to coat it evenly.
For a cleaner look, you can let any excess candy coating drip back into the container. Some people prefer to use a spoon to help spread the coating, especially if the coating is a bit thick. If the coating becomes too thick, you can gently reheat it using the microwave or double boiler methods described earlier. Place the dipped pretzel rod onto your prepared parchment-lined baking sheet.
Decorating with Sprinkles and Peppermint
This is where your Christmas pretzel rods truly come to life! While the candy coating is still wet, it’s time to add your festive decorations.
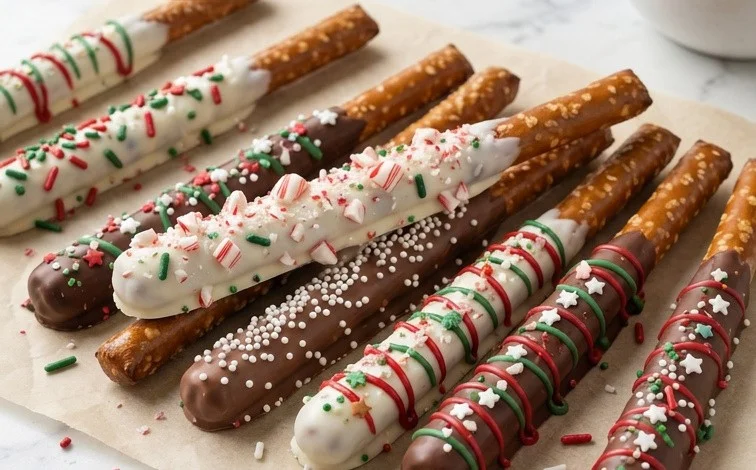
For the brown (milk chocolate) coating, I love to use the Wilton Holiday Nonpareils and the Confetti Holly Mix. These add a classic Christmas feel and a bit of sparkle.
For the white (vanilla) coating, the Wilton Christmas Snowflake Sprinkles are absolutely charming. They look so delicate against the white. You can also add a few of the Confetti Holly Mix sprinkles to these as well for a pop of color.
For the green and red coatings, I often use a combination. You can drizzle one color over another for a striped effect, or dip half in one color and half in another. Then, I like to sprinkle these with the Wilton Holiday Nonpareils or some more of the Confetti Holly Mix.
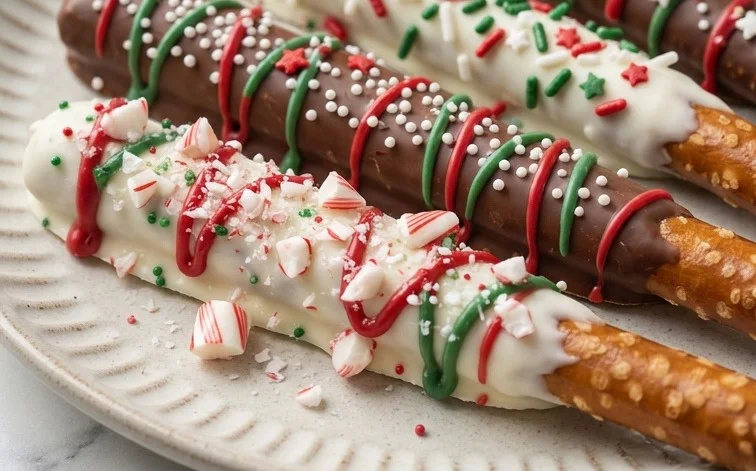
And don’t forget the crushed peppermint! This is a wonderful addition, especially over the white or brown coatings. The red and white stripes of the crushed candy cane look incredibly festive and add a delightful minty crunch. You can sprinkle it on generously or use a lighter hand. Ensure your sprinkles adhere well by pressing them gently into the wet candy coating.
Creating Patterns and Variations
Don’t be afraid to get creative with your decorating! You can dip the pretzel rods completely in one color, or use multiple colors for a more elaborate look. A simple drizzle of a contrasting color over a solid base can make a big impact. For example, after dipping a rod in white candy coating, you can drizzle melted green or red candy coating over it using a fork or a piping bag with a small round tip.
You can also create a marble effect by swirling two colors together before they set. To do this, dip the pretzel in one color, then immediately dip it into another color and swirl them gently with a toothpick.
Another fun idea is to dip only the top half of the pretzel rod, leaving the bottom part bare. This creates a different aesthetic and also makes them easier to hold. For a truly unique touch, you can dip the entire pretzel rod in one color, let it set slightly, and then dip the very tip in a contrasting color for a dipped-end look.
Setting and Storage
Once your pretzel rods are decorated, let them sit undisturbed on the parchment-lined baking sheet until the candy coating is completely set. This usually takes about 15-30 minutes at room temperature. If you’re in a hurry, you can speed up the process by placing the baking sheet in the refrigerator for about 10-15 minutes. However, be cautious of condensation if you refrigerate them for too long, as this can affect the sheen of the candy coating.
Once fully set, carefully peel them off the parchment paper. Store your Christmas pretzel rods in an airtight container at room temperature. They are best enjoyed within a week or two, but they typically stay fresh for longer. Avoid storing them in the refrigerator for extended periods, as the chocolate can bloom (develop white streaks) and the texture can change. These make wonderful edible gifts, so package them up in cellophane bags or festive boxes tied with ribbon.
Conclusion:
These Christmas pretzel rods are a fantastic way to bring some festive cheer to your kitchen and your loved ones. Their simple preparation makes them accessible for bakers of all skill levels, and the customizable nature means everyone can create their own unique designs. The contrast of the salty pretzel with the sweet candy coating and festive sprinkles is a winning combination that always disappears quickly. They look beautiful on a holiday dessert table, packaged up as thoughtful edible gifts, or enjoyed during a cozy family decorating session. Don’t hesitate to get creative with your colors and toppings! This Christmas pretzel rods recipe is truly a joy to make and share.
What are the best sprinkles for pretzel rods?
The best sprinkles are ones that complement the sweetness of the candy coating and add a festive visual appeal. Classic nonpareils, colorful confetti sprinkles, jimmies, sanding sugar, and even crushed peppermint or nuts all work well. Consider themed sprinkles like snowflakes or holly leaves for extra holiday flair. Ensure they are finely chopped if using larger items like candy canes so they adhere better.
How do I store Christmas pretzel rods?
Store your finished Christmas pretzel rods in an airtight container at room temperature. It’s best to place a layer of parchment paper between layers of pretzel rods to prevent them from sticking together. They will keep well for up to two weeks, making them a great make-ahead treat for the holidays. Avoid storing them in the refrigerator, as the humidity can cause the candy coating to ‘sweat’ and become sticky.
Can I use different types of pretzels?
While pretzel rods provide the ideal shape for dipping and decorating, you can certainly experiment with other pretzel shapes like twists or even pretzel snaps. However, be aware that the dipping and decorating technique might need slight adjustments. Pretzel rods offer the most surface area for coating and a satisfyingly thick crunch.
Christmas Pretzel Rods Recipe
Festive and easy-to-make Christmas pretzel rods, perfect for holiday gifting and parties. Dip in colorful candy coatings and decorate with holiday sprinkles and crushed peppermint for a sweet and salty treat.
Ingredients
-
24 pretzel rods
-
1 cup brown candy coating (milk chocolate morsels)
-
1 cup white candy coating (white chocolate morsels)
-
1 cup green candy coating
-
1 cup red candy coating
-
1/4 cup assorted sprinkles: Confetti Holly Mix
-
1/4 cup Wilton Holiday Nonpareils
-
1/4 cup Wilton Christmas Snowflake Sprinkles
-
1/4 cup crushed peppermint
Instructions
-
Step 1
Line a baking sheet with parchment paper or wax paper. -
Step 2
Melt the brown, white, green, and red candy coatings separately according to package directions. You can use a microwave or a double boiler. -
Step 3
Dip each pretzel rod about two-thirds of the way into one of the melted candy coatings, letting any excess drip off. -
Step 4
Place the coated pretzel rod on the prepared baking sheet. While the coating is still wet, immediately decorate with your chosen sprinkles and crushed peppermint. Work quickly as the candy coating will set. -
Step 5
Repeat with the remaining pretzel rods and candy coatings, varying the colors and decorations for a festive look. -
Step 6
Allow the pretzel rods to set completely at room temperature, or in the refrigerator for about 10 minutes, until the candy coating is firm.
Important Information
Nutrition Facts (Per Serving)
It is important to consider this information as approximate and not to use it as definitive health advice.
Allergy Information
Please check ingredients for potential allergens and consult a health professional if in doubt.



Leave a Comment