
Peppermint bark is one of those treats that just screams holiday season to me. The crisp snap of peppermint, the smooth sweetness of chocolate – it’s pure joy in every bite. Making it at home is surprisingly simple and incredibly rewarding, especially when you get to share it with loved ones or keep a stash all to yourself. This peppermint bark recipe uses just a few ingredients, but the result is a festive and delicious confection that rivals anything you’d buy in a shop. Ingredients: 18 ounces dark chocolate chips (you can use semi-sweet or milk chocolate chips if you prefer a sweeter bark) 18 ounces white chocolate chips 1/2 cup crushed candy canes or hard peppermint candies Making the Peppermint Bark This recipe comes together in a few easy steps, mostly involving melting chocolate and letting it set. The key is to work relatively quickly once the chocolate is melted, especially when adding the crushed candy canes. Step 1: Prepare Your Baking Sheet Before you melt the chocolate, get your baking sheet ready. Line a large baking sheet (about 10×15 inches or similar) with parchment paper. You want the paper to cover the entire surface, with a little overhang on the sides, which will make it easier to lift the bark out later. Smooth out any wrinkles as much as possible. If you don’t have parchment paper, wax paper will work, but parchment is generally preferred as it’s less likely to stick. Step 2: Melt the Dark Chocolate Layer Now, let’s get started with the chocolate. You have a few options for melting. The microwave is fast: place the dark chocolate chips in a microwave-safe bowl and heat in 30-second intervals, stirring well after each, until almost completely melted. Stir until the residual heat finishes melting the chips. Alternatively, use a double boiler. Fill the bottom pot with about an inch of water and bring it to a gentle simmer. Place the dark chocolate chips in the top bowl, ensuring it doesn’t touch the water, and stir constantly until smooth and melted. Pour the melted dark chocolate onto the prepared baking sheet and spread it into a thin, even layer, about 1/8 to 1/4 inch thick. Use an offset spatula or the back of a spoon. Try to get the layer as uniform as possible for consistent thickness in the finished bark.

Peppermint Bark
Peppermint bark is one of those treats that just screams holiday season to me. The crisp snap of peppermint, the smooth sweetness of chocolate – it’s pure joy in every bite. Making it at home is surprisingly simple and incredibly rewarding, especially when you get to share it with loved ones or keep a stash all to yourself. This recipe uses just a few ingredients, but the result is a festive and delicious confection that rivals anything you’d buy in a shop.
Ingredients:
- 18 ounces dark chocolate chips (you can use semi-sweet or milk chocolate chips if you prefer a sweeter bark)
- 18 ounces white chocolate chips
- 1/2 cup crushed candy canes or hard peppermint candies
Making the Peppermint Bark
This recipe comes together in a few easy steps, mostly involving melting chocolate and letting it set. The key is to work relatively quickly once the chocolate is melted, especially when adding the crushed candy canes.
Step 1: Prepare Your Baking Sheet
Before you begin melting chocolate, get your baking sheet ready. Line a large baking sheet (about 10×15 inches or similar) with parchment paper. You want the paper to cover the entire surface, with a little overhang on the sides, which will make it easier to lift the bark out later. Smooth out any wrinkles as much as possible. If you don’t have parchment paper, wax paper will work, but parchment is generally preferred as it’s less likely to stick.
Step 2: Melt the Dark Chocolate Layer
Now, let’s get started with the chocolate. You have a couple of options for melting: a double boiler or the microwave. For the microwave method, place the 18 ounces of dark chocolate chips in a microwave-safe bowl. Heat on 50% power for 30-second intervals, stirring well after each interval. It’s important to use 50% power to prevent the chocolate from scorching. Keep stirring and microwaving until the chocolate is almost entirely melted, and then continue stirring until it’s completely smooth. If you prefer a double boiler, fill a saucepan with about an inch of water and bring it to a gentle simmer. Place the dark chocolate chips in a heatproof bowl that fits snugly over the saucepan without touching the water. Stir constantly until the chocolate is smooth and melted. Once the dark chocolate is melted and smooth, carefully pour it onto the prepared baking sheet. Use an offset spatula or the back of a spoon to spread it into an even layer, about 1/4 inch thick. Try to get it as uniform as possible for even thickness.
Step 3: Melt the White Chocolate Layer
Clean out the bowl you used for the dark chocolate or use a separate one. Place the 18 ounces of white chocolate chips in the bowl. White chocolate can be more sensitive to heat than dark chocolate, so it’s even more important to melt it gently. Use the same microwave method as the dark chocolate: 50% power in 30-second intervals, stirring after each. Be patient; white chocolate can take a little longer to melt fully. Stir until it’s smooth and glossy. If you’re using a double boiler, follow the same gentle heating process. Once melted, carefully spoon the white chocolate over the dark chocolate layer on the baking sheet. This time, you want to spread it out using your spatula, but don’t press too hard, as you don’t want to mix the layers too much. Aim for a nice, even coating over the dark chocolate.
Step 4: Add the Peppermint Crunch
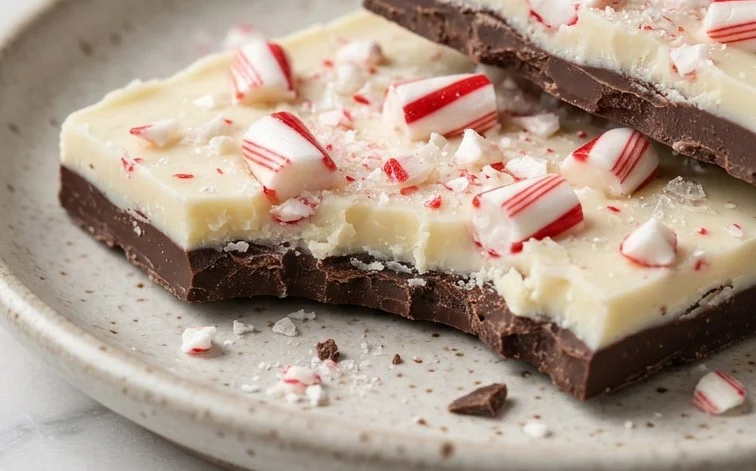
While both chocolate layers are still wet, it’s time to add that signature peppermint crunch. Quickly and evenly sprinkle the 1/2 cup of crushed candy canes or hard peppermint candies all over the white chocolate layer. The goal is to get them to stick before the chocolate starts to firm up. You can gently press them down with your hands if needed, but be careful not to disturb the chocolate layers too much. The crushed candy canes add a beautiful visual appeal and a delightful texture and flavor contrast to the smooth chocolate. For best results, ensure your candy canes are finely crushed; larger pieces might be too hard to bite into.
Step 5: Chill and Break
Now comes the hardest part: waiting! Carefully transfer the baking sheet to the refrigerator. Let the peppermint bark chill for at least 1 to 2 hours, or until it is completely firm and solid. You’ll know it’s ready when it’s hard to the touch and doesn’t bend at all. Once fully set, lift the parchment paper with the bark off the baking sheet. You can then break the bark into pieces by hand. The edges will naturally fracture, creating rustic, festive shapes. If you prefer more uniform pieces, you can use a sharp knife to carefully score or cut the bark into squares or rectangles before it fully hardens, but breaking it by hand is often more fun and easier.
Storing your peppermint bark is simple. Keep it in an airtight container at room temperature in a cool, dry place. If your kitchen tends to be warm, you might want to store it in the refrigerator to prevent it from melting, though the texture can become a bit firmer when chilled. This bark stays fresh for a couple of weeks, making it perfect for making ahead for parties or as edible gifts. You can also divide it into smaller bags or tins to give away. Enjoy this delightful homemade treat!
Conclusion:
This homemade peppermint bark is a fantastic holiday treat that brings a festive spirit to any gathering or a welcome indulgence for yourself. The simple combination of rich chocolate and cooling peppermint is a classic for a reason, and making it at home is incredibly satisfying. It’s a wonderful way to use up extra candy canes and spread some holiday cheer. The crisp snap of the bark and the smooth melt of the chocolate layers are sure to impress. You can easily adjust the sweetness by choosing milk, semi-sweet, or dark chocolate. For a fun variation, try adding a pinch of edible glitter or a swirl of green-tinted white chocolate for extra visual appeal. Store your finished peppermint bark in an airtight container at cool room temperature, or in the refrigerator if your kitchen tends to be warm, for up to two weeks. It makes a thoughtful edible gift for neighbors, friends, and family. Don’t be afraid to experiment and make this peppermint bark recipe your own!
Frequently Asked Questions
Can I use different types of chocolate?
Yes, absolutely! While the recipe calls for dark and white chocolate, feel free to substitute semi-sweet or milk chocolate for either layer, or use a combination. Just ensure you melt them carefully to avoid scorching.
How do I get clean breaks in the peppermint bark?
Once the bark is fully set and chilled, you can score it with a sharp knife to create neater pieces. Alternatively, simply break it apart with your hands for a more rustic look. For very clean breaks, ensure the chocolate is completely hardened and you use a firm, quick motion.
What if I don’t have candy canes?
Hard peppermint candies work just as well. You can crush them in a zip-top bag with a rolling pin or use a food processor for a finer texture. Other hard candies with similar flavors could also be used for a unique twist.
Peppermint Bark Recipe
A simple and festive peppermint bark recipe perfect for the holidays.
Ingredients
-
18 ounces dark chocolate chips
-
18 ounces white chocolate chips
-
1/2 cup crushed candy canes
-
1/4 teaspoon peppermint extract (for white chocolate)
-
1/4 teaspoon vanilla extract (for dark chocolate)
Instructions
-
Step 1
Line a baking sheet with parchment paper. -
Step 2
Melt the dark chocolate chips. You can do this in a microwave-safe bowl in 30-second intervals, stirring between each, or over a double boiler. -
Step 3
Stir in the vanilla extract into the melted dark chocolate. Spread the dark chocolate evenly onto the prepared baking sheet. -
Step 4
Melt the white chocolate chips using the same method as the dark chocolate. Stir in the peppermint extract. -
Step 5
Pour the melted white chocolate over the dark chocolate layer. Swirl gently with a toothpick or knife to create a marbled effect, if desired. -
Step 6
Immediately sprinkle the crushed candy canes evenly over the white chocolate layer before it sets. -
Step 7
Let the peppermint bark set completely at room temperature or in the refrigerator for about 1 hour, or until firm. -
Step 8
Once set, break the peppermint bark into pieces.
Important Information
Nutrition Facts (Per Serving)
It is important to consider this information as approximate and not to use it as definitive health advice.
Allergy Information
Please check ingredients for potential allergens and consult a health professional if in doubt.


Leave a Comment