
There’s something undeniably classic and satisfying about a homemade caramel apple. The tartness of the Granny Smith apple cuts through the rich, sweet caramel beautifully, and the crisp bite is just perfect. While they might seem fancy, making them at home is surprisingly straightforward, and you can customize them with all your favorite toppings. This recipe focuses on simplicity, ensuring you get that perfect gooey caramel coating without a fuss. We’re using readily available ingredients, and the process is designed to be forgiving, even if you’ve never made them before.
Preparing the Apples
The foundation of a great caramel apple is the apple itself. For this recipe, we’re using seven small Granny Smith apples. Their firm texture and tart flavor are ideal because they hold up well to the caramel and provide a wonderful contrast to the sweetness. You’ll want to wash them thoroughly under cool water to remove any waxy coating that can prevent the caramel from adhering properly. Then, it’s important to dry them completely. Any moisture will also make it difficult for the caramel to stick, leading to a messy, less-than-perfect coating. Once dry, insert a sturdy wooden craft stick or lollipop stick firmly into the stem end of each apple. Push it in about halfway, ensuring it’s secure enough to hold the weight of the caramel without wobbling.
Melting the Caramels
Now for the caramel itself. You’ll need about 15 ounces of caramels, like the chewy kind from Werther’s Original. Unwrap them first; this is a step that takes a little time but is worth doing ahead of time. You’ll melt these in a double boiler or a heatproof bowl set over a saucepan of simmering water. Add 3 tablespoons of heavy cream. The cream is key to getting a smooth, dip-able consistency. Stir gently and continuously as the caramels melt. You want it to be completely smooth, with no lumps. This usually takes about 8-10 minutes. Avoid overheating, which can make the caramel tough and difficult to work with. Once it’s smooth and luscious, remove the bowl from the heat.
Dipping and Decorating
With the caramel melted and apples prepped, it’s time to assemble. Hold an apple by its stick and dip it into the warm caramel, rotating it to coat as much of the apple as you like. Leave a little space at the top near the stick. You can use a spoon to help smooth out any thin spots or drips if you prefer. Immediately after dipping, if you’re adding toppings, sprinkle them on while the caramel is still wet so they stick. Popular choices include chopped peanuts, sprinkles, mini chocolate chips, or even crushed pretzels for a sweet and salty kick. Place the finished caramel apples on a baking sheet lined with parchment paper or wax paper. This prevents them from sticking as they cool and harden.
Cooling and Serving
Let the caramel apples cool completely at room temperature for at least 30 minutes, or until the caramel has set. If your kitchen is very warm, you might want to pop them in the refrigerator for a bit to speed things up, but letting them set at room temperature helps the caramel retain a better texture. Once set, they are ready to enjoy. These homemade caramel apples are best eaten within a couple of days. Store any leftovers loosely covered at room temperature. If you chill them for too long, the apple can become mealy and the caramel might crack when bitten.

Ingredients:
- 7 small Granny Smith apples (about 2 1/4 lbs)
- 15 oz. caramels (such as Werther’s Chewy)
- 3 Tbsp heavy cream
- Various toppings, optional (see notes())
Easy Caramel Apples
There’s something undeniably classic and satisfying about a homemade caramel apple. The tartness of the Granny Smith apple cuts through the rich, sweet caramel beautifully, and the crisp bite is just perfect. While they might seem fancy, making them at home is surprisingly straightforward, and you can customize them with all your favorite toppings. This recipe focuses on simplicity, ensuring you get that perfect gooey caramel coating without a fuss. We’re using readily available ingredients, and the process is designed to be forgiving, even if you’ve never made them before.
Preparing the Apples
The foundation of a great caramel apple is the apple itself. For this recipe, we’re using seven small Granny Smith apples. Their firm texture and tart flavor are ideal because they hold up well to the caramel and provide a wonderful contrast to the sweetness. You’ll want to wash them thoroughly under cool water to remove any waxy coating that can prevent the caramel from adhering properly. Then, it’s important to dry them completely. Any moisture will also make it difficult for the caramel to stick, leading to a messy, less-than-perfect coating. Once dry, insert a sturdy wooden craft stick or lollipop stick firmly into the stem end of each apple. Push it in about halfway, ensuring it’s secure enough to hold the weight of the apple and caramel. If the stem is large, you might need to wiggle the stick a bit to get it to go in fully. Having the sticks in place before you start melting the caramel means you’ll be ready to dip immediately, which is key for getting a smooth coating.
Melting the Caramel
This is where the magic happens. We need 15 ounces of caramels. Using chewy caramels, like Werther’s, is highly recommended because they melt down into a wonderfully smooth and pliable coating. Unwrap all of your caramels and place them in a medium-sized, heavy-bottomed saucepan. A heavy bottom prevents the caramel from scorching. Add 3 tablespoons of heavy cream to the caramels. The cream is essential for achieving that luscious, dippable consistency. It adds richness and helps create a silkier caramel that will coat the apples beautifully without becoming too stiff. Place the saucepan over low to medium-low heat. You need to melt the caramels gently. Stir frequently, using a heatproof spatula or wooden spoon, making sure to scrape the bottom and sides of the pan to prevent any sticking or burning. Be patient; this process can take about 10-15 minutes. You’re looking for the caramels to be completely melted and smooth, with no lumps. The mixture should be thick but pourable. Once melted and smooth, remove the pan from the heat. It’s important to let the caramel sit for just a minute or two before dipping; this allows it to cool slightly so it’s not scalding hot but still fluid enough to coat well.
Dipping and Coating
Now for the fun part: dipping the apples! Have your prepared apples standing upright, ready to go. Make sure your toppings are spread out on parchment paper or baking sheets if you’re using them. Carefully tilt the saucepan so the caramel is easy to access. Holding an apple by its stick, tilt it into the melted caramel. Gently twist and turn the apple, allowing the caramel to coat the entire surface. You want a good, even layer, but you don’t want it so thick that it drips excessively. Aim to dip about two-thirds to three-quarters of the way up the apple, leaving some of the red skin showing. Once coated, lift the apple out of the caramel and let any excess drip back into the pan for a few seconds. This is a good time to be mindful of the consistency of the caramel. If it seems too thick to coat properly, you can return the pan to very low heat for a moment, stirring constantly, to loosen it up again. Conversely, if it’s too thin, you might have let it get too hot, and you’ll need to let it cool for a bit longer before proceeding. Don’t be discouraged if your first one isn’t perfect; you’ll get the hang of it quickly!
Adding Toppings
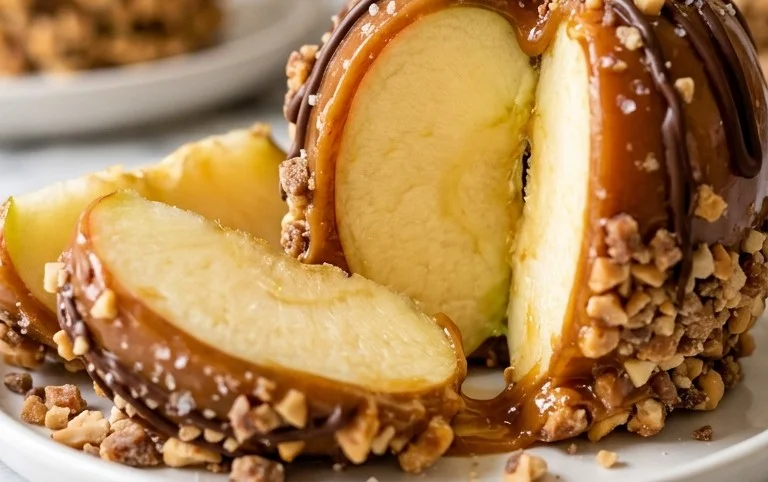
Immediately after dipping each apple, and while the caramel is still warm and sticky, is the time to add your toppings. If you’re using chopped nuts, sprinkles, mini chocolate chips, or crushed cookies, hold the caramel apple over your prepared topping station and gently press the toppings onto the caramel surface. You can roll the bottom of the apple in the toppings, or simply sprinkle them on. Some people like a classic drizzle of melted chocolate over the caramel, which you can do by melting some chocolate chips with a teaspoon of oil or shortening and then drizzling it over the coated apples using a spoon or a piping bag. If you’re going for a more elaborate look, you can dip the caramel-coated apples into melted chocolate before adding other toppings. This is the stage where you can get really creative and make each apple unique.
Chilling and Serving
Once all your apples are dipped and topped, you need to let them set. Place the finished caramel apples upright on a baking sheet lined with parchment paper or wax paper. Make sure they have a little space between them so they don’t touch each other as they firm up. You can place these baking sheets in the refrigerator. They’ll need to chill for at least 30 minutes to an hour, or until the caramel is firm to the touch. Chilling helps the caramel set completely, so the apples are easy to handle and eat. Once they’ve set, your delicious homemade caramel apples are ready to be enjoyed! They are best eaten within a few days and should be stored in the refrigerator. If you’re giving them as gifts, wrap them individually in cellophane bags or plastic wrap once they are completely cooled and set to keep them fresh and prevent them from sticking to each other.
Conclusion:
Making your own caramel apples is a really rewarding project that tastes fantastic. The balance of the tart Granny Smith apple with that rich, gooey caramel is classic for a reason. Plus, the fun of adding your favorite toppings means everyone can have their perfect treat. They’re surprisingly simple to make, perfect for a fall gathering, Halloween, or just a fun weekend activity with family. Remember to start with good apples, melt the caramel slowly, and get those toppings on while the caramel is still warm.
Serving Suggestions:
Serve them on a platter for a festive dessert or wrap them individually for party favors. They’re great alongside a cup of hot apple cider. You can also slice them up after they’ve set for easier sharing, though they are most fun to eat whole.
Variations:
Feel free to experiment with different apple varieties like Honeycrisp or Fuji if you prefer a sweeter apple. For the caramel, consider adding a pinch of sea salt for salted caramel apples, or even a touch of cinnamon for a spiced caramel. Toppings are where you can really get creative: chopped nuts, mini chocolate chips, shredded coconut, crushed cookies, or even a drizzle of melted chocolate over the caramel.
FAQs:
Why aren’t my caramels sticking to the apples?
This usually happens if the apples weren’t washed and dried thoroughly, or if there was a waxy coating on them. Make sure your apples are completely dry and have had any wax removed.
Can I use store-bought caramel dip?
While you can, melting down unwrapped caramels with a little cream gives you the best texture and control. Store-bought dips can sometimes be too thin or too thick.
How should I store leftover caramel apples?
Store them loosely covered at room temperature for up to 2 days. Avoid the refrigerator if possible, as it can make the apple texture change and the caramel crack.
Easy Caramel Apples
Simple and delicious caramel apples perfect for a treat, with customizable toppings.
Ingredients
-
7 small granny smith apples ((about 2 1/4 lbs))
-
15 oz. caramels, (such as Werther’s Chewy*)
-
3 Tbsp heavy cream
-
7 lollipop sticks
-
Parchment paper
-
Optional toppings (e.g., chopped nuts, sprinkles, mini chocolate chips)
Instructions
-
Step 1
Wash and thoroughly dry the apples. Insert a lollipop stick firmly into the stem end of each apple. -
Step 2
Unwrap caramels and place them in a microwave-safe bowl with the heavy cream. Microwave on high for 1-2 minutes, stirring halfway through, until smooth and melted. -
Step 3
Line a baking sheet with parchment paper. -
Step 4
Dip each apple into the melted caramel, rotating to coat evenly. Allow excess caramel to drip back into the bowl. -
Step 5
Place coated apples onto the prepared baking sheet. If using toppings, sprinkle them over the caramel before it sets. -
Step 6
Refrigerate for at least 15-20 minutes, or until the caramel is firm.
Important Information
Nutrition Facts (Per Serving)
It is important to consider this information as approximate and not to use it as definitive health advice.
Allergy Information
Please check ingredients for potential allergens and consult a health professional if in doubt.



Leave a Comment