
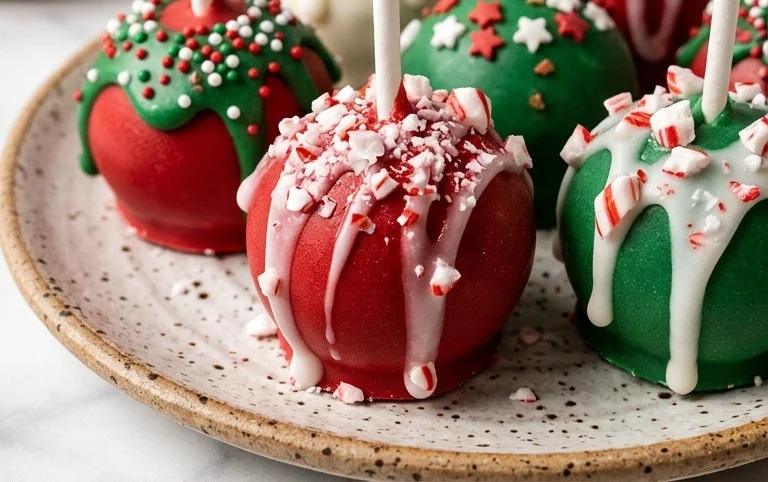
Festive Christmas Cake Pops start with the rich flavor of red velvet cake, a classic for holiday celebrations. They’re surprisingly simple to make, and the end result is a delightful, bite-sized treat that’s perfect for sharing or gifting. The key to their festive look is the colorful chocolate coating and cheerful sprinkles. Making these festive Christmas cake pops feels like bringing a little bit of edible magic to your holiday table. The combination of moist red velvet cake and creamy frosting, all dipped in a shell of smooth chocolate, is always a hit. Kids and adults alike adore these little gems. Plus, they are so customizable with different colored chocolates and a variety of sprinkles, making each batch unique.

Festive Christmas Cake Pops
These festive Christmas cake pops start with the rich flavor of red velvet cake, a classic for holiday celebrations. They’re surprisingly simple to make, and the end result is a delightful, bite-sized treat that’s perfect for sharing or gifting. The key to their festive look is the colorful chocolate coating and cheerful sprinkles.
Ingredients:
- Two 8-inch red velvet cake rounds
- 1 cup prepared vanilla frosting
- 3 12-ounce bags chocolate wafers, assorted colors (milk chocolate, dark chocolate, white chocolate are good choices)
- Vegetable shortening, as needed (about 1-2 tablespoons per bag of wafers)
- 30-40 wooden lollipop sticks
- Sprinkles and sanding sugar, assorted colors (think red, green, white, gold, silver)
Making the Cake Pop Mixture
The first step is to create the base for our cake pops. Take your two 8-inch red velvet cake rounds and crumble them into fine crumbs. You can do this by hand, or for a finer texture, you can pulse them gently in a food processor. Be careful not to over-process, or you’ll end up with a paste. You want them to resemble coarse breadcrumbs.
Next, add the 1 cup of prepared vanilla frosting to the cake crumbs. This frosting acts as the binder, holding the crumbs together. Start by adding about three-quarters of the frosting and mixing it in thoroughly with your hands or a sturdy spoon. The mixture should start to clump together, resembling a dough. If it feels too dry and won’t hold its shape when squeezed, add more frosting, a tablespoon at a time, until it reaches a pliable consistency. It shouldn’t be sticky, but it should stick together when you press it. This takes a bit of feel, so don’t be afraid to use your hands to really incorporate the frosting.
Forming and Chilling the Cake Pops
Once your cake mixture is ready, it’s time to form the cake balls. I like to use a small cookie scoop or a tablespoon to portion out the dough, aiming for balls that are about 1 inch in diameter. This size is perfect for a single bite and makes dipping easier. Roll each portion firmly between your palms to create smooth, round balls. Try to make them as uniform in size as possible so they cook evenly and look consistent.
Place the formed cake balls onto a baking sheet lined with parchment paper. Ensure they aren’t touching each other. Once all the cake balls are formed, place the baking sheet in the refrigerator for at least 30 minutes, or in the freezer for about 15 minutes. This chilling step is very important; it firms up the cake balls, making them much easier to dip and preventing them from falling apart. They should be firm to the touch but not frozen solid.
Melting and Coloring the Chocolate
While the cake balls are chilling, you can prepare your chocolate coatings. You’ll need to melt your chocolate wafers. A good way to do this is in a microwave-safe bowl in short intervals. Place one bag of chocolate wafers in a microwave-safe bowl, adding about 1 to 2 tablespoons of vegetable shortening. The shortening helps the chocolate melt smoothly and achieve a good dipping consistency. Microwave on 50% power for 30-second intervals, stirring well after each interval, until the chocolate is completely melted and smooth. Repeat this process for each bag of chocolate wafers, using different bowls for each color. If you prefer, you can also melt the chocolate using a double boiler method.
Dipping and Decorating the Cake Pops
Now for the fun part: decorating! Once the cake balls are chilled and firm, take them out of the refrigerator. Dip the end of a wooden lollipop stick about halfway into the melted chocolate, then insert it about halfway into a cake ball. This helps the cake ball adhere securely to the stick. If the cake ball feels too soft, a quick dip in melted chocolate on the stick can act like a glue.
After inserting the stick into several cake balls, let them sit for a minute to allow the chocolate on the stick to set slightly. Now, it’s time to dip the entire cake pop. Hold the stick and gently dip the cake ball into the melted chocolate, allowing any excess to drip back into the bowl. For a smooth coating, you might need to gently swirl the cake pop in the chocolate. Be patient; this can take a little practice. Once coated, hold the cake pop upright over the baking sheet with parchment paper and let the excess chocolate drip off.
Before the chocolate coating hardens, it’s time for the festive touches. Immediately after dipping, while the chocolate is still wet, generously apply your assorted sprinkles and sanding sugar. You can roll the wet cake pop in a small bowl of sprinkles or carefully sprinkle them on with your fingers. Get creative with color combinations! For instance, you could use red and green sprinkles for a traditional Christmas look, or silver and gold for a more elegant feel. Let the cake pops stand upright in a vase, a Styrofoam block, or even an egg carton to dry completely. Ensure they have enough space so the decorations don’t smudge. This dipping and decorating process will be repeated for all your cake balls, using your assorted chocolate colors.
Tips for Success and Storage
If your chocolate starts to thicken too much while you’re dipping, reheat it gently in the microwave for short bursts, stirring after each interval, and add a touch more shortening if needed. For sharper lines or more detailed designs, you can let the first layer of chocolate harden completely, then drizzle with a contrasting color of melted chocolate using a piping bag or a fork. Ensure all your decorating supplies, including sprinkles and sanding sugar, are ready to go before you start dipping, as the chocolate hardens quickly. Store your finished Christmas cake pops in an airtight container at room temperature for up to 3-4 days. If your kitchen is very warm, you might consider refrigerating them, but be aware that condensation can form on the chocolate coating when they come back to room temperature.
Conclusion:
These festive Christmas cake pops are a guaranteed hit for any holiday gathering. The combination of moist red velvet cake, creamy frosting, and a crisp chocolate shell makes them a joy to eat and to make. They’re perfect for adding a festive touch to your dessert table, as edible gifts for friends and family, or even as a fun activity to do with loved ones during the holiday season. Their bite-sized nature means people can enjoy a little bit of sweetness without overindulging, and they look so cheerful all lined up. Don’t be afraid to get creative with your decorations; the more colorful, the better!
Frequently Asked Questions:
Can I use a different flavor of cake?
Absolutely! While red velvet is classic for Christmas, you can use any cake flavor you like. Chocolate, vanilla, or even a spice cake would work wonderfully. Just ensure it’s baked and cooled completely before crumbling.
How do I store leftover cake pops?
Store your cake pops in an airtight container in the refrigerator for up to a week. It’s best to place them in a single layer or use parchment paper between layers to prevent the chocolate coating from sticking or smudging. Let them come to room temperature for about 15-20 minutes before serving for the best texture.
My chocolate is too thick when melting, what can I do?
If your chocolate wafers are too thick, add a small amount of vegetable shortening, about a teaspoon at a time, while melting. Stir until smooth. The shortening helps to thin out the chocolate, making it easier to dip the cake pops and achieve a smooth coating.
Festive Christmas Cake Pops
Delightful red velvet cake pops decorated for the holidays with colorful chocolate coatings and festive sprinkles.
Ingredients
-
Two 8-inch red velvet cake rounds
-
1 cup prepared vanilla frosting
-
3 12-ounce bags chocolate wafers, assorted colors
-
Vegetable shortening, as needed
-
30-40 wooden lollipop sticks
-
Sprinkles and sanding sugar, assorted colors
Instructions
-
Step 1
Crumble the red velvet cake rounds into a large bowl. Add the vanilla frosting and mix until well combined and the mixture holds its shape. -
Step 2
Roll the cake mixture into 1-inch balls and place them on a parchment-lined baking sheet. Chill in the refrigerator for at least 15 minutes. -
Step 3
Melt the chocolate wafers according to package directions, adding a small amount of vegetable shortening if needed to achieve a smooth consistency. Use assorted colors for variety. -
Step 4
Dip the end of a lollipop stick into melted chocolate, then insert it about halfway into a chilled cake ball. Repeat for all cake balls. -
Step 5
Dip each cake pop into the melted chocolate, ensuring it’s fully coated. Let excess chocolate drip off. -
Step 6
While the chocolate is still wet, decorate the cake pops with assorted sprinkles and sanding sugar. Place the decorated cake pops upright in a holder or vase to set. -
Step 7
Allow the cake pops to fully set at room temperature or in the refrigerator before serving.
Important Information
Nutrition Facts (Per Serving)
It is important to consider this information as approximate and not to use it as definitive health advice.
Allergy Information
Please check ingredients for potential allergens and consult a health professional if in doubt.

Leave a Comment