
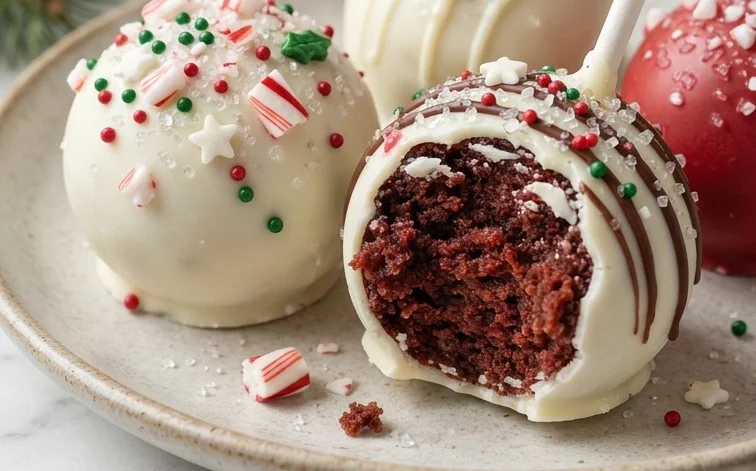
These little red velvet cake pops are a fantastic addition to any holiday gathering. The vibrant red color is perfect for Christmas, and they’re surprisingly simple to make once you get the hang of it. Kids and adults alike love them, and they’re small enough to enjoy without feeling too guilty. I like to make a big batch and have them ready for unexpected visitors during the festive season. They’re also great for cookie exchanges or as a cute edible gift. Making Festive Christmas Cake Pops is a fun activity for the whole family. You can get creative with decorations, using various sprinkles and sanding sugars to make each pop unique. The combination of moist red velvet cake and creamy frosting, all coated in chocolate, creates a delightful bite. They hold their shape well, making them perfect for transport and gifting.

Festive Christmas Cake Pops
These little red velvet cake pops are a fantastic addition to any holiday gathering. The vibrant red color is perfect for Christmas, and they’re surprisingly simple to make once you get the hang of it. Kids and adults alike love them, and they’re small enough to enjoy without feeling too guilty. I like to make a big batch and have them ready for unexpected visitors during the festive season. They’re also great for cookie exchanges or as a cute edible gift.
Ingredients:
- Two 8-inch red velvet cake rounds
- 1 cup prepared vanilla frosting
- 3 12-ounce bags chocolate wafers, assorted colors (this usually includes white, milk, and dark chocolate flavors)
- Vegetable shortening, as needed (this helps thin the melted chocolate for easier dipping)
- 30-40 wooden lollipop sticks
- Sprinkles and sanding sugar, assorted colors (look for festive reds, greens, golds, and silvers)
Making the Cake Pop Mixture
The first step is to create the base for your cake pops. You’ll need to crumble your red velvet cake rounds into fine crumbs. The easiest way to do this is to use your hands. Place the cake rounds in a large bowl and gently break them apart. Then, using your fingertips, rub the cake between your hands to break it down into a fine crumb texture. You don’t want any large chunks left. Once you have a bowl full of fine red velvet crumbs, it’s time to add the binder: the vanilla frosting. Add the cup of prepared vanilla frosting to the cake crumbs. Now, you’ll mix the frosting and cake crumbs together thoroughly. Use a sturdy spoon or your hands to really combine everything. You want the mixture to be moist enough to hold together when you squeeze it, but not so wet that it becomes sticky or gooey. It should feel like a slightly damp dough.
Forming the Cake Pops
Once your cake and frosting mixture is well combined and has the right consistency, you can start forming the cake pops. Scoop about a tablespoon of the mixture and roll it into a firm ball between your palms. Aim for a consistent size for each ball, about 1 inch in diameter. If the mixture feels too dry and crumbly, you can add a tiny bit more frosting, just a teaspoon at a time, until it holds together. If it feels too wet, you can add a few more cake crumbs. Place the formed balls onto a baking sheet lined with parchment paper. This prevents them from sticking. It’s a good idea to chill these balls before dipping. Place the baking sheet with the cake balls into the refrigerator for about 15-20 minutes. This helps them firm up, making them easier to handle and preventing them from falling apart when you dip them in chocolate.
Melting the Chocolate and Dipping
While the cake balls are chilling, you can prepare your chocolate coating. You’ll need to melt the chocolate wafers. The best method is to use a microwave or a double boiler. If using a microwave, place the chocolate wafers in a microwave-safe bowl and heat in 30-second intervals, stirring well after each interval. Be patient; melted chocolate can scorch easily. You’re looking for a smooth, pourable consistency. To achieve this, you’ll likely need to add a bit of vegetable shortening. For every bag of chocolate wafers, I usually add about 1 to 2 tablespoons of shortening. Stir it in until the chocolate is completely smooth and has a nice sheen. If using a double boiler, fill the bottom pot with about an inch of water and bring it to a simmer. Place the chocolate wafers and shortening in the top bowl, ensuring the bottom of the bowl doesn’t touch the water. Stir constantly until melted and smooth. Keep the melted chocolate warm over the low heat, stirring occasionally.
Now, it’s time for the fun part: dipping! Take the chilled cake balls out of the refrigerator. Dip the end of a wooden lollipop stick into the melted chocolate, then insert it about halfway into a cake ball. This little bit of chocolate acts as glue, helping the stick adhere securely. Let the excess chocolate drip off the stick. Then, carefully dip the entire cake ball into the melted chocolate. You might need to gently rotate the cake pop to ensure it’s fully coated. Use a spoon or a spatula to help spread the chocolate if needed. Once coated, lift the cake pop out of the chocolate and let the excess drip back into the bowl. You can gently tap the stick on the rim of the bowl to help remove excess chocolate. Be careful not to knock the cake pop off the stick!
Decorating the Christmas Cake Pops
Before the chocolate coating sets, it’s time to add your festive decorations. This is where you can really get creative with your Christmas theme. You have a few options for decorating. You can immediately roll the wet chocolate in sprinkles or sanding sugar. Hold the cake pop over a small bowl filled with your chosen sprinkles or sugar and gently roll it around until it’s covered to your liking. Alternatively, you can use a piping bag with a small tip to drizzle contrasting colored melted chocolate over the dipped cake pops for an added decorative effect. If you want to create swirls or patterns, do this while the initial chocolate coating is still wet. You can also add more sprinkles on top of the drizzles. If you miss the window for decorating and the chocolate hardens, you can always melt a little more chocolate and use it as “glue” to stick on more decorations, or just add a few more drizzles.
Finishing and Storing Your Cake Pops
Once decorated, place the finished cake pops back onto the parchment-lined baking sheet. You’ll want to let them set completely. You can leave them at room temperature for this, which usually takes about 30 minutes to an hour depending on the thickness of your chocolate coating and the room temperature. If you’re in a hurry, you can speed this up by placing the baking sheet in the refrigerator for about 10-15 minutes, but be mindful that very cold temperatures can sometimes cause condensation on the chocolate, making it look cloudy. Once they are firm and the chocolate has hardened, your festive Christmas cake pops are ready to be displayed or packaged. You can store them in an airtight container at room temperature for up to 3-4 days. If your kitchen is particularly warm, or if you’ve used a frosting that needs refrigeration, it’s best to store them in the refrigerator. Just be sure to let them come to room temperature for about 15-20 minutes before serving for the best flavor and texture.
Conclusion:
Making these Festive Christmas Cake Pops is truly a rewarding experience. They look so professional, but the process is straightforward once you get the hang of it. The joy on people’s faces when they see or taste these little treats is the best part. They are a wonderful way to bring some extra cheer to your holiday celebrations, a sweet bite that everyone enjoys. The texture of the cake mixed with frosting is moist and satisfying, and the chocolate coating adds a lovely crunch. You can prepare them a day or two in advance, which is a lifesaver during the busy Christmas period. Consider adding a touch of edible glitter for an extra sparkle. They are also fantastic for a Christmas party buffet or as part of a homemade gift basket for friends and family. Don’t be afraid to experiment with different cake flavors or frosting types for future batches, but this classic red velvet is hard to beat for the holidays.
Frequently Asked Questions:
Can I make cake pops with store-bought cake mix?
Yes, absolutely. You can bake your favorite cake mix according to package directions, let it cool completely, and then proceed with crumbling it for the cake pops. Ensure it’s a flavor that complements the frosting, like vanilla or a complementary chocolate.
How do I store leftover cake pops?
Store them in an airtight container at room temperature for up to 3 days. If your kitchen is very warm, or if you’ve used a frosting that requires refrigeration, it’s best to store them in the refrigerator. Let them come to room temperature for about 15-20 minutes before serving for the best texture.
My chocolate is too thick to dip the cake pops. What should I do?
This is where vegetable shortening comes in handy. Add a teaspoon of shortening to your melted chocolate wafers at a time and stir until the mixture reaches a smooth, dippable consistency. The shortening helps to thin the chocolate without altering its flavor significantly.
Festive Christmas Cake Pops
Delightful and festive cake pops perfect for holiday celebrations, featuring a rich red velvet base coated in colorful chocolate.
Ingredients
-
Two 8-inch red velvet cake rounds
-
1 cup prepared vanilla frosting
-
3 12-ounce bags chocolate wafers, assorted colors
-
Vegetable shortening, as needed
-
30-40 wooden lollipop sticks
-
Sprinkles and sanding sugar, assorted colors
Instructions
-
Step 1
Crumble the red velvet cake rounds into a large bowl. Mix in the vanilla frosting until well combined and the mixture holds together when squeezed. -
Step 2
Roll the cake mixture into 1-inch balls. Place them on a baking sheet lined with parchment paper. -
Step 3
Melt the chocolate wafers in separate bowls according to package directions. Add a small amount of vegetable shortening to help thin the chocolate for dipping, if necessary. -
Step 4
Dip the tip of a lollipop stick into melted chocolate and then insert it into the bottom of a cake ball, about halfway. -
Step 5
Dip the entire cake ball into the melted chocolate, coating it evenly. Gently tap off any excess chocolate. -
Step 6
Immediately decorate the wet chocolate with assorted sprinkles and sanding sugar. Place the decorated cake pop back onto the parchment-lined baking sheet to set. -
Step 7
Allow the cake pops to harden completely before serving or storing.
Important Information
Nutrition Facts (Per Serving)
It is important to consider this information as approximate and not to use it as definitive health advice.
Allergy Information
Please check ingredients for potential allergens and consult a health professional if in doubt.


Leave a Comment