
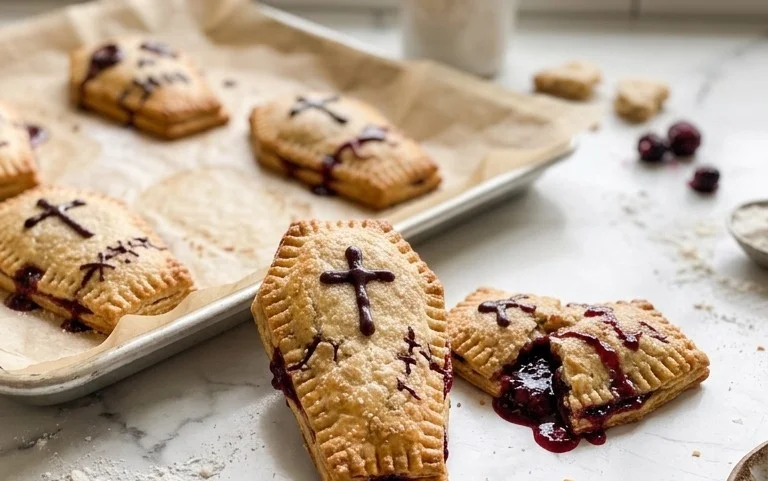
Coffin Pop Tarts have a flaky, golden crust filled with sweet jelly and topped with vanilla frosting. They’re a fun, spooky treat that comes together quickly, making them a great project for kids or a last-minute addition to any Halloween party. Using store-bought pie crust means you don’t have to worry about making dough from scratch, so you can focus on the fun part: shaping and decorating. The contrast between the buttery pastry and the sweet filling is classic, and the coffin shape adds a playful, festive touch. These little tarts bake up in no time, offering a delightful homemade feel without a lot of fuss. They’re perfect for an afternoon baking session or a quick Halloween dessert.
Preparing the Pie Crust
The first step is to get our pie crust ready. You’ll need two cans of refrigerated pie crust. Gently unroll each one on a lightly floured surface. It’s important not to overwork the dough, as this can make it tough. We want that lovely flaky texture, so just handle it enough to unroll it. Now, we need to cut out our coffin shapes. You can use a cookie cutter if you have a coffin-shaped one, which makes this super easy. If you don’t have a special cutter, don’t worry! You can freehand it with a knife. A simple coffin shape is like a rectangle with rounded corners at the bottom and a slightly wider, often straight-edged top. Aim for pieces that are roughly the size of a standard Pop Tart, maybe about 3.5 to 4 inches wide and 5 to 6 inches long. You’ll need pairs of these: one for the bottom and one for the top. For each Coffin Pop Tart, cut out two identical coffin shapes from the pie crust dough. Place one shape on a baking sheet lined with parchment paper. This will be your bottom crust.
Ingredients:
- Refrigerated pie crust (I used Pillsbury. Find it in the refrigerated section)
- Jelly (or jam, any flavor)
- Vanilla frosting
- Optional: Sprinkles for decoration
Coffin Pop Tarts
These Coffin Pop Tarts are perfect for a spooky treat, a fun Halloween project, or just whenever you want a cute, bite-sized dessert that’s easy to make. We’re starting with store-bought pie crust, which makes this recipe incredibly simple and accessible. The combination of flaky pastry, sweet jelly, and creamy vanilla frosting is a classic for a reason, and shaping them like little coffins adds a fun twist that everyone will love. They bake up quickly, making them ideal for an afternoon baking session or a last-minute party contribution.
Preparing the Pie Crust
The first step is to get our pie crust ready. You’ll need two cans of refrigerated pie crust. Gently unroll each one on a lightly floured surface. It’s important not to overwork the dough, as this can make it tough. We want that lovely flaky texture, so just handle it enough to unroll it.
Now, we need to cut out our coffin shapes. You can use a cookie cutter if you have a coffin-shaped one, which makes this super easy. If you don’t have a special cutter, don’t worry! You can freehand it with a knife. A simple coffin shape is like a rectangle with rounded corners at the bottom and a slightly wider, often straight-edged top. Aim for pieces that are roughly the size of a standard Pop Tart, maybe about 3.5 to 4 inches wide and 5 to 6 inches tall. You’ll need to cut out an equal number of top and bottom pieces, so if you want to make 6 pop tarts, cut out 12 shapes. I find it easiest to cut out a batch of the bottom pieces first, then use the remaining dough to cut out the top pieces.
Assembling the Coffin Pop Tarts
Once you have your coffin shapes, it’s time to assemble them. Lay out half of your coffin shapes on a baking sheet lined with parchment paper. These will be the bottoms of our Pop Tarts. Now, for the filling. We’re using jelly, but your favorite jam or even a fruit preserve works beautifully. Spoon about 1 to 2 tablespoons of jelly onto the center of each bottom coffin piece. Be careful not to overfill, as the jelly can ooze out during baking. Leave a small border around the edges, about half an inch, to allow for sealing. If you’re using a runnier jelly, you might want to stick to 1 tablespoon. If your jam is thicker, you can use a little more.
After filling, place the remaining coffin shapes on top of the filled ones. Now, for the crucial sealing step. Use the tines of a fork to press down around the edges of each Pop Tart. This not only creates a decorative edge but, more importantly, seals the jelly inside. Make sure you press firmly all the way around to prevent any leaks. You can also go over the edges with your fingers to ensure a good seal. If the dough gets too warm and sticky while you’re working, pop the baking sheet into the refrigerator for about 10 minutes. This will firm up the dough and make it easier to handle.
Baking the Coffin Pop Tarts
Preheat your oven to 375 degrees Fahrenheit (190 degrees Celsius). This temperature is ideal for baking pie crust, ensuring it gets golden brown and flaky without burning too quickly. Place the baking sheet with your assembled coffin Pop Tarts into the preheated oven.
Bake for about 15 to 20 minutes, or until the crust is golden brown and the jelly is bubbling slightly through any small vents you might have made. If you want to create small vents on the top crusts to allow steam to escape, you can do so with a small knife before baking. This helps prevent the crust from puffing up too much. Keep an eye on them towards the end of the baking time; ovens can vary, and you want a nice golden color, not dark brown.
Decorating Your Coffin Pop Tarts
Once they are baked to perfection, carefully remove the baking sheet from the oven. Let the coffin Pop Tarts cool on the baking sheet for about 5 to 10 minutes. This allows them to set up slightly and makes them easier to transfer. Then, move them to a wire rack to cool completely. It’s really important they cool down sufficiently before you start decorating. If they’re too hot, the frosting will just melt off.
When they’re cool enough to handle, it’s time for the fun part – decorating! You’ll need vanilla frosting. You can use store-bought vanilla frosting straight from the container, or you can whip up your own. If you’re using store-bought, it might be a bit stiff, so you can warm it slightly in the microwave for about 10-15 seconds, or stir in a teaspoon of milk or melted butter to make it more spreadable. Spread a generous layer of frosting over the top of each cooled coffin Pop Tart. Get it right to the edges.
If you want to add extra flair, this is where sprinkles come in! While the frosting is still wet, sprinkle your coffin Pop Tarts with your favorite sprinkles. Halloween-themed sprinkles, colored sugars, or even just plain jimmies work wonderfully. You can create patterns, cover them completely, or just add a few strategically placed sprinkles. Let the frosting set for a bit before serving.
Tips and Variations
If you want to try different flavors, feel free to experiment with the jelly or jam. Strawberry, raspberry, apricot, or even a dark cherry jam would be delicious. For a richer flavor, you could try a chocolate frosting instead of vanilla, or even a cream cheese frosting. You could also add a pinch of cinnamon to the pie crust dough before baking for a little extra warmth. If you’re feeling extra ambitious, you could even try making your own pie crust from scratch. However, using the refrigerated kind is perfectly fine and makes this a quick and easy project. Store any leftover Coffin Pop Tarts in an airtight container at room temperature for up to 3 days. They are best enjoyed fresh, though.
Conclusion:
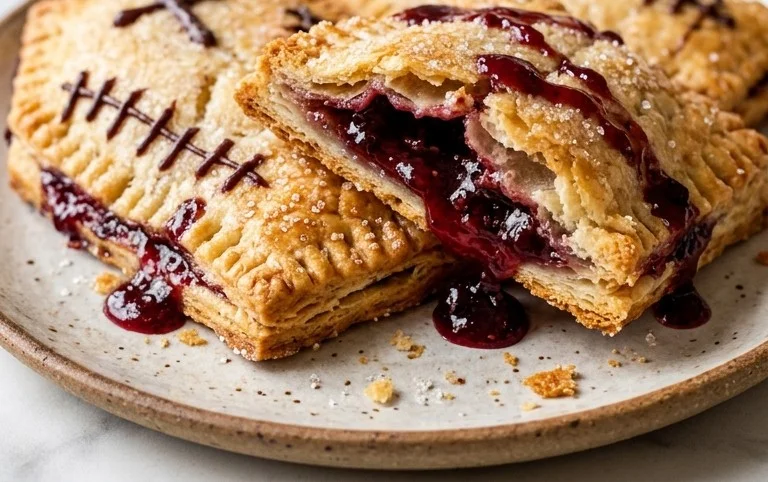
These Coffin Pop Tarts are a wonderfully spooky and simple way to get into the Halloween spirit. The combination of buttery, flaky pie crust, sweet jelly, and creamy frosting is a winner every time. They’re surprisingly quick to make, especially with refrigerated dough, which means more time for decorating and enjoying them. Whether you’re baking with kids, bringing them to a potluck, or just want a fun treat for yourself, these coffin-shaped delights are sure to be a hit. Don’t be afraid to get creative with your jelly flavors and frosting designs to make them uniquely yours.
Frequently Asked Questions:
Can I make the pie crust from scratch?
Yes, you absolutely can make your own pie crust dough from scratch if you prefer. Just ensure it’s rolled out to about 1/8 inch thickness, similar to store-bought refrigerated crust, so it bakes up properly without becoming too dense or too thin. You’ll still need enough dough for about 8-10 pairs of coffin shapes.
What kind of jelly works best?
Any thick jelly or jam will work well. Strawberry, raspberry, and grape are classic choices. For a truly spooky look, consider a darker jam like blackberry or blackcurrant. Make sure your jelly isn’t too runny, or it might bubble out of the tarts during baking. About 1 to 1.5 tablespoons per tart is usually a good amount.
How should I store leftover Coffin Pop Tarts?
Store any leftover Coffin Pop Tarts in an airtight container at room temperature for up to 2 days. If you’ve used a very thin frosting or the weather is warm, you might want to store them in the refrigerator to prevent the frosting from melting, though this can sometimes make the crust a bit less flaky.
Coffin Pop Tarts
Spooky and delicious coffin-shaped tarts perfect for Halloween or any themed party. These are a fun twist on classic Pop Tarts.
Ingredients
-
2 refrigerated pie crusts (Pillsbury recommended)
-
1/2 cup jelly (any flavor)
-
1/2 cup vanilla frosting
-
1 tablespoon milk
-
1/4 cup sprinkles (optional, for decorating)
Instructions
-
Step 1
Preheat your oven to 400°F (200°C). Line a baking sheet with parchment paper. -
Step 2
Unroll the refrigerated pie crusts. Use a coffin-shaped cookie cutter (or cut freehand) to cut out 16 coffin shapes from the dough. -
Step 3
Place 8 coffin shapes on the prepared baking sheet. Spoon about 1 tablespoon of jelly onto the center of each, leaving a small border around the edges. -
Step 4
Place the remaining 8 coffin shapes on top of the filled ones. Crimp the edges with a fork to seal them completely, ensuring no jelly can escape during baking. -
Step 5
Bake for 12-15 minutes, or until the crust is golden brown and the filling is bubbly. -
Step 6
Let the coffin pop tarts cool completely on a wire rack. This is important for the frosting to set properly. -
Step 7
In a small bowl, whisk together the vanilla frosting and milk until smooth and spreadable. If it’s too thick, add a tiny bit more milk; if too thin, add a little more frosting. -
Step 8
Spread the frosting evenly over the cooled coffin pop tarts. Decorate with sprinkles if desired before the frosting sets.
Important Information
Nutrition Facts (Per Serving)
It is important to consider this information as approximate and not to use it as definitive health advice.
Allergy Information
Please check ingredients for potential allergens and consult a health professional if in doubt.


Leave a Comment