
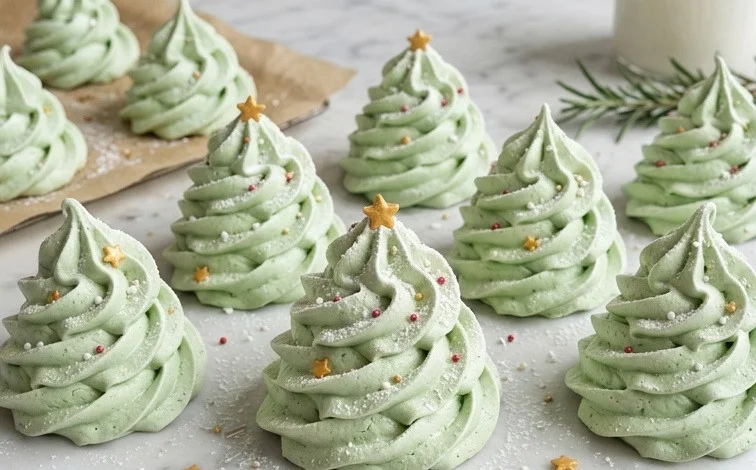
Meringue Christmas Trees bring a touch of frosted magic to any holiday gathering. These delicate, airy treats have a satisfying crispness that dissolves on the tongue, making them a favorite for both children and adults during the festive season. Their bright green color and tree shape make them charming decorations for your dessert table or even as edible ornaments on your actual Christmas tree. The key to achieving these delightful Meringue Christmas Trees lies in creating a stable meringue and patiently baking them at a low temperature until they are completely dry and crisp. This recipe guides you through the simple steps to ensure your trees are light, airy, and hold their festive shape.
Ingredients:
- 2 large egg whites (room temperature)
- 1/4 teaspoon cream of tartar
- 100 g granulated sugar
- green gel food colouring
- sprinkles
Instructions:
Preparing Your Equipment and Egg Whites
This step is all about setting yourself up for success. Make sure your mixing bowl and whisk attachment are impeccably clean and completely free of any grease. Even a tiny bit of oil can prevent your egg whites from whipping up properly. It’s also important that your egg whites are at room temperature. Cold egg whites don’t incorporate as much air as room-temperature ones, meaning your meringue won’t be as voluminous or stable. To separate your eggs, do it carefully, ensuring no yolk gets into the whites. Place the two room-temperature egg whites into your clean mixing bowl. Add the 1/4 teaspoon of cream of tartar. Cream of tartar is an acid that helps to stabilize the egg whites, making them whip up better and creating a stronger meringue structure that’s less likely to weep or collapse.
Whipping the Meringue
Now, let’s whip those egg whites. Start whisking on a medium speed. Gradually add the granulated sugar, a tablespoon at a time, while the mixer is still running. Continue to whisk until the meringue is thick, glossy, and holds stiff peaks. This means when you lift the whisk, the meringue stands straight up without curling over. It should feel smooth and look like shiny white clouds.
Meringue Christmas Trees
These delicate Meringue Christmas Trees are a wonderfully festive and surprisingly simple treat to make. They have a crisp, airy texture that melts in your mouth, and the bright green color makes them a charming addition to any holiday dessert table or even as edible tree decorations. The secret to their success lies in achieving stiff, glossy meringue and baking them at a low temperature to dry them out.
Ingredients:
- 2 large egg whites (room temperature)
- 1/4 teaspoon cream of tartar
- 100 g granulated sugar
- green gel food colouring
- sprinkles
Instructions:
-
Preparing Your Equipment and Egg Whites
This step is all about setting yourself up for success. Make sure your mixing bowl and whisk attachment are impeccably clean and completely free of any grease. Even a tiny bit of oil can prevent your egg whites from whipping up properly. It’s also important that your egg whites are at room temperature. Cold egg whites don’t incorporate as much air as room-temperature ones, meaning your meringue won’t be as voluminous or stable. To separate your eggs, do it carefully, ensuring no yolk gets into the whites. Place the two room-temperature egg whites into your clean mixing bowl. Add the 1/4 teaspoon of cream of tartar. Cream of tartar is an acid that helps to stabilize the egg whites, making them whip up better and creating a stronger meringue structure that’s less likely to weep or collapse.
-
Whipping the Meringue
Now, let’s whip those egg whites. Start whisking on a medium speed. You’ll see them begin to foam up. Keep whisking until soft peaks form – this means when you lift the whisk, the peaks curl over on themselves. At this stage, it’s time to gradually add the sugar. Add the 100 g of granulated sugar a tablespoon at a time, while the mixer is still running on medium speed. It’s crucial to add it slowly; this allows the sugar to dissolve properly into the egg whites, creating a smooth and glossy meringue. If you add it too quickly, the sugar granules might not dissolve, leading to a gritty meringue. Continue whisking after all the sugar has been added. Increase the mixer speed to high and whip until the meringue is thick, stiff, and glossy. When you rub a little between your fingers, it should feel smooth, not grainy. The peaks should stand up straight without drooping when you lift the whisk. This can take about 8-10 minutes, so be patient!
-
Colouring the Meringue and Piping the Trees
Once you have your stiff, glossy meringue, it’s time to add some festive color. Add a small amount of green gel food colouring to the meringue. Gel food colouring is best because it’s concentrated and won’t add excess liquid, which could affect the meringue’s texture. Start with just a drop or two and mix it in gently with a spatula until you achieve your desired shade of green. Be careful not to overmix, as this can deflate the meringue. For piping, you have a couple of options. You can use a piping bag fitted with a large star or round tip. If you don’t have a piping bag, you can carefully spoon mounds of meringue onto your baking sheet and then shape them with a spatula to resemble trees, or even use a sturdy zip-top bag with a corner snipped off. To create tree shapes, start with a wider base and pipe or spoon smaller mounds on top, tapering towards a point at the top. You can pipe them freehand or draw tree outlines on parchment paper and pipe over them. Don’t worry if they aren’t perfectly uniform; their rustic charm is part of their appeal.
-
Decorating and Baking the Meringue Trees
Before baking, it’s time for the fun part: decorating! While the meringue is still soft, gently press sprinkles onto the trees. You can use a variety of Christmas-themed sprinkles – silver balls, gold stars, or multi-colored jimmies. These will stick to the meringue easily. Ensure you’ve preheated your oven to a low temperature. For meringues, a low and slow bake is key. Preheat your oven to around 90-100°C (195-210°F). This low heat bakes and dries out the meringues without browning them, keeping them beautifully white or pale green and wonderfully crisp. Line your baking sheets with parchment paper to prevent sticking. Arrange the piped meringue trees on the prepared baking sheets, leaving a little space between them.
-
Drying and Cooling the Meringue Trees
Place the baking sheets into the preheated low-temperature oven. The baking time will vary depending on the size and thickness of your meringue trees and your oven, but typically it takes anywhere from 1.5 to 3 hours. You’re looking for the meringues to be completely dry to the touch and to lift easily off the parchment paper. They should feel light and hollow. If they still feel sticky or soft, they need more time. Once they are dry, turn off the oven and leave the meringue trees inside with the oven door slightly ajar (you can prop it open with a wooden spoon). Let them cool completely inside the oven. This gradual cooling further helps to prevent cracking and ensures they maintain their crisp texture. Resist the urge to open the oven door frequently during baking and cooling, as sudden temperature changes can cause them to collapse or weep.
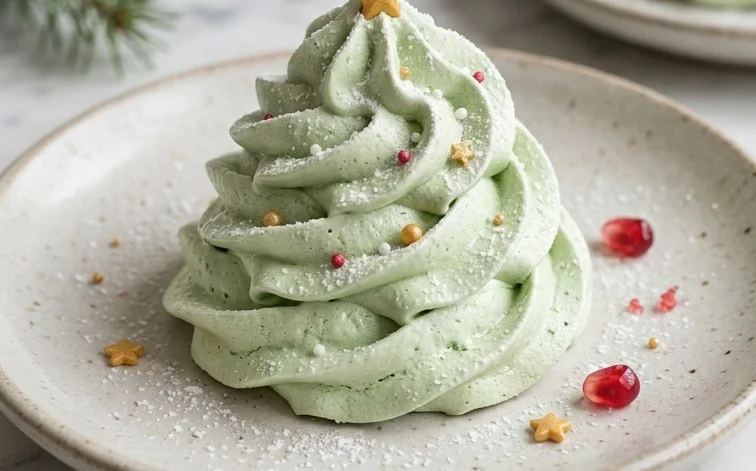
Once completely cooled, your Meringue Christmas Trees are ready to be enjoyed. Store them in an airtight container at room temperature. They can last for several weeks if stored properly, making them a great make-ahead holiday treat.
Conclusion:
Making these Meringue Christmas Trees is a rewarding process that adds a special touch to your holiday celebrations. Their light, crisp texture and charming appearance make them a memorable treat. They are surprisingly stable and hold their shape well, so don’t hesitate to use them as edible decorations. The simple ingredients and straightforward technique mean anyone can create these festive delights. They are a wonderful way to get into the holiday spirit and share something homemade with loved ones. Consider making a batch with children for a fun festive activity.
For serving, arrange them on a platter alongside other festive cookies or use them as a unique topper for cakes and cupcakes. You can also hang them carefully on the branches of your Christmas tree for an extra special edible decoration. For variations, try adding a tiny drop of peppermint extract to the meringue mixture for a subtle festive flavour, or use different colours like white or red. Ensure you store them in an airtight container at room temperature once completely cooled, as humidity can make them sticky.
Frequently Asked Questions:
Why are my meringues sticky?
Sticky meringues are usually caused by underbaking or by high humidity. Ensure your Meringue Christmas Trees are baked until completely dry and crisp. It’s best to bake them on a dry day if possible. Store them in an airtight container immediately after cooling.
Can I make these ahead of time?
Yes, absolutely. Meringue Christmas Trees can be made several days in advance, provided they are stored correctly in an airtight container at room temperature. This makes them a great make-ahead option for busy holiday schedules.
How do I get stiff peaks?
Stiff peaks are achieved by whisking egg whites until they are firm and stand straight up when the beater is lifted. Gradual addition of sugar and ensuring your bowl and whisk are grease-free are key. Over-whipping can cause the meringue to become dry and crumbly, so stop as soon as stiff peaks form.
Meringue Christmas Trees
Delicate and festive meringue cookies shaped like Christmas trees, perfect for holiday baking. These light and airy treats are easy to make and fun to decorate.
Ingredients
-
2 large egg whites (room temperature)
-
1/4 teaspoon cream of tartar
-
100 g granulated sugar
-
Green gel food colouring
-
Assorted sprinkles
Instructions
-
Step 1
Preheat your oven to 200°F (95°C). Line baking sheets with parchment paper. -
Step 2
In a clean, dry bowl, beat the egg whites and cream of tartar with an electric mixer on medium speed until soft peaks form. -
Step 3
Gradually add the granulated sugar, one tablespoon at a time, beating on high speed until stiff, glossy peaks form and the sugar is dissolved. -
Step 4
Add a few drops of green gel food colouring and gently fold it in until evenly distributed, creating a marbled effect or a solid green colour. -
Step 5
Transfer the meringue to a piping bag fitted with a star tip. Pipe cone shapes onto the prepared baking sheets to resemble Christmas trees. -
Step 6
Decorate the piped meringues with assorted sprinkles while they are still wet. -
Step 7
Bake for 1 hour and 30 minutes, or until the meringues are dry and lift easily from the parchment paper. Turn off the oven and let the meringues cool completely inside the oven with the door ajar.
Important Information
Nutrition Facts (Per Serving)
It is important to consider this information as approximate and not to use it as definitive health advice.
Allergy Information
Please check ingredients for potential allergens and consult a health professional if in doubt.
Leave a Comment