
Gooey Classic Butter Tart Squares are pure comfort food. The crust is tender and crumbly, and the filling is incredibly gooey and rich, with that signature sweet butter tart flavour. They’re much easier to make than individual butter tarts because you don’t have to fuss with pastry shells. I love making them for bake sales, holiday gatherings, or just when I need a serious dose of sweet nostalgia. They’re best enjoyed slightly warm or at room temperature, when the filling is at its most wonderfully gooey. The base of this treat relies on a simple press-in crust, while the topping is a lusciously sweet, caramel-like mixture that sets up just right. It’s a dessert that always gets rave reviews and disappears quickly.
Ingredients:
For the Crust:
Flour: 1 and ⅓ cup
Granulated Sugar: ¼ cup
Salt: ¼ teaspoon
Cold Butter: ½ cup
For the Filling:
Melted Butter: ½ cup
Brown Sugar, packed: 2 cups
Eggs: 4
Flour: 1 tablespoon
Vanilla Extract: 1 tablespoon
White Vinegar: 1 tablespoon
Salt: ½ teaspoon
Optional: ½ cup of raisins, walnuts and or pecans.
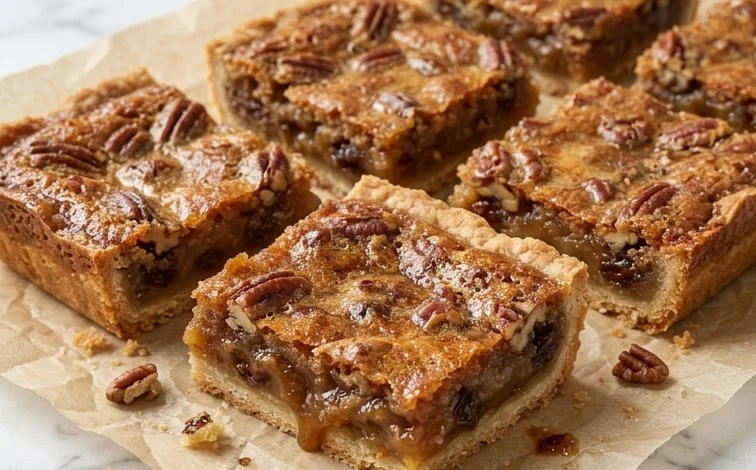
Gooey Classic Butter Tart Squares
These butter tart squares are pure comfort. The crust is tender and crumbly, and the filling is incredibly gooey and rich, with that signature sweet butter tart flavour. They’re much easier to make than individual butter tarts because you don’t have to fuss with pastry shells. I love making them for bake sales, holiday gatherings, or just when I need a serious dose of sweet nostalgia. They’re best enjoyed slightly warm or at room temperature, when the filling is at its most wonderfully gooey.
Ingredients:
- Flour: 1 and ⅓ cup
- Granulated Sugar: ¼ cup
- Salt: ¼ teaspoon
- Cold Butter: ½ cup
- Melted Butter: ½ cup
- Brown Sugar, packed: 2 cups
- Eggs: 4
- Flour: 1 tablespoon
- Vanilla Extract: 1 tablespoon
- White Vinegar: 1 tablespoon
- Salt: ½ teaspoon
- Optional: ½ cup of raisins, walnuts and or pecans.
Making the Crust
First, we need to get the crust ready. It’s a simple press-in crust that uses cold butter to get that lovely tender texture. In a medium bowl, whisk together the 1 and ⅓ cups of flour, ¼ cup of granulated sugar, and ¼ teaspoon of salt. This ensures everything is evenly distributed before we add the fat. Now, cut in the ½ cup of cold butter. You want to use cold butter because it creates little pockets of fat that melt during baking, resulting in a flaky, tender crust. You can do this with a pastry blender, two forks, or even your fingertips if you work quickly. Aim for pieces that resemble coarse crumbs, with some pea-sized bits of butter still visible. Don’t overwork it; we’re not looking for a smooth dough here.
Press this mixture evenly into the bottom of an 8×8 inch baking pan. Make sure to get it all the way into the corners. You can use the bottom of a measuring cup or your fingers to press it down firmly. This helps create a sturdy base for our gooey filling. Once pressed, you can bake this crust for about 10-12 minutes at 350°F (175°C) until it’s lightly golden around the edges. This par-baking step helps prevent a soggy bottom. While the crust is baking, prepare your delicious filling.
The Gooey Filling
For the filling, in a large bowl, combine the ½ cup of melted butter, 2 cups of packed brown sugar, 4 large eggs, 1 tablespoon of flour, 1 tablespoon of vanilla extract, 1 tablespoon of white vinegar, and ½ teaspoon of salt. Whisk everything together until it’s well combined and the sugar has mostly dissolved. The brown sugar provides that classic caramel-like sweetness, and the eggs act as the binder. The tablespoon of flour helps thicken the filling slightly so it sets up nicely without becoming rubbery. The white vinegar might seem unusual, but it’s a secret ingredient that helps cut through the richness and adds a subtle tang, really balancing the sweetness and preventing the filling from tasting overly cloying.
Now, if you’re feeling classic, this is where you can add your optional ½ cup of raisins, chopped walnuts, or pecans. I sometimes do a mix of raisins and pecans for a bit of chew and crunch. Stir these gently into the filling mixture. Be sure not to overmix once you’ve added your mix-ins; just get them evenly distributed.
Assembly and Baking
Once the crust has had its initial bake and is lightly golden, carefully remove it from the oven. Pour the prepared filling directly over the hot crust. Spread it out evenly to cover the entire surface. It will look quite liquidy, and that’s exactly what we want.
Return the pan to the 350°F (175°C) oven. Bake for about 30-40 minutes. The key here is to watch it closely. The edges of the filling should be set and slightly puffed, but the center should still have a slight jiggle. It will continue to set up as it cools. If the edges start to brown too quickly, you can loosely tent the pan with aluminum foil. Overbaking will result in a dry, candy-like filling rather than the desired gooey texture.
Cooling and Serving
This is perhaps the hardest part: letting them cool. Once they’re out of the oven, resist the urge to cut into them immediately. Let the butter tart squares cool completely in the pan on a wire rack. This allows the filling to fully set and firm up. If you cut them too soon, the gooey filling will just ooze out everywhere, and while delicious, it won’t have the same structure. Once completely cool, you can then lift the whole slab out of the pan using the parchment paper (if you lined the pan with it) or cut them directly in the pan.
Cut the squares into your desired size. They are rich, so smaller squares are often perfect. They store beautifully at room temperature in an airtight container for a few days, though they are undeniably best within the first day or two when the filling is at its peak gooeyness. Enjoy these delightful, classic butter tart squares!
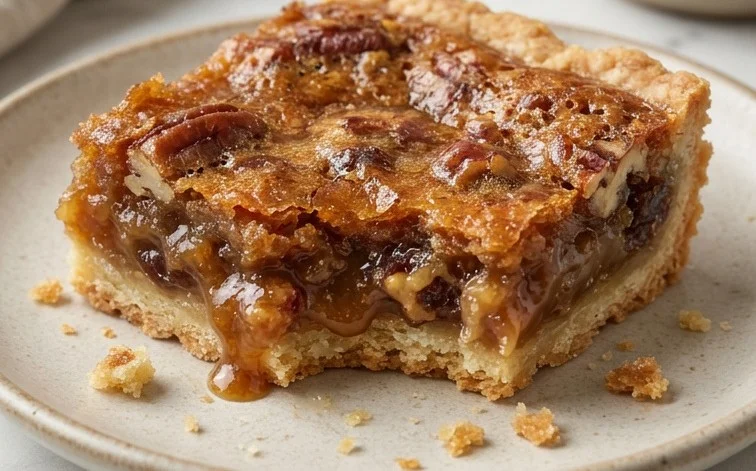
Conclusion:
These Gooey Classic Butter Tart Squares are a foolproof way to enjoy that beloved butter tart flavour without the fuss of individual tart shells. The contrast between the tender, crumbly crust and the rich, caramel-like filling is simply irresistible. They bring a sense of comfort and nostalgia to any occasion, from casual get-togethers to more formal holiday celebrations. Serve them slightly warm for the ultimate gooey experience, or at room temperature if that’s more convenient. They are wonderfully adaptable; consider adding chopped nuts like pecans or walnuts, or even raisins to the filling for extra texture and flavour. You can also experiment by adding a pinch of cinnamon to the crust mixture for a warmer spice note. Storing them is straightforward: keep them in an airtight container at room temperature for up to 3 days, or refrigerate them for slightly longer storage.
Frequently Asked Questions:
Can I make these ahead of time?
Yes, absolutely. Gooey Classic Butter Tart Squares are excellent for making a day in advance. They store well in an airtight container at room temperature for up to 3 days. If you plan to keep them longer, refrigeration is a good option.
Why is there vinegar in the filling?
The white vinegar might seem unusual, but it plays a key role in the filling’s texture. It helps to activate the baking soda (if used, though not listed here) and reacts with the brown sugar and eggs to create that signature chewy, slightly tangy, and perfectly set gooey texture that butter tarts are known for. It balances the sweetness and enhances the overall flavour without tasting like vinegar.
What is the best way to store leftovers?
Leftovers should be stored in an airtight container. At room temperature, they are best enjoyed within 2-3 days. For longer storage, cover them tightly and refrigerate for up to a week. Let them come to room temperature slightly before serving for the best texture.
Gooey Classic Butter Tart Squares
Indulge in the irresistible sweetness of classic butter tart squares with a perfectly gooey center and a tender shortbread crust. A timeless Canadian treat.
Ingredients
-
1 and ⅓ cup Flour (for crust)
-
¼ cup Granulated Sugar (for crust)
-
¼ teaspoon Salt (for crust)
-
½ cup Cold Butter (for crust)
-
½ cup Melted Butter (for filling)
-
2 cups Brown Sugar, packed
-
4 Eggs
-
1 tablespoon Flour (for filling)
-
1 tablespoon Vanilla Extract
-
1 tablespoon White Vinegar
-
½ teaspoon Salt (for filling)
-
½ cup raisins, walnuts and or pecans (optional)
Instructions
-
Step 1
Preheat oven to 350°F (175°C). Lightly grease and flour an 8×8 inch baking pan. -
Step 2
In a medium bowl, combine 1 and ⅓ cups flour, ¼ cup granulated sugar, and ¼ teaspoon salt. Cut in ½ cup cold butter until the mixture resembles coarse crumbs. Press evenly into the bottom of the prepared baking pan to form the crust. -
Step 3
In a separate large bowl, whisk together the melted butter, brown sugar, eggs, 1 tablespoon flour, vanilla extract, white vinegar, and ½ teaspoon salt until well combined and smooth. -
Step 4
If using, stir in optional raisins, walnuts, or pecans into the filling mixture. -
Step 5
Pour the filling evenly over the prepared crust. -
Step 6
Bake for 35-45 minutes, or until the edges are set and the center is still slightly gooey. The filling will firm up as it cools. -
Step 7
Let cool completely in the pan before cutting into squares. This allows the gooey center to set properly.
Important Information
Nutrition Facts (Per Serving)
It is important to consider this information as approximate and not to use it as definitive health advice.
Allergy Information
Please check ingredients for potential allergens and consult a health professional if in doubt.

Leave a Comment