
Candy Cookie Cone Christmas Trees are a fun, edible craft project that looks absolutely festive on any holiday dessert table. They’re surprisingly easy to assemble, making them a perfect activity to do with kids or to prepare ahead of time for a holiday party. The base is a simple sugar cone, transformed into a miniature evergreen with colorful candies and sweet coatings.
Ingredients:
- 12 sugar cones
- 12 long-size lollipop sticks
- 3 pieces of foil (each one about 10 inches long)
- 12 tablespoons of prepared cookie dough
- 12 tablespoons chocolate chips (semi-sweet or sweet)
- 8 ounces vanilla candy coating (about 4 squares of vanilla Almond Bark)
- 8 ounces chocolate candy coating (about 4 squares of chocolate Almond Bark)
- 1/2 cup shredded coconut
- 1/2 cup mini M&M candies
- 1/4 cup chocolate chips
- 1/4 cup white morsels
- Colored candy sprinkles
Cooking Instructions
Prepare Your Workspace and Tools
First, let’s get our workspace ready. This project involves melted candy coatings, so it’s a good idea to cover your counter with some parchment paper or wax paper to catch any drips. You’ll also need a few bowls for melting the candy coatings, a microwave-safe spatula for stirring, and a small spoon for drizzling. For the cones, you’ll want to have your sugar cones standing upright. I find it easiest to insert the lollipop sticks into the cones first. Push one long lollipop stick firmly into the wide opening of each sugar cone, all the way to the tip. This stabilizes the cone and gives you something to hold onto while decorating.
Next, let’s prepare our ‘dough’ for the trees. In a small bowl, combine the 12 tablespoons of prepared cookie dough with the 12 tablespoons of chocolate chips. Mix them well. You’ll use this mixture to create the snowy base around the bottom of the cones, making it look like the tree is planted in a snowy mound. If your cookie dough is very stiff, you can let it soften at room temperature for about 10-15 minutes before mixing with the chips. This makes it easier to handle and shape.
Now, let’s melt the candy coatings. You’ll need two separate microwave-safe bowls for this: one for the vanilla coating and one for the chocolate coating. Break the candy coating squares into smaller pieces. Microwave the vanilla coating in 30-second intervals, stirring well after each interval, until it’s smooth and completely melted. Repeat this process with the chocolate candy coating in a separate bowl. Be patient when melting; overheating can cause the coating to seize up and become unusable. Stirring gently is key.
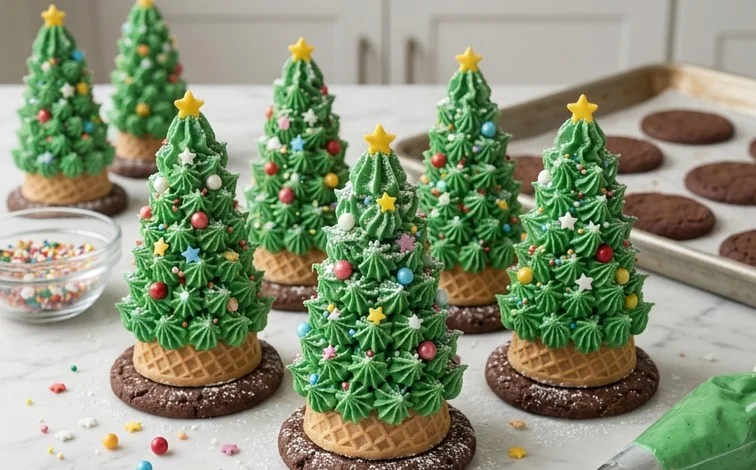
Candy Cookie Cone Christmas Trees
These Candy Cookie Cone Christmas Trees are a fun, edible craft project that looks absolutely festive on any holiday dessert table. They’re surprisingly easy to assemble, making them a perfect activity to do with kids or to prepare ahead of time for a holiday party. The base is a simple sugar cone, transformed into a miniature evergreen with colorful candies and sweet coatings.
Ingredients:
- 12 sugar cones
- 12 long-size lollipop sticks
- 3 pieces of foil (each one about 10 inches long)
- 12 tablespoons of prepared cookie dough
- 12 tablespoons chocolate chips (semi-sweet or sweet)
- 8 ounces vanilla candy coating (about 4 squares of vanilla Almond Bark)
- 8 ounces chocolate candy coating (about 4 squares of chocolate Almond Bark)
- 1/2 cup shredded coconut
- 1/2 cup mini M&M candies
- 1/4 cup chocolate chips
- 1/4 cup white morsels
- Colored candy sprinkles
Cooking Instructions
Prepare Your Workspace and Tools
First, let’s get our workspace ready. This project involves melted candy coatings, so it’s a good idea to cover your counter with some parchment paper or wax paper to catch any drips. You’ll also need a few bowls for melting the candy coatings, a microwave-safe spatula for stirring, and a small spoon for drizzling. For the cones, you’ll want to have your sugar cones standing upright. I find it easiest to insert the lollipop sticks into the cones first. Push one long lollipop stick firmly into the wide opening of each sugar cone, all the way to the tip. This will serve as the “trunk” and handle for our trees.
Next, we need to prepare the “dirt” for our trees. Take your 12 tablespoons of prepared cookie dough. You can use your favorite sugar cookie dough recipe or even store-bought dough. Roll each tablespoon of dough into a small ball. Then, flatten each ball slightly and press a small handful of chocolate chips into one side. You want enough chocolate chips so they are visible but not so many that the dough can’t hold together. These will be baked and act as the base around the trunk of our tree. Place these on a baking sheet lined with parchment paper. Bake according to your cookie dough’s package directions, usually around 350°F (175°C) for 8-10 minutes, or until golden brown. Let them cool completely on the baking sheet.
Creating the Cone “Trees”
Now for the fun part: making the actual trees. You’ll need to melt your vanilla candy coating and chocolate candy coating separately. You can do this in the microwave by heating them in 30-second intervals, stirring well after each interval, until smooth. Be careful not to overheat candy melts, as they can seize up. Alternatively, you can use a double boiler.
Take one sugar cone at a time. Dip the wide end of the cone into the melted vanilla candy coating. You want to coat the bottom half to two-thirds of the cone. Let the excess drip off for a moment. While the coating is still wet, gently press some shredded coconut around the bottom edge of the coated area. This creates a snowy effect around the base of your tree. Stand the cone up on one of the foil pieces you prepared. You can insert the lollipop stick into a small piece of Styrofoam or an overturned empty egg carton to keep them upright while the coating sets. Repeat this with all 12 cones, using vanilla coating and coconut for some, and then switching to chocolate coating and coconut for others, if you like. You can also mix and match; perhaps some vanilla trees with chocolate “snow” or vice versa. Let these set completely. This usually takes about 10-15 minutes at room temperature, or you can speed it up by placing them in the refrigerator for a few minutes.
Decorating Your Christmas Trees
Once the initial coating is set, it’s time to add the branches and decorations. Re-melt your vanilla and chocolate candy coatings if they have hardened. You’ll be using these coatings to adhere your “ornaments.” Using a spoon or a piping bag fitted with a small round tip, create a wavy “branch” pattern down the sides of the cone, starting from the tip and working your way down towards the base. You can do this with either vanilla or chocolate coating. While the coating is still wet, immediately sprinkle on your decorations.
For the green “foliage,” I like to use mini M&M candies. Press them gently into the wet candy coating to create the look of needles on a pine tree. You can alternate colors or create patterns. For extra sparkle and variety, use the colored candy sprinkles. These add a festive touch and make your trees look even more like miniature Christmas trees. You can also use the extra 1/4 cup of chocolate chips and 1/4 cup of white morsels. Melt a small amount of each separately and use them to pipe more decorative lines or dots onto the trees, like little ornaments or icicles. Don’t be afraid to be creative with your decorating. The goal is to make them look festive and fun!
Assembling the Final Trees
Once your cones are fully decorated and the candy coating is completely set, it’s time to assemble the final tree. Take one of your baked cookie dough “bases.” Gently press the lollipop stick of a decorated sugar cone into the center of the cookie base. The cookie should be firm enough to hold the cone upright. If your cookie bases are a bit crumbly, you can “glue” them to a small piece of parchment paper with a dab of melted chocolate or candy coating. This step helps to secure the tree and makes it look like it’s growing right out of the ground.
If you want to add an extra touch, you can drizzle more melted candy coating over the cookie base and sprinkle with a few more mini M&Ms or sprinkles to make it look like a decorated snowy patch. Allow this final bit of melted coating to harden. These Candy Cookie Cone Christmas Trees are best served at room temperature, but if you need to store them for a day or two, keep them in a cool, dry place, uncovered, to prevent the candy coating from sweating. They are a delightful edible decoration for any holiday gathering.
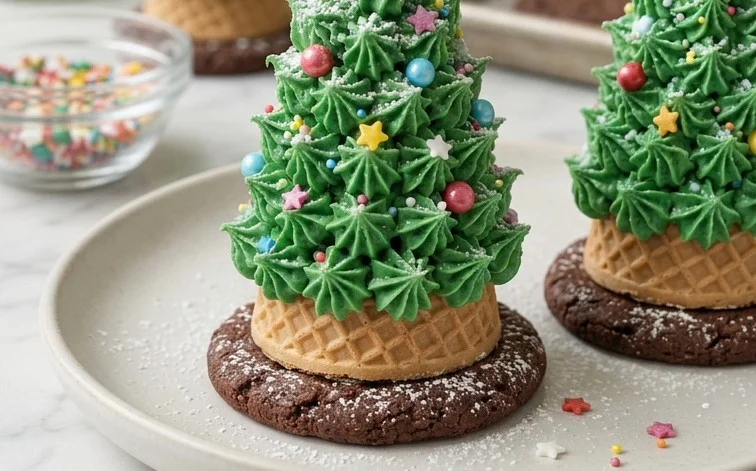
Conclusion:
These Candy Cookie Cone Christmas Trees are more than just a treat; they’re a festive centerpiece and a delightful activity rolled into one. The combination of crisp sugar cones, rich cookie dough, and colorful candy decorations makes for a visually stunning and tasty holiday creation. They are perfect for decorating your dessert table, for kids to get involved in holiday baking, or even as a fun craft to complete before a party. Your guests will be amazed at these edible trees!
For serving, stand them upright on a platter. You can even add a dusting of powdered sugar to mimic snow for an extra touch. Variations are endless: try different colored candy coatings, various sprinkles, or even a dusting of edible glitter for extra sparkle. You could also use different types of small candies like gumdrops or colorful sprinkles to create unique patterns on your trees. Get creative with the decorations!
Frequently Asked Questions:
Can I make these ahead of time?
Yes, absolutely! Once the candy coating is completely set, you can store the Candy Cookie Cone Christmas Trees in an airtight container at room temperature for up to a week. It’s best to place parchment paper between layers to prevent sticking.
What if I don’t have cookie dough?
If you don’t have prepared cookie dough, you can substitute it with a thick royal icing or even a firm buttercream frosting. You’ll still mix in the chocolate chips for texture and flavor.
How do I get the candy coating to melt smoothly?
The key is to melt the candy coating in short bursts in the microwave (30 seconds at a time) and stir thoroughly between each burst. Avoid overheating, as this can cause it to become thick and clumpy. You can also melt it gently in a double boiler if you prefer.
Candy Cookie Cone Christmas Trees
Edible Christmas trees made from sugar cones, cookie dough, and colorful candy decorations. A fun and festive holiday treat!
Ingredients
-
12 sugar cones
-
12 long-size lollipop sticks
-
3 pieces of foil (each one about 10 inches long)
-
12 tablespoons of prepared cookie dough
-
12 tablespoons chocolate chips (semi-sweet or sweet)
-
8 ounces vanilla candy coating
-
8 ounces chocolate candy coating
-
1/2 cup shredded coconut
-
1/2 cup mini M&M candies
-
1/4 cup chocolate chips
-
1/4 cup white morsels
-
Colored candy sprinkles
Instructions
-
Step 1
Prepare your workstation by lining a baking sheet with parchment paper or a silicone mat. Have your ingredients ready and organized. -
Step 2
Insert a lollipop stick into the wide end of each sugar cone. This will serve as the base and handle for your tree. -
Step 3
Form small balls (about 1 tablespoon each) from the prepared cookie dough. Press a few chocolate chips into each cookie dough ball. -
Step 4
Place one cookie dough ball onto the pointed tip of each sugar cone, pressing gently to adhere. This will be the top of your tree. -
Step 5
Melt the vanilla candy coating according to package directions in separate bowls. Melt the chocolate candy coating in another separate bowl. -
Step 6
Dip each cookie dough-topped cone into the melted vanilla candy coating, covering the cone and the cookie dough. Allow excess to drip off. -
Step 7
While the vanilla coating is still wet, decorate the trees. Sprinkle with shredded coconut (for snow), mini M&M candies (for ornaments), and colored candy sprinkles. -
Step 8
Place the decorated cones on the prepared baking sheet. You can use the foil to prop them up if needed, ensuring they stand upright. -
Step 9
For optional frosting, drizzle melted chocolate candy coating over the vanilla-coated trees. Add a few extra chocolate chips or white morsels for detail. -
Step 10
Allow the candy coating to harden completely before handling or serving. Store in a cool, dry place.
Important Information
Nutrition Facts (Per Serving)
It is important to consider this information as approximate and not to use it as definitive health advice.
Allergy Information
Please check ingredients for potential allergens and consult a health professional if in doubt.


Leave a Comment