
Butterfinger Balls are a fantastic treat for anyone who loves that unique, crispy, peanut-buttery crunch of a Butterfinger bar. They’re surprisingly easy to make, perfect for bake sales, parties, or just satisfying a serious sweet tooth. The beauty of these is their simplicity; no baking is required, which makes them an ideal project for a warm afternoon when you don’t want to turn on the oven. The texture is a delightful contrast between the creamy, dense center and the shatteringly crisp pieces of Butterfinger mixed throughout. They capture the essence of the candy bar in a bite-sized, indulgent form. Many people think that creating something this satisfying requires a lot of effort, but that’s not the case here. These Butterfinger Balls prove that you can achieve incredible texture and flavor without turning on your oven at all. They are a quick win for any occasion.
Ingredients:
- 1 cup creamy peanut butter
- 1/4 cup unsalted butter (softened)
- 2 cups powdered sugar
- 1 teaspoon vanilla extract
- Pinch of salt
- 6 Butterfinger candy bars (finely crushed)
- 12 ounces semisweet or milk chocolate (chopped (for dipping, optional))
Making the Base
The first step in creating these delightful Butterfinger Balls is to form a sturdy, yet tender, base mixture. In a medium-sized mixing bowl, combine your softened unsalted butter and the creamy peanut butter. It’s important that the butter is softened, not melted. Softened butter will incorporate much more smoothly into the peanut butter, creating a homogenous base that’s easier to work with. If your butter is too cold, it will create lumps, and if it’s melted, the mixture will be too greasy and won’t hold its shape well. You can use a sturdy spoon or a hand mixer on low speed to cream these two ingredients together until they are thoroughly combined and smooth.
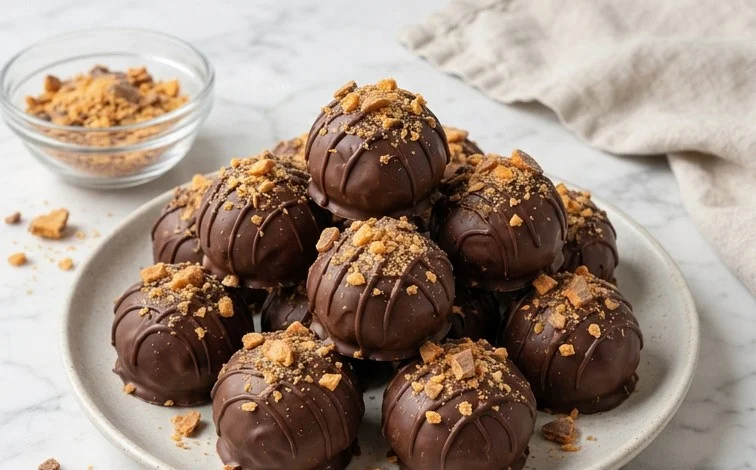
Butterfinger Balls
These Butterfinger Balls are a fantastic treat for anyone who loves that unique, crispy, peanut-buttery crunch of a Butterfinger bar. They’re surprisingly easy to make, perfect for bake sales, parties, or just satisfying a serious sweet tooth. The beauty of these is their simplicity; no baking is required, which makes them an ideal project for a warm afternoon when you don’t want to turn on the oven. The texture is a delightful contrast between the creamy, dense center and the shatteringly crisp pieces of Butterfinger mixed throughout.
Ingredients:
- 1 cup creamy peanut butter
- 1/4 cup unsalted butter (softened)
- 2 cups powdered sugar
- 1 teaspoon vanilla extract
- Pinch of salt
- 6 Butterfinger candy bars (finely crushed)
- 12 ounces semisweet or milk chocolate (chopped (for dipping, optional))
Making the Base
The first step in creating these delightful Butterfinger Balls is to form a sturdy, yet tender, base mixture. In a medium-sized mixing bowl, combine your softened unsalted butter and the creamy peanut butter. It’s important that the butter is softened, not melted. Softened butter will incorporate much more smoothly into the peanut butter, creating a homogenous base that’s easier to work with. If your butter is too cold, it will create lumps, and if it’s melted, the mixture will be too greasy and won’t hold its shape well. You can use a sturdy spoon or a hand mixer on low speed to cream these two ingredients together until they are thoroughly combined and smooth. This initial mixing ensures that every bite of your Butterfinger Ball will have that perfect peanut butter foundation.
Next, gradually add the powdered sugar to the peanut butter and butter mixture. It’s best to add it in stages, about half a cup at a time, mixing well after each addition. This prevents a cloud of sugar from poofing up into your face and helps to ensure that the sugar is evenly incorporated. As you add the powdered sugar, the mixture will start to thicken considerably, becoming more like a dough or a very stiff frosting. You might find that you need to switch from a spoon to a more robust mixing tool, like a sturdy spatula or even your hands, to fully combine everything. Once the powdered sugar is all incorporated, stir in the vanilla extract and the pinch of salt. The vanilla adds a warm, sweet aroma and flavor, while the salt helps to balance the sweetness and bring out the peanut butter flavor. Don’t skip the salt; it makes a surprising difference!
Incorporating the Crunch
Now for the star ingredient: the Butterfinger candy bars. You want to finely crush these. A food processor works wonderfully for this, but if you don’t have one, you can place the unwrapped Butterfinger bars in a sturdy resealable bag, seal it tightly, and then use a rolling pin or a heavy can to crush them into small pieces. Aim for pieces that are about the size of coarse breadcrumbs. You don’t want large chunks, as they can make the balls difficult to roll and might create sharp edges. Add the finely crushed Butterfinger pieces to your peanut butter mixture. Gently fold them in using a spatula until they are evenly distributed throughout the dough. You’ll see those signature flaky, crispy bits of Butterfinger throughout the mixture. This is where the magic happens, as the peanut butter base perfectly complements the distinct Butterfinger flavor.
Forming and Chilling the Balls
Once the Butterfinger pieces are mixed in, you should have a thick, slightly sticky dough. Now it’s time to form the balls. You can lightly grease your hands with a bit of cooking spray or a tiny amount of peanut butter if the mixture is sticking too much. Roll the mixture into small, bite-sized balls, roughly about one inch in diameter. It’s helpful to try and make them all the same size so they look uniform and bake (or chill) evenly if you plan to dip them in chocolate. Place the rolled balls onto a baking sheet lined with parchment paper. This prevents them from sticking to the sheet. After you’ve rolled all the dough into balls, it’s crucial to chill them. Place the baking sheet with the Butterfinger Balls into the refrigerator for at least 30 minutes, or into the freezer for about 15 minutes. This chilling step is very important because it firms up the mixture, making it much easier to handle, especially if you plan to dip them in chocolate. A cold ball will hold its shape better and is less likely to melt when dipped.
The Optional Chocolate Dip
For an extra layer of indulgence, you can dip your chilled Butterfinger Balls in chocolate. This is entirely optional but highly recommended for a truly decadent treat. Place your chopped semisweet or milk chocolate into a microwave-safe bowl. Microwave the chocolate in 30-second intervals, stirring well after each interval, until it is completely melted and smooth. Be careful not to overheat the chocolate, as it can seize up. Alternatively, you can melt the chocolate using a double boiler. Once the chocolate is melted and smooth, you can start dipping the chilled balls. Use a fork or a dipping tool to carefully dip each ball into the melted chocolate, ensuring it’s fully coated. Let any excess chocolate drip back into the bowl. Place the dipped balls back onto the parchment-lined baking sheet. You can drizzle additional melted chocolate over the tops for decoration if you like, or sprinkle a few extra tiny pieces of crushed Butterfinger over the wet chocolate for a decorative touch. Once dipped, place the baking sheet back into the refrigerator until the chocolate has set completely, which usually takes about 15-20 minutes.
Storage and Serving
Once your Butterfinger Balls are fully set, whether they’ve been dipped in chocolate or not, they are ready to be enjoyed! Store any leftover balls in an airtight container in the refrigerator. They will stay fresh for up to a week. The refrigeration helps to keep the balls firm and prevents the chocolate from melting. When you’re ready to serve them, you can take them out of the refrigerator a few minutes beforehand if you prefer them at room temperature, especially if they are not dipped in chocolate. These are wonderful served as is, or alongside a glass of cold milk. They make fantastic additions to dessert platters for parties, holidays, or any occasion where you want a crowd-pleasing, homemade treat.

Conclusion:
These Butterfinger Balls are a true winner for anyone craving that distinct Butterfinger taste and texture in a convenient, no-bake format. The combination of the smooth, creamy center with the crunchy candy bar pieces is simply irresistible. They’re so straightforward to prepare, making them an excellent choice when you need a quick dessert or a crowd-pleasing treat for an event. Don’t be afraid to get creative with them; while the chocolate dip is optional, it adds an extra layer of decadence. Whether you’re making them for a party, a bake sale, or just for yourself, these Butterfinger Balls are guaranteed to be a hit. They come together fast and disappear even faster!
Frequently Asked Questions:
Can I use crunchy peanut butter instead of creamy?
Yes, you can use crunchy peanut butter. It will add an extra layer of texture to the creamy base, which can be a nice addition. Just make sure to still cream it well with the softened butter to get a smooth consistency before adding the other ingredients.
How should I store the Butterfinger Balls?
Store the Butterfinger Balls in an airtight container in the refrigerator. They will keep well for up to a week. The cold helps to keep them firm, especially if you’ve dipped them in chocolate.
What’s the best way to crush the Butterfinger bars?
For the best results, place the Butterfinger bars in a resealable plastic bag and use a rolling pin or a mallet to crush them into small, bite-sized pieces. You want some crunch left, so avoid turning them into dust. This method also helps contain the mess.
Butterfinger Balls
Delicious no-bake balls featuring the iconic crunch of Butterfinger candy bars, blended with creamy peanut butter and a hint of vanilla, then coated in chocolate. Perfect for holidays and parties.
Ingredients
-
1 cup creamy peanut butter
-
1/4 cup unsalted butter, softened
-
2 cups powdered sugar
-
1 teaspoon vanilla extract
-
Pinch of salt
-
6 Butterfinger candy bars, finely crushed
-
12 ounces semisweet or milk chocolate, chopped (for dipping, optional)
Instructions
-
Step 1
In a large bowl, cream together the peanut butter and softened butter until smooth. -
Step 2
Gradually add the powdered sugar and salt, mixing until well combined and a stiff dough forms. -
Step 3
Stir in the vanilla extract and the finely crushed Butterfinger candy bars until evenly distributed throughout the mixture. -
Step 4
Roll the mixture into small, 1-inch balls and place them on a baking sheet lined with parchment paper. -
Step 5
If dipping in chocolate, melt the chocolate according to package directions. Dip each ball into the melted chocolate, allowing excess to drip off. -
Step 6
Place the dipped balls back on the parchment-lined baking sheet and refrigerate until the chocolate is set.
Important Information
Nutrition Facts (Per Serving)
It is important to consider this information as approximate and not to use it as definitive health advice.
Allergy Information
Please check ingredients for potential allergens and consult a health professional if in doubt.

Leave a Comment