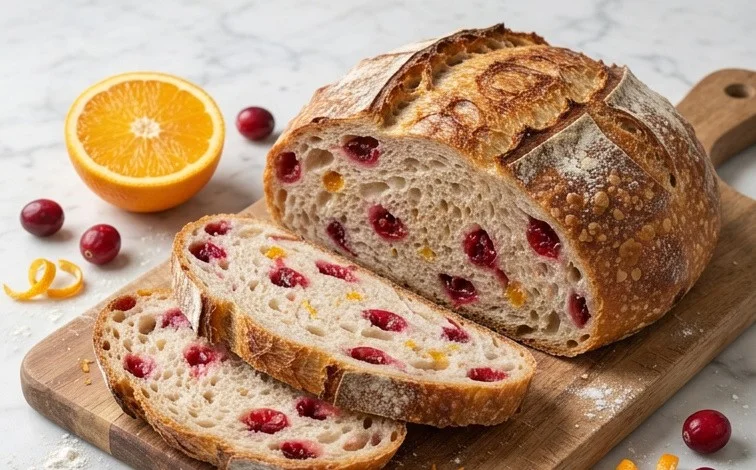
The tartness of cranberries and the bright zest of orange come together beautifully in this Cranberry Orange Sourdough Bread. This loaf has a wonderful tangy crumb from the sourdough, balanced by the sweet-tart burst of dried cranberries and the subtle perfume of orange zest. It’s a loaf that feels special enough for a weekend brunch but is hearty enough for your daily toast. Making sourdough can seem daunting, but this recipe breaks down the process into manageable steps, starting with building a lively levain. The addition of dried cranberries and orange zest happens towards the end of mixing, so they don’t interfere with gluten development. This Cranberry Orange Sourdough Bread is particularly lovely when served warm with a smear of butter. The combination of flavors makes it a standout from your usual sandwich bread. I love the rustic look it gets from baking in a Dutch oven. It’s a rewarding bake that fills your home with an amazing aroma.
Ingredients:
- 50 g active sourdough starter (this is your bubbly, fed starter, ready to go)
- 50 g bread flour (for the levain)
- 50 g water (for the levain)
- 350 g water (for the main dough)
- all of the levain (which we’ll make first)
- 500 g bread flour (for the main dough)
- 10 g salt
- 100 g dried cranberries
- zest of one orange
- 20 g honey or maple syrup, optional (adds a touch of sweetness and helps with browning)
Making the Levain
The first step is to create our levain, which is essentially a pre-ferment that boosts the sourdough flavor and leavening power. In a small bowl or jar, combine the 50 g of active sourdough starter, 50 g of bread flour, and 50 g of water. Mix this until it’s well combined and there are no dry bits of flour. Cover the bowl loosely and let it sit at room temperature for about 4 to 12 hours. You’re looking for it to become bubbly and active, at least doubling in size. The exact time will depend on how warm your kitchen is and how active your starter is. This will be our leavening agent for the bread.
Mixing the Dough
Once your levain is ready and active, it’s time to mix the main dough. In a large mixing bowl, combine the 350 g of water and all of the prepared levain. Stir them together until the levain is mostly dispersed. Add the 500 g of bread flour to this mixture. Start mixing with your hands or a sturdy spoon until a shaggy dough forms. Don’t worry about developing the gluten extensively at this stage; we just want to ensure all the flour is hydrated. Let this mixture rest, covered, for about 30 minutes. This resting period is called autolyse and helps the flour absorb water, making the dough easier to work with and improving gluten development later.
After the autolyse, add the 10 g of salt to the dough. If you’re using the honey or maple syrup, add it now as well. It’s best to wet your hands slightly to prevent the salt and honey/syrup from sticking to your fingers. Knead the dough gently in the bowl for about 5 to 10 minutes. You’re looking for the dough to start becoming smoother and more elastic. It might still be a bit sticky, which is normal for sourdough.
Developing the Dough and Incorporating Add-ins
Now comes the bulk fermentation, where the dough develops flavor and strength. Over the next 3 to 4 hours, you’ll perform a series of “stretch and folds.” To do this, wet your hands slightly. Grab one side of the dough, stretch it up gently, and fold it over the rest of the dough. Rotate the bowl and repeat this process for all four sides of the dough. Aim to do about 4 to 6 sets of stretch and folds, with a 30-minute rest in between each set. As you continue with the stretch and folds, you’ll notice the dough becoming smoother, more cohesive, and stronger.
During the last couple of stretch and fold sessions, when the dough is starting to feel quite elastic, it’s time to add the cranberries and orange zest. Sprinkle the 100 g of dried cranberries and the zest of one orange over the dough. Perform the stretch and folds as usual, working to distribute the cranberries and zest evenly throughout the dough without tearing it. If the dough feels too wet to incorporate them well, you can do one final stretch and fold after they’re added. This stage is also where you build more structure into the dough.
Shaping and Cold Fermentation
After the bulk fermentation is complete and the dough has increased in volume and looks airy, it’s time to shape the loaf. Gently turn the dough out onto a lightly floured surface. Be careful not to deflate it too much. Shape the dough into your desired loaf shape, whether it’s a round boule or an oval. You want to create surface tension, which will help the loaf hold its shape as it bakes.
Once shaped, place the dough seam-side up into a floured proofing basket (banneton) or a bowl lined with a floured tea towel. Cover the basket or bowl and place it in the refrigerator for a cold fermentation. This cold fermentation usually lasts for 12 to 24 hours. This long, slow fermentation develops a deeper flavor and makes the dough easier to score and handle for baking. It also helps achieve that classic sourdough oven spring.
Baking the Bread
When you’re ready to bake, preheat your oven to 230°C (450°F) with a Dutch oven or baking stone inside. It’s important to get the oven and your baking vessel very hot. Carefully remove the dough from the refrigerator. Gently invert the dough onto a piece of parchment paper. Using a sharp knife or a lame, score the top of the loaf. A simple cross or a few slashes are common. This scoring allows the bread to expand predictably during baking.
Carefully transfer the loaf (on the parchment paper if using) into the hot Dutch oven. If using a baking stone, slide the parchment paper with the loaf onto the stone. Cover the Dutch oven with its lid. Bake for 20 minutes with the lid on. Then, carefully remove the lid and continue to bake for another 20 to 25 minutes, or until the crust is a deep golden brown and the internal temperature of the bread reaches about 96°C (205°F). If the crust is browning too quickly, you can reduce the oven temperature slightly.
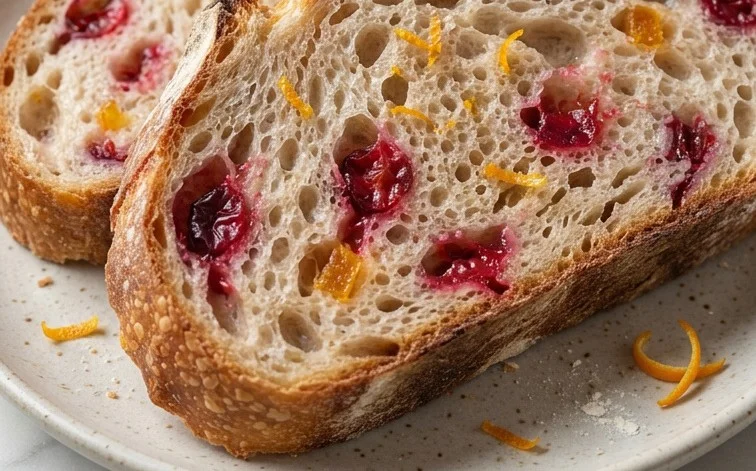
Once baked, remove the bread from the oven and place it on a wire rack to cool completely. Resist the urge to cut into it too soon; letting it cool allows the crumb structure to set properly. Slicing it while hot can result in a gummy texture. This Cranberry Orange Sourdough bread has a wonderfully tangy flavor with bright citrus notes and sweet pops of cranberry. It’s perfect enjoyed on its own, toasted with butter, or as a special addition to any meal.
Conclusion:
This Cranberry Orange Sourdough Bread is a delightful twist on a classic sourdough, offering a perfect balance of tangy, sweet, and citrus notes. The chewy texture of the dried cranberries and the fragrant orange zest make each bite interesting and satisfying. It’s a bread that brings a touch of homemade charm to any table, whether you’re enjoying it for breakfast, lunch, or as a snack. The natural leavening of sourdough provides a wonderful depth of flavor that store-bought bread just can’t match. Baking this loaf is a rewarding process, and the aroma that fills your kitchen is an added bonus.
Serving Suggestions: This bread is fantastic on its own, but it also pairs wonderfully with butter, cream cheese, or a drizzle of honey. It makes an excellent base for French toast or bread pudding. For a savory pairing, try it with mild cheeses or alongside a hearty soup.
Variations: If you don’t have dried cranberries, dried cherries or even chopped apricots can be used. For an extra citrus punch, add a little orange juice to the dough along with the zest. If you prefer a sweeter loaf, you can increase the honey or maple syrup slightly. A sprinkle of chopped walnuts or pecans can add a lovely crunch.
FAQ: How long does sourdough starter take to become active for the levain?
Your sourdough starter typically needs 4 to 12 hours to become active and bubbly, at least doubling in size. This time can vary depending on your kitchen’s temperature and the starter’s own activity level. Look for lots of bubbles and a domed surface before using it for the levain.
FAQ: Can I use all-purpose flour instead of bread flour?
While bread flour is recommended for its higher protein content which helps develop a strong gluten structure, you can use all-purpose flour if that’s what you have. Your loaf might be a bit softer and not rise quite as high, but it will still be delicious. Just be sure to mix the dough until it’s well hydrated.
FAQ: How should I store this bread?
Store the Cranberry Orange Sourdough Bread in a bread box or a loosely tied paper bag at room temperature for up to 3-4 days. Once cooled completely, you can also slice it and freeze it for longer storage; simply toast the slices directly from the freezer.
Cranberry Orange Sourdough Bread
A delicious and tangy sourdough bread infused with the bright flavors of cranberry and orange.
Ingredients
-
50 g active sourdough starter
-
50 g bread flour
-
50 g water
-
350 g water
-
500 g bread flour
-
10 g salt
-
100 g dried cranberries
-
zest of one orange
-
20 g honey or maple syrup, optional
Instructions
-
Step 1
Prepare the levain: Mix 50g active sourdough starter, 50g bread flour, and 50g water. Let it ferment at room temperature for 4-8 hours until bubbly and doubled in size. -
Step 2
Autolyse: In a large bowl, mix 500g bread flour and 350g water until just combined. Let rest for 30 minutes. -
Step 3
Combine dough: Add the prepared levain and 10g salt to the autolysed dough. Mix thoroughly until well incorporated. If using, add the honey or maple syrup. -
Step 4
Bulk Fermentation: Perform a series of stretch and folds every 30 minutes for the first 2 hours. Then, let the dough rest for another 4-6 hours at room temperature, or until it has increased in volume by about 50-75%. -
Step 5
Add Inclusions: Gently incorporate the dried cranberries and orange zest into the dough. Be careful not to degas the dough too much. -
Step 6
Shape and Proof: Lightly flour a work surface and shape the dough into a round or oval. Place the shaped dough into a floured proofing basket. Cover and refrigerate for 12-24 hours for cold proofing. -
Step 7
Bake: Preheat your oven with a Dutch oven inside to 450°F (230°C). Carefully score the top of the cold dough and transfer it into the preheated Dutch oven. Bake covered for 20 minutes, then uncover and bake for another 25-30 minutes, or until the crust is golden brown and the internal temperature reaches 200-210°F (93-99°C). -
Step 8
Cool: Remove the bread from the Dutch oven and let it cool completely on a wire rack before slicing.
Important Information
Nutrition Facts (Per Serving)
It is important to consider this information as approximate and not to use it as definitive health advice.
Allergy Information
Please check ingredients for potential allergens and consult a health professional if in doubt.



Leave a Comment