
Peanut Butter Spider Cookies have been a fixture in my kitchen every October for years. They start with a classic, chewy peanut butter cookie base that’s so comforting and familiar. What makes these cookies a real Halloween hit is the surprise Whopper candy baked right into the center, adding a fantastic chewy texture contrast to the tender cookie. Then, a few dabs of white decorating gel transform them into adorable, spooky spiders. They’re not just fun to look at; they taste amazing too, with that rich peanut butter flavor everyone loves. I love making these with my kids because they’re simple enough for little hands to help with, from rolling the dough to dotting on the spider eyes. These Peanut Butter Spider Cookies are a guaranteed smile-maker for any Halloween gathering or just a fun afternoon baking project.
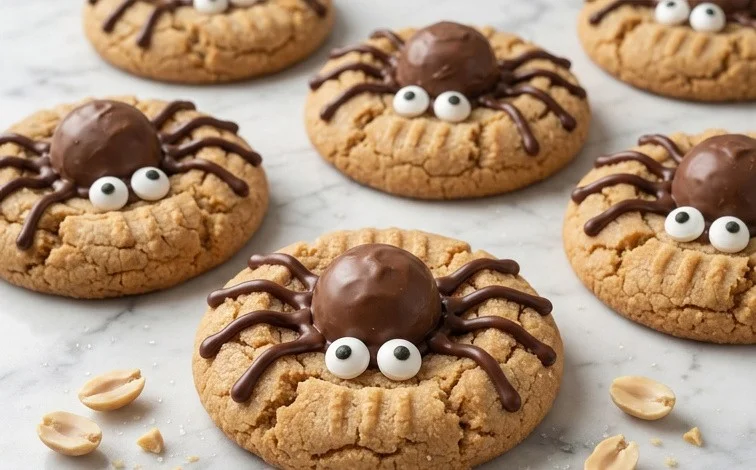
Peanut Butter Spider Cookies
These peanut butter cookies are a fun Halloween tradition in my house. The Whoppers inside give them a chewy center, and the decorating gel turns them into spooky little spiders. They’re surprisingly easy to make, even with kids helping out.
Ingredients:
- 1 ½ cups all-purpose flour
- ½ tsp baking soda
- ½ tsp baking powder
- ½ cup salted butter (softened)
- ½ cup granulated sugar
- ½ cup brown sugar
- 1 egg
- ½ cup creamy peanut butter (not natural)
- 1 tsp vanilla
- 44 Whoppers
- 1 cup semi-sweet chocolate chips ((6 ounces))
- 1 small tube white cake decorating gel
- ¼ cup granulated sugar (for rolling)
Making the Cookie Dough
First, get all your dry ingredients together. In a medium bowl, whisk together the all-purpose flour, baking soda, and baking powder. Whisking helps distribute them evenly so you don’t end up with pockets of leavening agents in your cookies, which can make them rise unevenly. Set this bowl aside for now.
Next, in a large mixing bowl, cream together the softened salted butter, granulated sugar, and brown sugar. You want to beat these together until the mixture is light and fluffy. This usually takes about 2-3 minutes with an electric mixer. The creaming process incorporates air into the butter and sugar, which contributes to the cookie’s texture. Make sure your butter is truly softened, not melted. If it’s too cold, it won’t cream properly.
Now, add the egg and the creamy peanut butter to the butter and sugar mixture. Beat again until everything is well combined. Add the vanilla extract and mix until just incorporated. Using creamy peanut butter that isn’t natural is important here. Natural peanut butters can sometimes separate, and their oil content can make the dough too greasy and affect the cookie’s spread.
Gradually add the dry ingredients from the first bowl to the wet ingredients. Mix on low speed, or by hand with a sturdy spoon, until just combined. Be careful not to overmix the dough at this stage. Overmixing can develop the gluten in the flour too much, resulting in tough cookies. Stop mixing as soon as you no longer see streaks of flour.
Assembling the Spider Cookies
Now comes the fun part of assembling the spiders. Line baking sheets with parchment paper. This prevents the cookies from sticking and makes cleanup much easier. Take about 1 tablespoon of the cookie dough and roll it into a ball. Then, gently press one Whopper into the center of the dough ball. Make sure the Whopper is mostly embedded in the dough.
Once the Whopper is in place, gently roll the dough ball again to completely enclose the Whopper. You want a nice, smooth ball of dough with the Whopper hidden inside. This creates that surprise chewy center.
Next, you’re going to roll these dough balls in granulated sugar. Pour the ¼ cup of granulated sugar into a shallow bowl or plate. Roll each dough ball in the sugar until it’s evenly coated. This sugar coating will give the cookies a nice sweet crunch and a bit of sparkle when they bake.
Baking and Decorating
Preheat your oven to 350 degrees Fahrenheit (175 degrees Celsius). Place the sugared dough balls about 2 inches apart on the prepared baking sheets. The cookies will spread as they bake.
Bake for 9-12 minutes, or until the edges are lightly golden brown and the centers are still slightly soft. Don’t overbake them; you want them to be chewy. Let the cookies cool on the baking sheets for about 5 minutes before transferring them to a wire rack to cool completely. This allows them to set up properly.
While the cookies are cooling, prepare to decorate them. You’ll need to melt the semi-sweet chocolate chips. You can do this in a microwave-safe bowl in 30-second intervals, stirring in between, until smooth, or use a double boiler. Once melted and smooth, transfer the melted chocolate into a piping bag with a small tip, or a zip-top bag with a tiny corner snipped off.
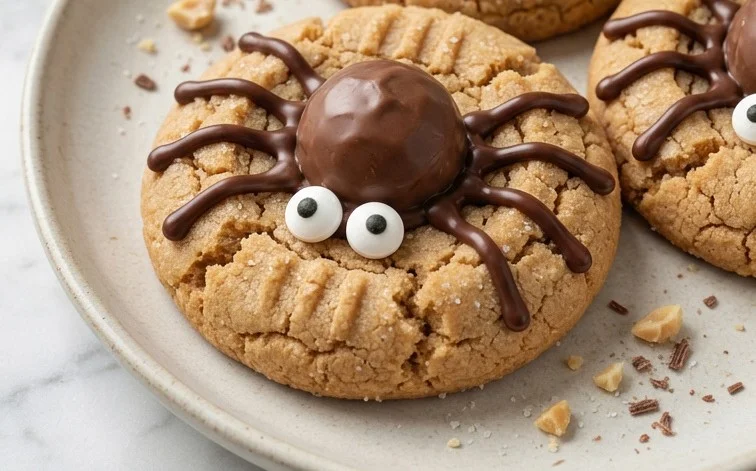
Once the cookies are completely cool, it’s time to add the spider legs and eyes. Using the melted chocolate, pipe eight legs onto the top of each cookie, four on each side, extending out from the Whopper. Then, use the white cake decorating gel to add two small dots for eyes above where the legs meet. The white gel provides a nice contrast to the dark chocolate. You can get creative with the leg placement and shape!
These cookies are best enjoyed within a few days. Store them in an airtight container at room temperature. They also freeze well before decorating, or after they’re fully decorated. Enjoy your spooky and delicious treats!
Conclusion:
These Peanut Butter Spider Cookies are a fantastic treat that brings smiles and spooky fun to any Halloween celebration. The combination of a soft, chewy peanut butter cookie with the hidden Whopper in the center offers a delightful texture surprise. Plus, their charming spider design makes them a visual hit that kids and adults alike will adore. They are surprisingly straightforward to make, making them perfect for involving children in the baking process. Whether you’re hosting a Halloween party or just looking for a festive activity, these cookies are a wonderful choice.
For serving, they are excellent on their own with a glass of cold milk. You could also place them on a platter with other Halloween-themed treats. If you’re looking for variations, you could experiment with different candies inside for different textures, like a caramel chew or a chocolate truffle, though the Whopper is classic. For a different look, try using black decorating gel for the spider legs and eyes. These cookies keep well in an airtight container at room temperature for up to a week, making them a great make-ahead option.
FAQ: Can I use natural peanut butter?
Using natural peanut butter can alter the texture because it’s often oilier and less stable. It might cause the cookies to spread more. Creamy, commercial peanut butter like Jif or Skippy is recommended for the best texture and flavor.
FAQ: How do I store these cookies?
Store the cookies in an airtight container at room temperature for up to 5 days. Adding a slice of bread to the container can help keep them soft. Ensure they are completely cooled before storing to prevent condensation.
FAQ: Can I make the dough ahead of time?
Yes, you can prepare the cookie dough and chill it in the refrigerator for up to 3 days before baking. Shape the dough into balls and let them come closer to room temperature for about 15-20 minutes before baking as directed.
Peanut Butter Spider Cookies
Fun and spooky peanut butter cookies decorated to look like spiders, perfect for Halloween parties. These cookies feature a chewy peanut butter base topped with chocolate and candy eyes.
Ingredients
-
1 ½ cups all-purpose flour
-
½ tsp baking soda
-
½ tsp baking powder
-
½ cup salted butter (softened)
-
½ cup granulated sugar
-
½ cup brown sugar
-
1 egg
-
½ cup creamy peanut butter (not natural)
-
1 tsp vanilla
-
44 Whoppers
-
1 cup semi-sweet chocolate chips ((6 ounces))
-
1 small tube white cake decorating gel
-
¼ cup granulated sugar (for rolling)
Instructions
-
Step 1
Preheat oven to 350°F (175°C). Line baking sheets with parchment paper. -
Step 2
In a medium bowl, whisk together the all-purpose flour, baking soda, and baking powder. -
Step 3
In a large bowl, cream together the softened butter, granulated sugar, and brown sugar until light and fluffy. Beat in the egg and vanilla extract until well combined. -
Step 4
Add the creamy peanut butter to the wet ingredients and beat until smooth. Gradually add the dry ingredients to the wet ingredients, mixing until just combined. -
Step 5
Roll dough into 1-inch balls and then roll each ball in the ¼ cup granulated sugar set aside for rolling. Place balls 2 inches apart on the prepared baking sheets. -
Step 6
Bake for 8-10 minutes, or until the edges are lightly golden. Let cookies cool on the baking sheets for a few minutes before transferring them to wire racks to cool completely. -
Step 7
Melt the semi-sweet chocolate chips in a microwave-safe bowl in 30-second intervals, stirring between each, until smooth. Dip the flat side of each Whopper into the melted chocolate and place it on top of a cooled cookie to create the spider’s body. -
Step 8
Using the white cake decorating gel, draw two small dots on each Whopper for the spider’s eyes. Once the chocolate has set, the cookies are ready to serve.
Important Information
Nutrition Facts (Per Serving)
It is important to consider this information as approximate and not to use it as definitive health advice.
Allergy Information
Please check ingredients for potential allergens and consult a health professional if in doubt.



Leave a Comment