
Meringue Christmas Trees are a wonderfully light and airy treat that bring a touch of festive sparkle to any celebration. They’re surprisingly simple to make, and the crisp, sweet meringue is always a crowd-pleaser, especially with the little ones. The vibrant green color and playful sprinkles make them look like miniature enchanted trees, perfect for a holiday cookie plate or even as edible decorations. They have a satisfying crunch that melts in your mouth, leaving behind just a hint of sweetness.
Ingredients:
- 2 large egg whites (room temperature)
- 1/4 teaspoon cream of tartar
- 100 g granulated sugar
- Green gel food colouring
- Sprinkles
Instructions:
Prepare your baking sheets and preheat the oven. This is the first step to ensuring your meringues bake evenly. Line two large baking sheets with parchment paper. Don’t use wax paper, as it can melt in the oven. Set aside. Preheat your oven to 100°C (210°F). A low and slow baking process is key to drying out the meringue rather than browning it, which gives you that perfect crisp texture. If your oven has a fan, use it on a low setting.
Whip the egg whites and cream of tartar. In a very clean, dry bowl (any trace of fat can prevent the egg whites from whipping properly), add the 2 large egg whites and the 1/4 teaspoon of cream of tartar. Start whisking on a low speed until the egg whites become frothy, like bubble bath. Gradually increase the speed to medium-high and continue whisking until soft peaks form. Soft peaks are when you lift the whisk and the egg white mixture forms a gentle, drooping peak.
Gradually add the sugar. Once you have soft peaks, start adding the granulated sugar one tablespoon at a time, whisking continuously. Allow each addition of sugar to incorporate fully before adding the next. This slow addition is what builds the structure of the meringue and makes it glossy. Keep whisking on medium-high speed until the meringue is stiff and glossy. Stiff peaks mean that when you lift the whisk, the peak stands straight up without drooping. You can test if the sugar has dissolved by rubbing a little meringue between your fingers; it should feel smooth, not gritty. This process can take 8-10 minutes.
Add color and pipe the trees. Once you have stiff, glossy meringue, add a few drops of green gel food colouring. Start with a small amount and add more until you reach your desired festive green. Gel colouring is best as it doesn’t add excess liquid. Spoon the meringue into a piping bag fitted with a large star or open-tip nozzle. You can also use a zip-top bag with a corner snipped off. Pipe tree shapes onto the prepared baking sheets. Hold the piping bag at a 90-degree angle to the parchment paper, starting at the bottom and piping a wider base, then moving upwards in smaller circles or layers to create a tree shape. Leave some space between each tree.
Decorate and bake. While the meringue is still soft, immediately sprinkle the piped trees with your chosen sprinkles. This helps them stick. Bake in the preheated oven for 1 to 1.5 hours, or until the meringues are dry to the touch and lift easily off the parchment paper. They should sound hollow when tapped. Turn off the oven, prop the door open slightly with a wooden spoon, and let the meringues cool completely inside the oven. This gradual cooling prevents cracking.
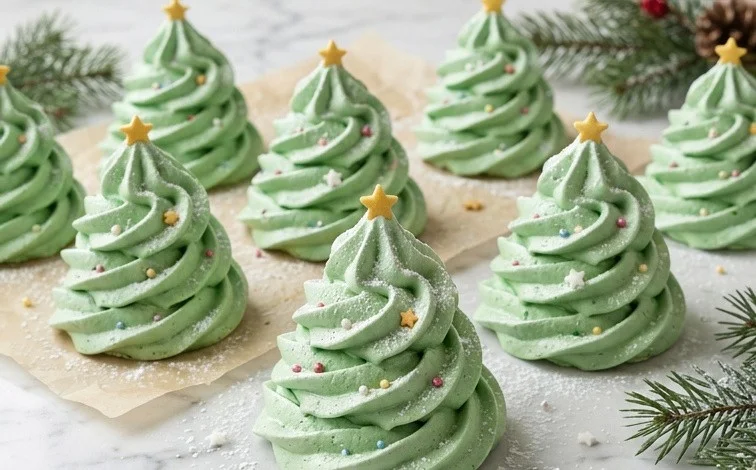
Meringue Christmas Trees
These delicate Meringue Christmas Trees are a wonderfully light and airy treat that bring a touch of festive sparkle to any celebration. They’re surprisingly simple to make, and the crisp, sweet meringue is always a crowd-pleaser, especially with the little ones. The vibrant green color and playful sprinkles make them look like miniature enchanted trees, perfect for a holiday cookie plate or even as edible decorations. They have a satisfying crunch that melts in your mouth, leaving behind just a hint of sweetness.
Ingredients:
- 2 large egg whites (room temperature)
- 1/4 teaspoon cream of tartar
- 100 g granulated sugar
- Green gel food colouring
- Sprinkles
Instructions:
- Prepare your baking sheets and preheat the oven. This is the first step to ensuring your meringues bake evenly. Line two large baking sheets with parchment paper. Don’t use wax paper, as it can melt in the oven. Set aside. Preheat your oven to 100°C (210°F). A low and slow baking process is key to drying out the meringue rather than browning it, which gives you that perfect crisp texture. If your oven has a fan, use it on a low setting.
- Whip the egg whites and cream of tartar. In a very clean, dry bowl (any trace of fat can prevent the egg whites from whipping properly), add the 2 large egg whites and the 1/4 teaspoon of cream of tartar. Start whisking on a low speed until the egg whites become frothy, like bubble bath. Gradually increase the speed to medium-high and continue whisking until stiff, glossy peaks form. This means when you lift the whisk, the egg white peaks stand straight up without drooping. This stage can take about 5-7 minutes depending on your mixer. The cream of tartar helps to stabilize the egg whites, making them hold their shape better.
- Gradually add the sugar and color the meringue. With the mixer still running on medium-high speed, start adding the 100 g of granulated sugar, about a tablespoon at a time. It’s important to add it very slowly and allow each addition to incorporate before adding the next. This gradual addition allows the sugar to dissolve properly into the egg whites, creating a smooth, stable meringue. Continue whisking until the sugar is completely dissolved and the meringue is thick, glossy, and very stiff. To check if the sugar has dissolved, rub a small amount of the meringue between your fingers; if it feels smooth, it’s ready. Once the meringue is perfectly stiff and glossy, add a few drops of green gel food colouring. Gel food colouring is best as it’s highly concentrated and won’t add excess liquid to your meringue. Gently fold the colour in with a spatula until it’s evenly distributed and you have a beautiful Christmas tree green. Don’t overmix at this stage.
- Shape the meringue trees. Spoon the meringue mixture into a piping bag fitted with a large star or round nozzle. If you don’t have a piping bag, you can use a sturdy zip-top bag with a corner snipped off. Pipe cones of meringue onto the prepared baking sheets, starting with a wider base and tapering to a point to create the tree shape. You can make them as tall or as short as you like. Aim for consistent shapes so they bake evenly. Leave a little space between each tree as they might spread slightly. For a fuller tree effect, you can pipe layers, overlapping them slightly.
- Decorate and bake. While the meringue is still soft and before it starts to set, immediately sprinkle your piped trees generously with your chosen sprinkles. This is where you can get creative with colours and shapes! Once decorated, carefully transfer the baking sheets to the preheated oven. Bake for 1 hour and 15 minutes to 1 hour and 30 minutes. The meringues should feel dry and crisp to the touch and lift easily off the parchment paper. If they are still soft or sticky, continue baking for another 10-15 minutes, checking frequently. The low temperature ensures they dry out thoroughly without browning.
- Cool and store. Once baked, turn off the oven and leave the meringue trees inside with the oven door slightly ajar (you can prop it open with a wooden spoon). This slow cooling process prevents the meringues from cracking due to a sudden temperature change. Let them cool completely in the oven. This can take several hours or even overnight. Once completely cool, store the meringue trees in an airtight container at room temperature. They are best enjoyed within a week, though they often stay crisp for longer if stored properly. Avoid refrigerating them, as the moisture can make them sticky.
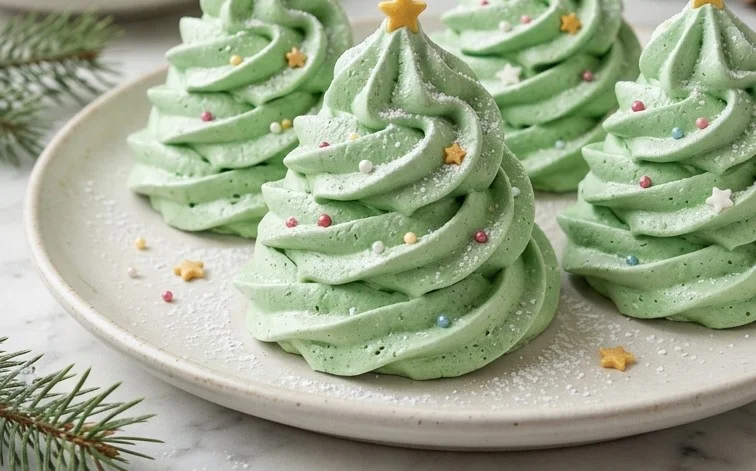
Conclusion:
These Meringue Christmas Trees are a charming addition to any holiday spread, offering a delightful crunch and melt-in-your-mouth sweetness. Their festive appearance makes them a hit with all ages, and they are surprisingly simple to create, proving that beautiful decorations don’t need to be complicated. They are perfect for filling cookie boxes, decorating your Christmas table, or even as edible ornaments for your tree. The crisp texture combined with the subtle sweetness is wonderfully satisfying.
For variations, consider adding a tiny drop of peppermint extract to the meringue for a festive flavour, or experimenting with different coloured sprinkles. You could also try piping smaller individual meringue ‘ornaments’ to hang on the tree. Once fully baked and cooled, they store exceptionally well in an airtight container at room temperature for up to two weeks, making them a great make-ahead treat for the busy holiday season.
FAQ
Can I make meringue Christmas trees ahead of time?
Yes, absolutely! Once completely cooled, store the Meringue Christmas Trees in an airtight container at room temperature. They will stay crisp for up to two weeks, making them ideal for holiday baking prep.
My meringues are sticky. What did I do wrong?
Sticky meringues are often a result of too much humidity during baking or insufficient baking time. Ensure your oven is at the correct low temperature and that they are baked until completely dry. Also, letting them cool slowly in the oven with the door ajar helps them dry out properly.
Can I use different colours for my meringue trees?
Definitely! While green is traditional for Christmas trees, feel free to use red, white, or even gold gel food colouring to create different festive designs. Just be sure to use gel colouring as it’s more concentrated and adds less moisture than liquid food colouring.
Meringue Christmas Trees
Delicate and festive meringue cookies shaped into charming Christmas trees, perfect for holiday decorating.
Ingredients
-
2 large egg whites (room temperature)
-
1/4 teaspoon cream of tartar
-
100 g granulated sugar
-
Green gel food colouring
-
Sprinkles
-
Pinch of salt
Instructions
-
Step 1
Preheat your oven to 100°C (210°F) and line baking sheets with parchment paper. -
Step 2
In a clean, dry bowl, whisk the egg whites and cream of tartar until soft peaks form. -
Step 3
Gradually add the granulated sugar, one tablespoon at a time, whisking continuously until stiff, glossy peaks form and the sugar is dissolved. -
Step 4
Add a few drops of green gel food colouring and gently fold it in until evenly distributed, creating a festive green hue. Be careful not to overmix. -
Step 5
Transfer the meringue to a piping bag fitted with a star tip. Pipe cone shapes onto the prepared baking sheets to resemble Christmas trees. -
Step 6
Decorate the meringue trees with sprinkles while they are still soft. -
Step 7
Bake for 60 minutes, or until the meringues are firm and lift easily off the parchment paper. Turn off the oven and let the meringues cool completely inside the oven with the door ajar.
Important Information
Nutrition Facts (Per Serving)
It is important to consider this information as approximate and not to use it as definitive health advice.
Allergy Information
Please check ingredients for potential allergens and consult a health professional if in doubt.

Leave a Comment