
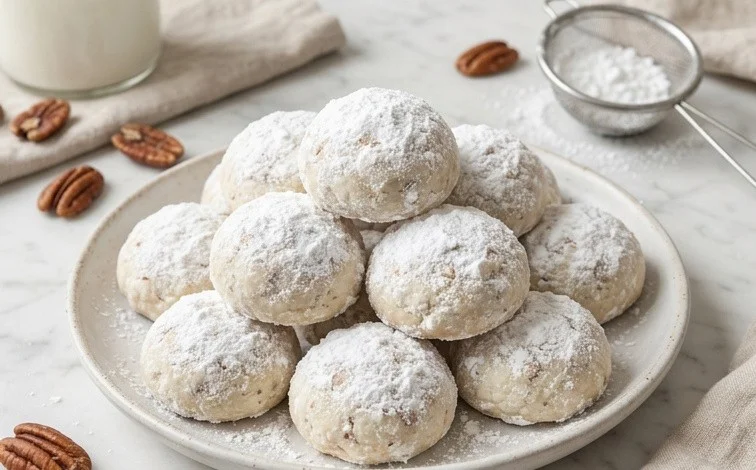
Snowball Cookies are those delightful little mounds that instantly evoke a sense of cozy celebration. They’re the kind of cookie that melts in your mouth, leaving behind just a hint of sweetness and nutty crunch from finely chopped nuts. I love making Snowball Cookies especially when the weather turns cooler, but they’re a fantastic year-round treat for any occasion. What makes them so special is their incredibly tender, crumbly texture, a signature result of the creaming process and the careful balance of ingredients. The snowy coating of powdered sugar is not just for looks; it adds another layer of delicate sweetness that complements the buttery dough perfectly. You can use walnuts as the recipe suggests, or experiment with almonds or pecans for a slightly different nutty profile. Just be sure to chop them very finely so they integrate smoothly into the cookie dough, ensuring every bite is just right.
Snowball Cookies
These Snowball Cookies are a classic for a reason. They’re tender, melt-in-your-mouth little bites that get their name from their beautiful snowy coating of powdered sugar. They’re surprisingly simple to make, and perfect for gifting or just enjoying with a cup of tea. The base is a buttery, crumbly dough with finely chopped nuts for a bit of texture and nutty flavor. You can use walnuts as suggested, or feel free to swap in almonds or pecans if that’s what you have on hand. The key is to chop them very finely so they blend seamlessly into the cookie.
Ingredients:
- 2 cups flour (white, spelt, whole wheat pastry, or Bob’s Red Mill gluten-free blend all work well)
- 1/2 cup finely chopped walnuts (or almonds or pecans)
- 1 cup butter (softened to room temperature, or coconut oil for a dairy-free option)
- 1/2 cup powdered sugar
- Optional additional powdered sugar (for rolling)
Cookie Dough Preparation
Start by creaming together the softened butter (or coconut oil) and the 1/2 cup of powdered sugar. You want to beat these until they are light and fluffy. This might take a few minutes with an electric mixer. Don’t rush this step; it incorporates air into the dough, which contributes to the cookies’ tender texture. If you’re using a stand mixer, use the paddle attachment. If you’re using a hand mixer, just be patient.
Next, you’ll add the dry ingredients. Gradually add the flour to the butter and sugar mixture, mixing on low speed until just combined. Be careful not to overmix the dough once the flour is added, as this can develop the gluten and make the cookies tough. Overmixing is a common mistake with buttery shortbread-style cookies.
Now, fold in the finely chopped nuts. Make sure they are evenly distributed throughout the dough. The nuts add a lovely subtle crunch and a depth of flavor that complements the sweet, buttery cookie. If you’re using a different type of nut, ensure it’s also chopped very finely, about the same size as coarse sand. This helps them bake evenly and not be hard little pebbles in your cookies.
Shaping and Baking
Once your dough is ready, it’s time to form the cookies. You can do this in a couple of ways. The easiest is to roll the dough into small balls, about 1 inch in diameter. You can use a small cookie scoop for consistency, or just scoop out portions with a spoon and roll them between your palms. Place these dough balls onto a baking sheet lined with parchment paper. Leave a little space between them, about 2 inches, as they won’t spread a lot but you want to ensure even baking.
If your dough seems a little soft to roll, you can pop it into the refrigerator for about 15-20 minutes until it’s firmer and easier to handle. This is especially helpful if your kitchen is warm. Once the dough balls are formed and on the baking sheet, you’ll bake them in a preheated oven at 350°F (175°C). Baking time is typically around 10-12 minutes. You’re looking for them to be lightly golden around the edges, but still pale in the center. They will continue to bake slightly on the hot baking sheet after you take them out of the oven, so it’s better to underbake them slightly than to overbake.
The Finishing Touch: The Snowball Effect
This is where the magic happens and these cookies get their name. As soon as the cookies come out of the oven, while they are still warm, you want to gently roll them in the additional powdered sugar. Don’t wait for them to cool completely; the warmth helps the sugar adhere and create that classic snowy coating. Some people like to do a double roll: let them cool for a minute or two, then roll them once, let them cool a bit more, and then give them another roll. This creates a thicker, more snow-like appearance.
If you’d like a more festive variation, you can mix a tablespoon or two of unsweetened cocoa powder into your additional powdered sugar before rolling. This creates a delightful “mudball” or “snowdrift” effect. Just make sure the cookies have cooled a little before rolling in the cocoa mixture, as it can be a bit messier with the warmer cookies. You can also do a mix of both – some plain snowballs and some cocoa-dusted ones.
Allow the cookies to cool completely on a wire rack before storing them. This is important because they are very delicate when warm. Once they are fully cooled, they can be stored in an airtight container at room temperature for up to a week. They actually tend to get even more tender and delicious on the second day. These cookies are a wonderful addition to any holiday cookie platter or just for a simple, sweet treat anytime.

Conclusion:
These Snowball Cookies truly live up to their name, offering a tender, melt-in-your-mouth experience with every bite. The simple combination of butter, sugar, flour, and finely chopped nuts creates a classic cookie that’s both comforting and elegant. Their delicate sweetness and crumbly texture make them a hit with everyone, and the snowy powdered sugar coating adds a festive touch that’s perfect for holidays or just brightening an ordinary day. They are surprisingly simple to put together, making them an ideal baking project for bakers of all skill levels. Enjoy them with a warm cup of tea or coffee, or pack them up as thoughtful homemade gifts. You can also try variations like adding a touch of vanilla extract to the dough for extra aroma or a sprinkle of cinnamon for a warm spice note.
Frequently Asked Questions:
Can I make Snowball Cookies ahead of time?
Absolutely! Snowball Cookies keep very well stored in an airtight container at room temperature for up to a week. In fact, their flavor often deepens slightly after a day or two, so making them ahead is a great idea, especially for events or gifting.
What kind of nuts work best in Snowball Cookies?
Walnuts are traditional and provide a wonderful flavor, but almonds and pecans are excellent substitutions. The most important thing is to chop them very finely – almost to a powder. This ensures they distribute evenly throughout the cookie dough and contribute to the tender texture without creating large chunks.
How do I get the perfect snowy coating?
For the best coating, let the cookies cool completely before rolling them in powdered sugar. You might want to roll them twice: once while the cookies are slightly warm (if you like a thicker coating that slightly melts into the cookie) and then again after they are completely cooled for that classic, powdery snow effect. Make sure to use a generous amount of powdered sugar for that iconic look.
Snowball Cookies
Delicate, melt-in-your-mouth snowball cookies, perfect for holidays or any time you need a sweet treat.
Ingredients
-
2 cups flour
-
1/2 cup finely chopped walnuts
-
1 cup butter
-
1/2 cup powdered sugar
-
additional powdered sugar (for rolling)
Instructions
-
Step 1
Preheat oven to 350°F (175°C). Line baking sheets with parchment paper. -
Step 2
In a large bowl, cream together the butter and powdered sugar until light and fluffy. -
Step 3
Gradually add the flour, mixing until just combined. Stir in the finely chopped walnuts. -
Step 4
Roll dough into 1-inch balls and place on prepared baking sheets. -
Step 5
Bake for 10-12 minutes, or until the edges are lightly golden. The cookies should not brown significantly. -
Step 6
Let cookies cool on the baking sheet for a few minutes before transferring to a wire rack to cool completely. -
Step 7
Once cooled, roll the cookies in additional powdered sugar to resemble snowballs.
Important Information
Nutrition Facts (Per Serving)
It is important to consider this information as approximate and not to use it as definitive health advice.
Allergy Information
Please check ingredients for potential allergens and consult a health professional if in doubt.


Leave a Comment