
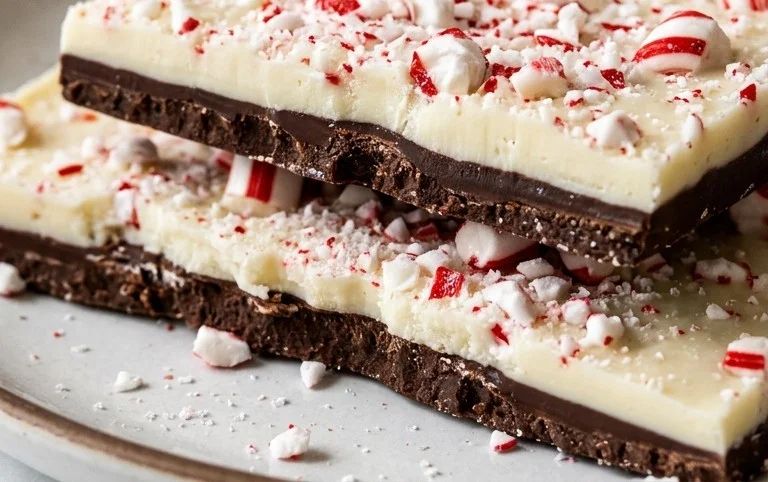
Peppermint Bark Recipe This peppermint bark is a holiday favorite for a reason. It’s simple to make, looks festive, and tastes exactly like those classic treats you find in stores during the season, but even better because you made it yourself. The satisfying snap of the dark chocolate, the sweet creaminess of the white chocolate, and that cool burst of peppermint are a winning combination. I love making big batches to share with neighbors and friends, and it’s always a hit. The beauty of this recipe is its simplicity; you only need a few ingredients and a little bit of patience for the chocolate to set.
Ingredients:
- 18 ounces dark chocolate chips (you can also use semi-sweet or milk chocolate chips if you prefer)
- 18 ounces white chocolate chips
- 1/2 cup crushed candy canes or hard peppermint candies
Instructions:
Prepare Your Workspace and Candy Canes The first step is to get everything ready so that once the chocolate is melted, you can work quickly. Line a baking sheet, roughly 13×18 inches, with parchment paper. You want the parchment paper to hang over the sides a bit; this makes it easier to lift the finished bark off the sheet. Now, let’s deal with the candy canes. Place your candy canes or hard peppermint candies into a sturdy zip-top bag. Seal the bag, removing as much air as possible. Then, using a rolling pin, a meat mallet, or even the bottom of a heavy pan, gently but firmly crush the candies into small pieces. You’re aiming for a mix of fine dust and small, crunchy bits, so don’t over-process them into powder. Set the crushed candy canes aside. This preparation ensures you can move smoothly through the melting and spreading stages.

Peppermint Bark Recipe
This peppermint bark is a holiday favorite for a reason. It’s simple to make, looks festive, and tastes exactly like those classic treats you find in stores during the season, but even better because you made it yourself. The satisfying snap of the dark chocolate, the sweet creaminess of the white chocolate, and that cool burst of peppermint are a winning combination. I love making big batches to share with neighbors and friends, and it’s always a hit. The beauty of this recipe is its simplicity; you only need a few ingredients and a little bit of patience for the chocolate to set.
Ingredients:
- 18 ounces dark chocolate chips (you can also use semi-sweet or milk chocolate chips if you prefer)
- 18 ounces white chocolate chips
- 1/2 cup crushed candy canes or hard peppermint candies
Instructions:
-
Prepare Your Workspace and Candy Canes
The first step is to get everything ready so that once the chocolate is melted, you can work quickly. Line a baking sheet, roughly 13×18 inches, with parchment paper. You want the parchment paper to hang over the sides a bit; this makes it easier to lift the finished bark off the sheet. Now, let’s deal with the candy canes. Place your candy canes or hard peppermint candies into a sturdy zip-top bag. Seal the bag, removing as much air as possible. Then, using a rolling pin, a meat mallet, or even the bottom of a heavy pan, gently but firmly crush the candies into small pieces. You’re aiming for a mix of fine dust and small, crunchy bits. Be careful not to pulverize them into a complete powder; the texture is part of what makes the bark so good. Set the crushed candy aside.
-
Melt the Dark Chocolate
Now, it’s time to melt the dark chocolate. You have a couple of reliable methods for this. The most common and often easiest for home cooks is the microwave method. Place the 18 ounces of dark chocolate chips in a microwave-safe bowl. Microwave on 50% power for 30-second intervals, stirring well after each interval. It’s important to use 50% power to prevent the chocolate from burning. Keep going, stirring each time, until the chocolate is almost entirely melted, with just a few small lumps remaining. Then, stir continuously until the residual heat melts those last few lumps and the chocolate is smooth and glossy. Alternatively, you can use a double boiler. Fill the bottom of a double boiler with about an inch of water and bring it to a simmer. Place the dark chocolate chips in the top bowl, ensuring the bottom of the bowl doesn’t touch the water. Stir constantly until melted and smooth. Once melted, carefully pour the smooth dark chocolate onto the prepared baking sheet. Using a spatula, spread it into an even layer, about 1/8 to 1/4 inch thick. Aim for a rectangular shape that covers a good portion of the baking sheet.
-
Melt the White Chocolate and Add Peppermint
While the dark chocolate layer is still wet, it’s time to prepare the white chocolate. Melt the 18 ounces of white chocolate chips using the same method you used for the dark chocolate—either the microwave (again, on 50% power in 30-second intervals, stirring well each time) or a double boiler. White chocolate can be a little more finicky than dark chocolate, so be extra patient and gentle. Once the white chocolate is melted and smooth, stir in about half of your crushed candy canes. Mix them in just enough to distribute them evenly. This is where you’ll get that lovely peppermint crunch within the white chocolate layer.
-
Assemble the Layers
Quickly and carefully pour the melted white chocolate mixture over the still-warm dark chocolate layer on the baking sheet. Use your spatula to gently spread the white chocolate into an even layer, covering the dark chocolate completely. Don’t overwork it, as you don’t want to mix the two layers too much. You want a distinct separation. Immediately after spreading the white chocolate, sprinkle the remaining crushed candy canes evenly over the top of the white chocolate layer. Press them down gently with your hand or the back of a spatula to help them adhere to the chocolate. This top layer of candy canes is what gives the peppermint bark its signature festive look.
-
Chill and Break the Bark
Now comes the hardest part: waiting! Let the bark sit at room temperature for about 10-15 minutes to start setting. Then, carefully transfer the entire baking sheet to the refrigerator. Chill for at least 1 to 2 hours, or until the chocolate is completely firm and set. You’ll know it’s ready when you can gently press on the surface and it feels solid. Once fully chilled and hardened, use the parchment paper overhang to lift the slab of peppermint bark off the baking sheet. Place it on a cutting board. Now, you can break it into pieces. You can either gently break it with your hands for rustic, irregular shapes, or use a sharp knife to score and cut it into more uniform pieces. Smaller shards and larger chunks are both great. Store the finished peppermint bark in an airtight container at room temperature if your kitchen is cool, or in the refrigerator during warmer months to prevent it from melting. It’s best enjoyed within a week or two.
Conclusion:
This homemade Peppermint Bark Recipe is a delightful way to capture the festive spirit of the holidays. Its simple charm lies in the contrasting textures of smooth chocolate and crunchy candy, all brought together by that refreshing peppermint flavor. You’ve seen how straightforward it is: melt, layer, sprinkle, and set. The result is a beautiful and delicious treat that rivals anything you can buy in a store, made with care in your own kitchen. It’s perfect for gifting, adding to cookie platters, or simply enjoying with a cup of hot cocoa on a cold evening. Don’t be afraid to experiment with the chocolate types or the amount of peppermint crunch to suit your taste.
Frequently Asked Questions:
Can I use different kinds of chocolate?
Absolutely. While the recipe calls for dark and white chocolate, feel free to substitute with semi-sweet or milk chocolate chips. You can even do a three-layer bark using all three types for a richer flavor profile and visual appeal.
How should I store the peppermint bark?
Once completely set, break the bark into pieces and store it in an airtight container at cool room temperature or in the refrigerator. Placing parchment paper between layers can prevent sticking, especially if it’s warm. It stays fresh for about two weeks.
What if I don’t have candy canes?
No problem. You can use hard peppermint candies, like starlight mints, and crush them just the same. The key is to get that intense peppermint flavor and satisfying crunch.
Peppermint Bark Recipe
A classic holiday treat, easy-to-make peppermint bark with crunchy candy cane pieces.
Ingredients
-
18 ounces dark chocolate chips
-
18 ounces white chocolate chips
-
1/2 cup crushed candy canes
-
1 teaspoon peppermint extract
-
1/4 teaspoon salt
Instructions
-
Step 1
Line a baking sheet with parchment paper. -
Step 2
Melt the dark chocolate chips. You can do this in a double boiler or in the microwave in 30-second intervals, stirring in between, until smooth. -
Step 3
Pour the melted dark chocolate onto the prepared baking sheet and spread it into a thin, even layer. -
Step 4
Melt the white chocolate chips using the same method as the dark chocolate. -
Step 5
Pour the melted white chocolate over the dark chocolate layer and spread it evenly. -
Step 6
Immediately sprinkle the crushed candy canes over the white chocolate layer. -
Step 7
Gently press the candy canes into the chocolate to ensure they adhere. -
Step 8
Allow the peppermint bark to set completely at room temperature or in the refrigerator for about 30 minutes. -
Step 9
Once set, break the peppermint bark into pieces.
Important Information
Nutrition Facts (Per Serving)
It is important to consider this information as approximate and not to use it as definitive health advice.
Allergy Information
Please check ingredients for potential allergens and consult a health professional if in doubt.



Leave a Comment