Rustic no-knead cranberry orange bread is what I reach for when I want something comforting and flavorful without a lot of fuss. It’s the kind of bread that makes your kitchen smell amazing as it bakes, and it’s surprisingly simple to make thanks to the no-knead method. The combination of tart cranberries and bright orange zest is a classic for a reason, and it turns out wonderfully in this soft, slightly chewy bread. It’s perfect for breakfast, brunch, or just with a cup of tea. Plumping the cranberries is a small step that makes a big difference in the final texture, ensuring they are soft and hydrated without drawing too much moisture from the dough itself. This is a bread that proves you don’t need complex techniques to achieve truly satisfying results, just a bit of patience and good ingredients. The beautiful orange hue from the zest and the festive red of the cranberries make it a treat for the eyes as well as the palate.
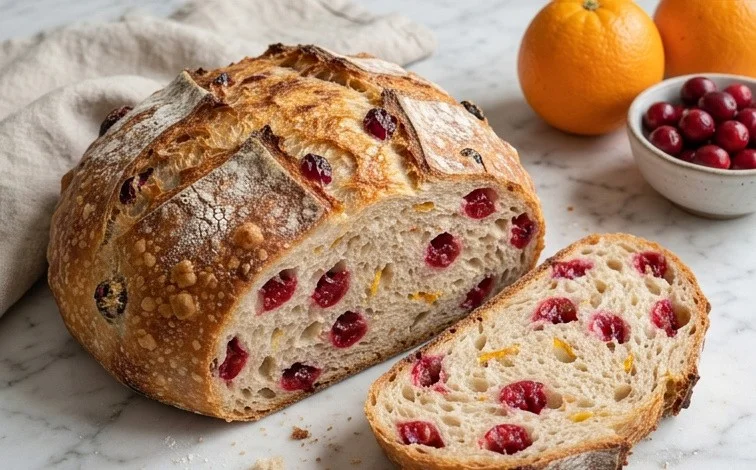
Rustic No-Knead Cranberry Orange Bread
This rustic cranberry orange bread is what I reach for when I want something comforting and flavorful without a lot of fuss. It’s the kind of bread that makes your kitchen smell amazing as it bakes, and it’s surprisingly simple to make thanks to the no-knead method. The combination of tart cranberries and bright orange zest is a classic for a reason, and it turns out wonderfully in this soft, slightly chewy bread. It’s perfect for breakfast, brunch, or just with a cup of tea.
Ingredients:
- 3 cups all purpose flour
- ½ tsp. active dry yeast
- 2 tsp. salt
- 1½ cups water
- zest of 2 oranges
- ¾ cup “plumped” dried cranberries
Getting Started: Plumping the Cranberries
Before we even think about mixing the dough, let’s get those dried cranberries ready. I like to “plump” them because it rehydrates them slightly, making them softer and less likely to absorb moisture from the dough, which can sometimes lead to a drier finished product. It’s a simple step that makes a difference. In a small bowl, combine your ¾ cup of dried cranberries with enough warm water to just cover them. Let them sit for about 15-20 minutes while you prepare the dough. You’ll see them swell up a bit. Once plumped, drain them very well. You can gently press out any excess water with a paper towel if you want to be sure.
Mixing the Dough
This no-knead dough is almost ridiculously easy to put together. In a large mixing bowl, whisk together your 3 cups of all-purpose flour, ½ teaspoon of active dry yeast, and 2 teaspoons of salt. Make sure everything is well distributed. Then, add 1½ cups of lukewarm water to the dry ingredients. The water temperature is important here; it should feel warm to the touch, like a comfortable bath, but not hot. If it’s too hot, it can kill the yeast, and if it’s too cold, the yeast won’t activate properly.
Now, add the zest of 2 oranges. This is where a lot of that lovely citrus fragrance comes from. You can zest them directly into the bowl. Use a microplane or a fine grater to get just the colored part of the peel; the white pith underneath can be bitter. Stir everything together with a wooden spoon or a spatula. You’re not looking for a smooth, elastic dough like you would with traditional bread making. This dough will be very wet and shaggy, almost like a thick batter. Don’t worry if it looks messy; that’s exactly what you want. Just mix until all the flour is hydrated and you don’t see any dry patches.
The Long, Slow Rise
Once your dough is mixed, cover the bowl tightly with plastic wrap or a lid. Leave it on the counter in a relatively warm spot for about 12 to 18 hours. This long, slow fermentation is what develops the flavor and texture of the bread without any kneading. During this time, the yeast will work its magic, creating tiny air bubbles that will give the bread its characteristic open crumb. It will more than double in size and become very bubbly on the surface. The longer it ferments, the more complex the flavor will become. If your kitchen is cooler, it might take the longer end of that time range. I usually start mine in the evening, and it’s ready to bake the next afternoon.
Shaping and the Second Rise
After the long first rise, the dough will be visibly puffy and covered in small bubbles. Gently uncover the bowl. Now, it’s time to add those plumped and drained cranberries. Sprinkle them over the surface of the dough, then use your spatula or a floured hand to gently fold them into the dough a few times. Again, don’t overwork it. You just want to distribute them.
Prepare a clean surface by lightly flouring it. Turn the very wet dough out onto the floured surface. It will spread quite a bit. Using floured hands, gently shape the dough into a rough ball or log. The trick here is to be gentle and not deflate all those air bubbles. You’re essentially just tucking the edges underneath to create some surface tension.
Now, place your shaped dough onto a piece of parchment paper. This makes it easy to transfer to your hot pot later. Cover the dough loosely with plastic wrap or a clean kitchen towel. Let it rest for another 1 to 1.5 hours. During this second rise, the dough will puff up again, becoming lighter and airier. It won’t double in size like the first rise, but it will look noticeably more relaxed and puffy.
Baking the Bread
About 30 minutes before the end of the second rise, place a Dutch oven or a heavy, oven-safe pot with a lid into your oven. You want the pot to get screaming hot, so preheat your oven to 450 degrees Fahrenheit (230 degrees Celsius). A hot pot is key to getting a good crust.
Once the oven and pot are preheated, and your dough has finished its second rise, it’s time to bake. Carefully remove the hot Dutch oven from the oven (use oven mitts!). Remove the lid. Using the parchment paper as handles, gently lift the dough and carefully lower it into the hot pot. It’s okay if it’s a little bit lopsided; that’s part of its rustic charm. Replace the lid on the Dutch oven.
Place the covered pot back into the hot oven. Bake for 30 minutes with the lid on. The lid traps the steam released from the dough, which helps the bread to rise and develop a beautiful, crackly crust. After 30 minutes, carefully remove the lid. The bread should look pale and puffed up. Continue to bake for another 15-25 minutes, or until the crust is a deep golden brown and the internal temperature of the bread reaches 200-210 degrees Fahrenheit (93-99 degrees Celsius) when tested with an instant-read thermometer.
Once baked, carefully remove the bread from the Dutch oven using the parchment paper. Transfer it to a wire rack to cool completely. Resist the urge to slice into it right away! The inside needs to set. Letting it cool fully will result in a much better texture. This bread is wonderful served warm or at room temperature. Enjoy the simple, delicious flavor!
Conclusion:
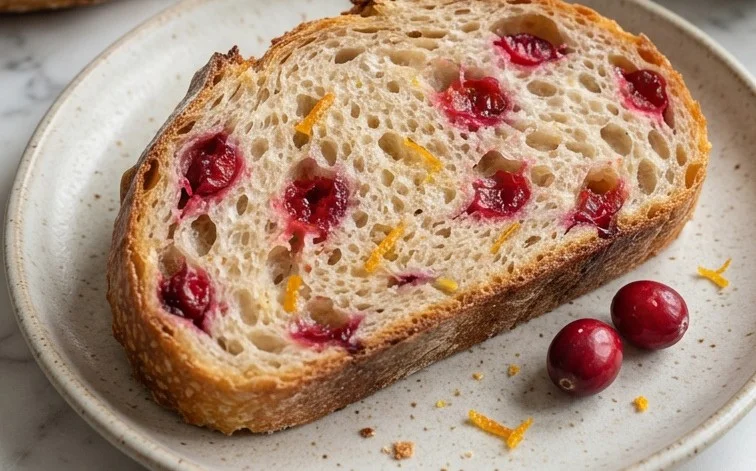
This rustic no-knead cranberry orange bread is a joy to make and even better to eat. The simplicity of the no-knead method means anyone can achieve a wonderfully textured loaf, making it a fantastic option for both beginner bakers and seasoned pros looking for a comforting bake. The bright notes of orange and the tartness of cranberries create a truly delightful flavor profile that is both refreshing and satisfying, perfect for any occasion. It’s a bread that fills your home with a wonderful aroma and brings a touch of handmade goodness to your table.
Serving this bread is a pleasure. It’s fantastic simply sliced and enjoyed on its own, perhaps toasted lightly with a smear of butter. It also pairs beautifully with a cup of coffee or tea for a relaxed breakfast or afternoon snack. For brunch, consider serving it alongside eggs or with a dollop of cream cheese. A variation you might enjoy is adding a teaspoon of ground ginger to the dry ingredients for a subtle spicy warmth that complements the orange and cranberry.
What is the best way to store this bread?
Once completely cooled, wrap the bread tightly in plastic wrap or place it in an airtight container. It will keep at room temperature for 2-3 days. For longer storage, you can freeze slices or the whole loaf.
Can I use fresh cranberries instead of dried?
Yes, you can use fresh cranberries. You would need about 1 to 1.5 cups of fresh cranberries. They will not need to be plumped. Be aware that fresh cranberries release more moisture as they bake, which might make the bread slightly more cake-like.
My dough is too sticky, what should I do?
No-knead doughs are meant to be sticky and shaggy. If it feels excessively wet, you can add flour 1 tablespoon at a time until it’s manageable to handle, but avoid adding too much, as this can lead to a dense loaf. Ensure you have plumped and drained your cranberries well, as this can affect dough hydration.
Rustic No-Knead Cranberry Orange Bread
A simple, no-knead bread bursting with tart cranberries and bright orange zest, perfect for any occasion.
Ingredients
-
3 cups all purpose flour
-
½ tsp. active dry yeast
-
2 tsp. salt
-
1½ cups water
-
zest of 2 oranges
-
¾ cup plumped dried cranberries
Instructions
-
Step 1
In a large bowl, whisk together the flour, active dry yeast, and salt. -
Step 2
Pour in the water and stir until just combined and a shaggy dough forms. Let it rest for 5 minutes. -
Step 3
Add the orange zest and plumped dried cranberries. Gently fold them into the dough until evenly distributed. -
Step 4
Cover the bowl with plastic wrap and let it rise in a warm place for at least 2 hours, or until doubled in size. -
Step 5
Preheat your oven to 450°F (230°C). Place a Dutch oven with its lid inside the oven while it preheats. -
Step 6
Carefully remove the hot Dutch oven from the oven. Turn the dough out onto a piece of parchment paper. Score the top of the dough with a sharp knife. -
Step 7
Carefully lift the dough using the parchment paper and lower it into the hot Dutch oven. Place the lid back on. -
Step 8
Bake for 30 minutes with the lid on. Remove the lid and bake for an additional 5-10 minutes, or until the crust is golden brown and the internal temperature reaches 200-210°F (93-99°C). -
Step 9
Remove the bread from the Dutch oven and let it cool completely on a wire rack before slicing.
Important Information
Nutrition Facts (Per Serving)
It is important to consider this information as approximate and not to use it as definitive health advice.
Allergy Information
Please check ingredients for potential allergens and consult a health professional if in doubt.
Leave a Comment