Mixed Vegetables Refrigerator Pickles are a fantastic way to use up garden abundance or just brighten up your week with some zesty, crunchy vegetables. I love making a big batch when I have an assortment of fresh produce from the market. They are incredibly easy, require no canning, and are ready to eat in just a few days, making them a perfect quick pickle project. The mix of textures and flavors is what makes them so appealing – crisp cucumbers, tender carrots, snappy celery, and sweet bell peppers all swimming in a tangy, spiced brine. This recipe uses common pantry staples and fresh produce to create a condiment that’s far superior to anything store-bought. You can customize the vegetables based on what you have on hand, making these refrigerator pickles incredibly versatile. They stay crisp for weeks in the fridge, so you can enjoy them throughout the season.
Ingredients:
- 1 cup sliced pickling cucumbers (about 1/4-inch thick)
- 1 cup cauliflower florets (bite-sized)
- 1/3 cup sliced peeled carrots (about 1/4-inch thick rounds or half-moons)
- 1/3 cup sliced celery (about 1/4-inch thick pieces)
- 1/3 cup sliced onions (thinly sliced, yellow or red work well)
- 1 medium bell pepper (seeded and cut into strips, any color you like)
- 2 cups white vinegar (5% acidity)
- 1 cup water
- 2 tablespoons sugar
- 1 tablespoon pickling salt (or non-iodized salt like kosher salt)
- 1 tablespoon pickling spice blend
- 4 sprigs fresh dill
- 1 small dried chili pepper (optional, for a touch of heat)
- 2 teaspoons mustard seeds
- 1 teaspoon celery seeds
Preparing the Vegetables
The first step is to get all your vegetables prepped and ready. Wash all your produce thoroughly. For the cucumbers, slicing them about 1/4-inch thick gives them a good crunch without being too overwhelming. If you have larger pickling cucumbers, you can cut them into half-moons or quarter-moons for better bite-size pieces. For the cauliflower, make sure the florets are bite-sized so they pickle evenly. Carrots should be sliced thinly, either into rounds or half-moons, about 1/4-inch thick for a tender-crisp texture. Celery should be cut into similar 1/4-inch pieces. Onions can be thinly sliced; yellow or red onions both add a nice flavor and color. Bell peppers should be seeded and cut into strips that are easy to grab. This thorough preparation ensures each vegetable cooks evenly in the brine and maintains a pleasant texture.
Making the Brine
While the vegetables are draining, it’s time to make the pickling brine. In a medium saucepan, combine the white vinegar, water, sugar, pickling salt, pickling spice blend, mustard seeds, celery seeds, and the optional dried chili pepper. Place the saucepan over medium-high heat. Stir the mixture occasionally until the sugar and salt have completely dissolved. Bring the brine to a rolling boil. Once boiling, let it bubble for about one minute to allow the spices to release their flavors. This ensures the brine is well-infused and ready to pickle the vegetables. Be careful when handling boiling liquids.
Assembling the Pickles
Now it’s time to bring everything together. Grab your clean jars. Wide-mouth jars are usually the easiest to work with for packing vegetables. You can use quart-sized jars or even larger ones, depending on the batch size you’re making. Divide the fresh dill sprigs and the optional dried chili pepper among the jars. Next, pack the prepared vegetables tightly into the jars. Alternate the vegetables to ensure a good mix in each jar. Try to fill the jars as full as you can without crushing the vegetables. This helps keep them submerged in the brine.
Pickling Process
Once the jars are packed with vegetables, carefully ladle the hot brine over the vegetables. Make sure to fill the jars all the way to the top, ensuring that all the vegetables are completely submerged in the brine. This is essential for proper pickling and to prevent spoilage. Leave about 1/2 inch of headspace at the top of the jar. Gently tap the jars on the counter a few times to release any trapped air bubbles. You can also use a clean skewer or chopstick to run around the inside edges of the jar to dislodge bubbles. Place the lids on the jars and let them cool on the counter until they reach room temperature. Once cooled, transfer the jars to the refrigerator.
Storage and Serving
These Mixed Vegetables Refrigerator Pickles are ready to eat after about 24 to 48 hours, but they taste even better after a few days, allowing the flavors to meld and deepen. They will keep in the refrigerator for at least 3-4 weeks, sometimes longer if they remain fully submerged in the brine. The vegetables should retain a pleasant crunch. To serve, simply spoon them out of the jar as needed. They are wonderful as a side to sandwiches, burgers, or grilled meats. Chop them up and add them to potato salad, coleslaw, or tuna salad for a zesty kick. You can also serve them on a charcuterie board or as a bright accompaniment to any meal.
Tips and Variations
Don’t have pickling cucumbers? Regular cucumbers work, but might become softer faster. For a spicier pickle, add more chili peppers or a pinch of red pepper flakes to the brine. If you don’t have a pre-made pickling spice blend, you can create your own with equal parts dill seed, mustard seed, coriander seed, and a pinch of cloves or allspice. Feel free to add other crisp vegetables like green beans, radishes, or snap peas. Just ensure they are cut to a size that will pickle evenly. Make sure your jars are very clean to prevent any unwanted bacteria.
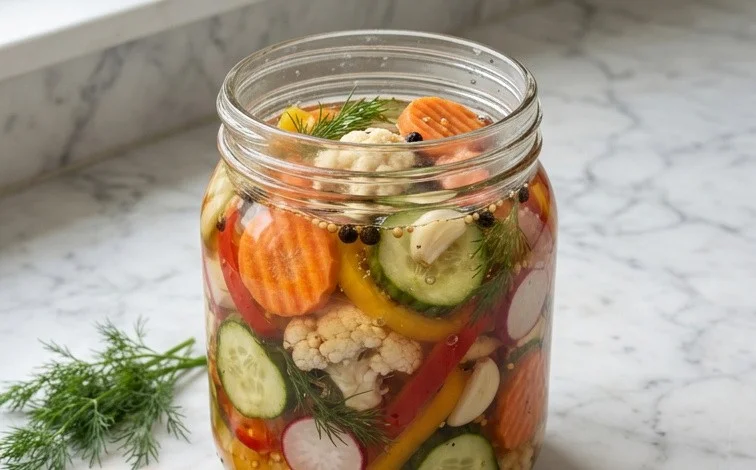
Mixed Vegetables Refrigerator Pickles
These refrigerator pickles are a fantastic way to use up garden abundance or just brighten up your week with some zesty, crunchy vegetables. I love making a big batch when I have an assortment of fresh produce from the market. They are incredibly easy, require no canning, and are ready to eat in just a few days, making them a perfect quick pickle project. The mix of textures and flavors is what makes them so appealing – crisp cucumbers, tender carrots, snappy celery, and sweet bell peppers all swimming in a tangy, spiced brine.
Ingredients:
- 1 cup sliced pickling cucumbers (about 1/4-inch thick)
- 1 cup cauliflower florets (bite-sized)
- 1/3 cup sliced peeled carrots (about 1/4-inch thick rounds or half-moons)
- 1/3 cup sliced celery (about 1/4-inch thick pieces)
- 1/3 cup sliced onions (thinly sliced, yellow or red work well)
- 1 medium bell pepper (seeded and cut into strips, any color you like)
- 2 cups white vinegar (5% acidity)
- 1 cup water
- 2 tablespoons sugar
- 1 tablespoon pickling salt (or non-iodized salt like kosher salt)
- 1 tablespoon pickling spice blend
- 4 sprigs fresh dill
- 1 small dried chili pepper (optional, for a touch of heat)
- 2 teaspoons mustard seeds
- 1 teaspoon celery seeds
Preparing the Vegetables
The first step is to get all your vegetables prepped and ready. Wash all your produce thoroughly. For the cucumbers, slicing them about 1/4-inch thick gives them a good crunch without being too overwhelming. If you have larger pickling cucumbers, you might want to cut them into half-moons or quarter-rounds. Break your cauliflower into bite-sized florets; if they are too large, they won’t pickle as evenly. Peel your carrots and slice them thinly, similar to the cucumbers. Slice your celery into bite-sized pieces, and thinly slice your onions. For the bell pepper, remove the seeds and membranes, then cut it into strips that are easy to grab with a fork. Having all your vegetables cut to a similar size ensures they pickle at roughly the same rate.
Making the Brine
While you’re preparing the vegetables, you can get the brine started. In a medium saucepan, combine the white vinegar, water, sugar, and pickling salt. Stir these ingredients together over medium heat. You want to heat the mixture until the sugar and salt are completely dissolved. This usually takes just a few minutes. Don’t let it boil vigorously; a gentle simmer is all that’s needed to ensure everything dissolves properly. Once dissolved, remove the saucepan from the heat. This brine is what will infuse all the vegetables with that classic pickle flavor and help preserve them.
Assembling the Jars
Now it’s time to pack your jars. You’ll need clean glass jars with tight-fitting lids. I prefer using quart-sized jars for this recipe, but you can also use pint jars. Divide the prepared vegetables among your jars, packing them in fairly snugly but not so tight that they can’t absorb the brine. Distribute the dill sprigs, the dried chili pepper (if using), mustard seeds, and celery seeds evenly between the jars as you layer the vegetables. Adding these aromatics and spices directly to the jar infuses the pickles with their wonderful flavor as they sit. If you’re using a store-bought pickling spice blend, you can add about a tablespoon of that to the brine itself, or divide it among the jars as well.
Adding the Brine and Chilling
Once the jars are filled with vegetables and aromatics, carefully pour the warm (not hot) brine over the vegetables. Make sure the brine covers all the vegetables completely. Leave about a 1/2-inch headspace at the top of each jar. Gently tap the jars on the counter a few times to release any trapped air bubbles. Wipe the rims of the jars clean with a damp cloth to ensure a good seal, then screw on the lids tightly. Let the jars cool down on the counter for about an hour. Once they are at room temperature, transfer them to the refrigerator. This is why they are called refrigerator pickles – they don’t require a hot water bath for sealing.
Waiting for the Magic to Happen
Now comes the hardest part: waiting! For these pickles to reach their best flavor, they need at least 24 to 48 hours in the refrigerator to allow the flavors to meld and the vegetables to soften slightly while retaining their crunch. I usually wait at least two full days before I open the first jar. The longer they sit, the more the flavors will develop. You’ll notice the brine becoming cloudier as the flavors infuse. These pickles are wonderful as a side dish, on sandwiches, or just enjoyed straight from the jar when you need a little tangy crunch.
Storage and Enjoyment
These mixed vegetable refrigerator pickles will keep in the refrigerator for about 2 to 3 weeks. Because they are not heat-processed, they won’t last as long as traditional canned pickles, but they are so quick and easy to make that you can whip up another batch whenever you run out. They are incredibly versatile. I love them on burgers, in potato salad, or as part of an antipasto platter. The combination of the crunchy vegetables and the zesty, spiced brine is truly satisfying.
Conclusion:
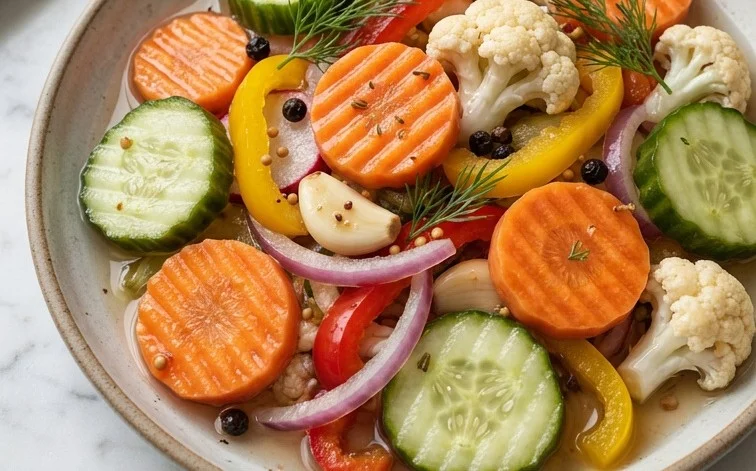
These Mixed Vegetables Refrigerator Pickles are a true kitchen staple for anyone who loves a tangy, crunchy condiment. They’re incredibly simple to make, require no special canning equipment, and offer a customizable way to preserve fresh produce. The combination of crisp vegetables like cucumbers and carrots with the zesty, spiced brine is incredibly satisfying and versatile. You’ll find yourself reaching for them to liven up sandwiches, salads, or just as a snack straight from the jar. Making a batch is a rewarding way to enjoy the flavors of the season long after the harvest is over.
Serving Suggestions:
Serve these pickles chilled alongside grilled chicken or beef. They are also fantastic chopped and mixed into tuna salad, egg salad, or potato salad for an extra layer of flavor and texture. A small bowl of these refrigerator pickles makes a bright appetizer or a welcome addition to any picnic spread.
Variations:
For a different flavor profile, consider adding a few slices of jalapeño along with the chili pepper for more heat, or swap some of the dill for fresh parsley or oregano. You can also experiment with adding thinly sliced kohlrabi or Brussels sprouts, cut into halves.
Frequently Asked Questions:
How long do these refrigerator pickles last?
Stored properly in the refrigerator and fully submerged in brine, these pickles should stay fresh and crunchy for at least 3 to 4 weeks. Always check for any signs of spoilage before consuming.
Can I use different vegetables?
Absolutely! This recipe is very forgiving. Feel free to add other firm vegetables like snap peas, radishes, green beans, or even thinly sliced zucchini. Just ensure they are cut into manageable, bite-sized pieces so they pickle evenly.
My vegetables are soft, not crunchy. What did I do wrong?
Several things could cause this. Ensure you are using fresh, firm vegetables. Over-boiling the brine or letting the vegetables sit in the hot brine for too long before refrigerating can also soften them. Make sure to chill them in the refrigerator promptly after packing.
Mixed Vegetables Refrigerator Pickles
A quick and easy refrigerator pickle recipe featuring a vibrant mix of garden vegetables.
Ingredients
-
1 cup sliced pickling cucumbers
-
1 cup cauliflower florets
-
1/3 cup sliced peeled carrots
-
1/3 cup sliced celery
-
1/3 cup sliced onions
-
1 medium bell pepper (seeded and cut into strips)
-
2 cups white vinegar
-
1 cup water
-
2 tablespoons sugar
-
1 tablespoon pickling salt
-
1 tablespoon pickling spice
-
4 sprigs fresh dill
-
1 small dried chili pepper
-
2 teaspoons mustard seeds
-
1 teaspoon celery seeds
Instructions
-
Step 1
Prepare the vegetables: Wash and slice the pickling cucumbers, separate cauliflower into florets, slice carrots, celery, and onions, and seed and cut the bell pepper into strips. Combine all prepared vegetables in a large bowl. -
Step 2
Make the brine: In a saucepan, combine white vinegar, water, sugar, pickling salt, and pickling spice. Bring to a simmer over medium heat, stirring until sugar and salt are dissolved. -
Step 3
Add aromatics: Stir in the fresh dill sprigs, dried chili pepper, mustard seeds, and celery seeds into the simmering brine. Let it simmer for 2 minutes. -
Step 4
Pack jars: Tightly pack the prepared vegetables into clean jars, distributing them evenly. -
Step 5
Pour brine: Carefully pour the hot brine over the vegetables in the jars, ensuring they are fully submerged. Leave about 1/2 inch of headspace. -
Step 6
Cool and refrigerate: Let the jars cool to room temperature on the counter. Once cooled, seal the jars tightly and refrigerate. Allow to pickle for at least 24 hours before serving.
Important Information
Nutrition Facts (Per Serving)
It is important to consider this information as approximate and not to use it as definitive health advice.
Allergy Information
Please check ingredients for potential allergens and consult a health professional if in doubt.


Leave a Comment