
Polar Bear Cookies have a crisp, almost snowy texture that makes them feel special, like a little bite of winter wonder. They’re a favorite because they look so pure and white, and they have that satisfying crunch that’s hard to find in softer cookies. I love making these when I want something festive but not overly complicated. The secret to their unique snap comes from a clever combination of ingredients in the dough, which I’ll walk you through. Plus, the simple, sweet frosting is the perfect finishing touch. These aren’t just any sugar cookies; they’re designed for a distinct texture that contrasts beautifully with the smooth, creamy icing. We achieve this texture by carefully balancing the fats and ensuring we don’t overwork the dough, keeping them light and crisp even after they’re frosted.
The Dough Ingredients
- 3/4 cup (1 1/2 sticks) unsalted butter, room temperature (170g)
- 1/2 cup or 4 oz. full fat cream cheese, room temp (113g)
- 1 1/2 cups granulated sugar (300g)
- 1 large egg, room temperature (56g)
- 2 tsp vanilla extract or vanilla bean paste (8g)
- 3 cups all-purpose flour (375g)
- 1 Tbsp cornstarch (8g)
- 1/2 tsp baking powder (2g)
- 1/2 tsp fine salt (3g)
The Frosting Ingredients
- 1 cup unsalted butter, room temperature (226g)
- 1 Tbsp vanilla extract or vanilla bean paste (12g)
- 1/2 tsp fine salt (3g)
- 3 1/2 cups powdered sugar (454g or 1 lb. box)
- 1/4 cup heavy whipping cream, room temperature (60g)
- 1 cup coarse sanding sugar
Polar Bear Cookies – The Dough
These cookies get their name from their pale, snowy appearance and their wonderfully crisp texture, reminiscent of a chilly Arctic landscape. They’re a simple sugar cookie base that we’ll transform with a little shaping and a sweet frosting. The key to their delightful crunch is the combination of cream cheese in the dough, which adds a subtle tang and tenderness without making them soft, and the correct baking time. Making sure your butter and cream cheese are truly at room temperature is important for achieving a smooth dough that incorporates all the ingredients evenly. If they’re too cold, the dough can become lumpy and tough.
1. Creaming the Wet Ingredients: In a large mixing bowl, combine the 3/4 cup (1 1/2 sticks) of softened unsalted butter and the 1/2 cup (4 oz.) of room temperature full-fat cream cheese. Using an electric mixer (handheld or stand mixer with paddle attachment), beat them together on medium speed until the mixture is light and fluffy, about 3-4 minutes. This step is crucial for incorporating air, which contributes to the cookie’s final texture. Scrape down the sides of the bowl halfway through to ensure everything is evenly mixed.
2. Adding Sugar and Egg: Gradually add the 1 1/2 cups of granulated sugar to the creamed butter and cream cheese mixture. Continue mixing on medium speed until well combined and the mixture becomes even lighter and fluffier, about another 2-3 minutes. Beat in the large egg and 2 teaspoons of vanilla extract. Mix until just combined; be careful not to overmix once the egg is added, as this can toughen the cookies. The mixture should look smooth and cohesive.
3. Combining Dry Ingredients: In a separate medium bowl, whisk together the 3 cups of all-purpose flour, 1 tablespoon of cornstarch, 1/2 teaspoon of baking powder, and 1/2 teaspoon of fine salt. Whisking helps to distribute the leavening agents and salt evenly throughout the flour, preventing pockets of saltiness or uneven rising. Cornstarch is used here to enhance the crispness of the cookies.
4. Forming the Dough: Gradually add the dry ingredient mixture to the wet ingredients, mixing on low speed until just combined. Mix only until no streaks of flour remain. Overmixing the dough at this stage can develop the gluten in the flour too much, resulting in tough cookies. The dough should look cohesive but still slightly soft. Turn the dough out onto a clean surface and gently bring it together into a disc. Wrap the dough tightly in plastic wrap and refrigerate for at least 1 hour, or up to 2 days. Chilling the dough is essential for making it easier to handle and for developing its flavor and texture. It also helps prevent the cookies from spreading too much during baking.
Polar Bear Cookies – The Frosting
The frosting for these cookies is a simple buttercream that provides a sweet, smooth contrast to the crisp cookie base. We want it to be thick enough to hold its shape but still spreadable. Using room temperature ingredients for the frosting is just as important as it is for the dough to ensure a smooth, lump-free consistency.
1. Creaming the Butter: In a large mixing bowl, combine the 1 cup of room temperature unsalted butter, 1 tablespoon of vanilla extract, and 1/2 teaspoon of fine salt. Beat with an electric mixer on medium speed until the butter is completely softened and creamy, about 2-3 minutes. Make sure there are no lumps of butter remaining.
2. Adding Powdered Sugar: Gradually add the 3 1/2 cups of powdered sugar to the creamed butter, about a cup at a time, mixing on low speed until each addition is incorporated. Once all the powdered sugar is added, increase the mixer speed to medium-high and beat for another 2-3 minutes until the frosting is light and fluffy. This process incorporates air, making the frosting airy and smooth.
3. Adjusting Consistency: Add the 1/4 cup of heavy whipping cream to the frosting. Mix on low speed until just combined, then increase to medium speed and beat for 1-2 minutes more until the frosting reaches a smooth, spreadable consistency. If the frosting seems too thick, add another teaspoon of cream at a time until it’s right. If it seems too thin, add a bit more powdered sugar.
Shaping and Baking the Polar Bear Cookies
This is where the cookies start to look like their namesake! The shaping is simple and relies on creating a smooth, round cookie that bakes up pale.
1. Preparing the Dough: Remove the chilled dough from the refrigerator. Take about 1.5 tablespoons of dough and roll it into a smooth ball between your palms. If the dough is too stiff, let it sit at room temperature for 5-10 minutes to soften slightly, but avoid letting it get too warm. Smooth balls help the cookies bake evenly and maintain their round shape.
2. Rolling in Sanding Sugar: Place the coarse sanding sugar in a shallow bowl. Gently roll each dough ball in the sanding sugar until it’s evenly coated. This sugar coating gives the cookies their sparkly, snowy appearance and adds a delightful crunch.
3. Baking: Place the coated dough balls about 2 inches apart on baking sheets lined with parchment paper. This spacing allows them to spread slightly without touching. Bake in a preheated oven at 350°F (175°C) for 10-12 minutes. You’re looking for the edges to be very lightly golden, but the centers should still appear pale. It’s important not to overbake them if you want that signature crisp texture and white appearance. Rotate the baking sheets halfway through baking for even cooking.
4. Cooling: Let the cookies cool on the baking sheets for 5 minutes before transferring them to a wire rack to cool completely. Allowing them to cool on the sheet initially lets them set up properly. Ensure they are completely cool before frosting.
Decorating the Polar Bear Cookies
Decorating these cookies is simple and lets the cookie itself be the star.
1. Frosting the Cookies: Once the cookies are completely cool, spread a layer of the prepared buttercream frosting evenly over the top of each cookie using an offset spatula or a butter knife. Aim for a smooth, even layer. You can make swirls or keep it flat, depending on your preference.
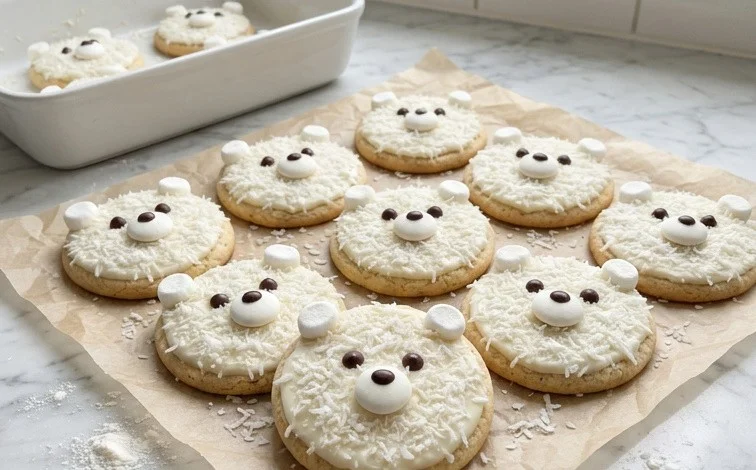
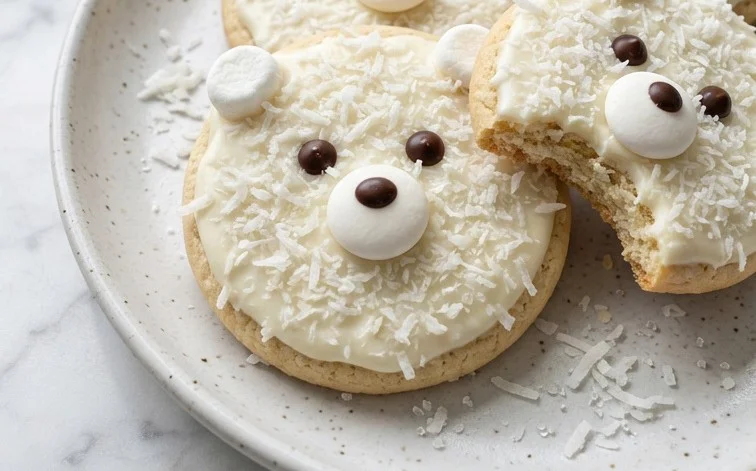
2. Adding Finishing Touches (Optional): For extra sparkle, you can sprinkle a little more coarse sanding sugar over the wet frosting. You could also add a tiny drop of black edible food coloring to a small amount of frosting to create ‘eyes’ or ‘noses’ for a more literal polar bear look, or use edible marker pens. However, the simple frosted cookie is traditional and very appealing.
Ingredients:
- 3/4 cup (1 1/2 sticks) unsalted butter, room temperature (170g)
- 1/2 cup or 4 oz. full fat cream cheese, room temp (113g)
- 1 1/2 cups granulated sugar (300g)
- 1 large egg, room temperature (56g)
- 2 tsp vanilla extract or vanilla bean paste (8g)
- 3 cups all-purpose flour (375g)
- 1 Tbsp cornstarch (8g)
- 1/2 tsp baking powder (2g)
- 1/2 tsp fine salt (3g)
- 1 cup unsalted butter, room temperature (226g)
- 1 Tbsp vanilla extract or vanilla bean paste (12g)
- 1/2 tsp fine salt (3g)
- 3 1/2 cups powdered sugar (454g or 1 lb. box)
- 1/4 cup heavy whipping cream, room temperature (60g)
- 1 cup coarse sanding sugar
Polar Bear Cookies – The Dough
These cookies get their name from their pale, snowy appearance and their wonderfully crisp texture, reminiscent of a chilly Arctic landscape. They’re a simple sugar cookie base that we’ll transform with a little shaping and a sweet frosting. The key to their delightful crunch is the combination of cream cheese in the dough, which adds a subtle tang and tenderness without making them soft, and the correct baking time. Making sure your butter and cream cheese are truly at room temperature is important for achieving a smooth dough that incorporates all the ingredients evenly. If they’re too cold, the dough can become lumpy and tough.
1. Creaming the Wet Ingredients:
In a large mixing bowl, combine the 3/4 cup (1 1/2 sticks) of softened unsalted butter and the 1/2 cup (4 oz.) of room temperature full-fat cream cheese. Using an electric mixer (handheld or stand mixer with a paddle attachment), beat these together on medium speed until they are light and fluffy, with no lumps of cream cheese remaining. This usually takes about 2-3 minutes. Gradually add the 1 1/2 cups of granulated sugar and continue to beat until the mixture is pale and airy, scraping down the sides of the bowl as needed. This process incorporates air, which contributes to the cookie’s texture. Next, add the large egg and the 2 teaspoons of vanilla extract. Mix on low speed until just combined, being careful not to overmix at this stage.
2. Adding the Dry Ingredients:
In a separate medium bowl, whisk together the 3 cups of all-purpose flour, 1 tablespoon of cornstarch, 1/2 teaspoon of baking powder, and 1/2 teaspoon of fine salt. Whisking these dry ingredients ensures they are evenly distributed, which helps prevent pockets of leavening agent or salt in your finished cookies. Gradually add the dry ingredients to the wet ingredients in the large bowl, mixing on low speed until just combined and no dry streaks of flour remain. The dough will be thick and slightly soft at this point.
3. Chilling the Dough:
Turn the dough out onto a lightly floured surface and gently bring it together into a cohesive ball. Divide the dough in half. Flatten each half into a disk, wrap them tightly in plastic wrap, and refrigerate for at least 1 hour, or until firm enough to handle. Chilling is a critical step; it allows the gluten to relax, making the dough easier to roll out and also prevents the cookies from spreading too much in the oven. If you try to roll out warm dough, it will be sticky and difficult to work with, and your cookies might lose their shape.
Shaping the Polar Bear Cookies
This is where the fun really begins! Once the dough is well-chilled, we’ll create our little polar bears. The shaping is quite straightforward and doesn’t require any special cookie cutters.
4. Rolling and Cutting the Shapes:
Preheat your oven to 350°F (175°C). Line baking sheets with parchment paper. On a lightly floured surface, roll out one disk of chilled dough to about 1/4-inch thickness. Using a round cookie cutter or the rim of a glass (about 3 inches in diameter), cut out circles of dough. Reroll scraps as needed, but try not to overwork the dough. For each polar bear, you’ll need one larger circle for the body and a smaller circle cut from the remaining dough (about 1.5 inches in diameter, or use a smaller round cutter or the cap of a bottle). Gently place the smaller circle slightly above the center of the larger circle to form the head. You can use a toothpick or a small knife to lightly score a line between the body and head to define them a bit more, though this is optional. If you want to add little ears, you can pinch small bits of dough from the edges and stick them on top of the head, or cut out two tiny triangles. Place the shaped cookies about 2 inches apart on the prepared baking sheets.
5. Baking the Cookies:
Bake for 10-12 minutes, or until the edges are lightly golden and the centers are set. The key here is not to overbake, as we want them to remain pale, like a polar bear’s coat. If you bake them too long, they will turn golden brown and lose their intended snowy appearance. Let the cookies cool on the baking sheets for 5 minutes before transferring them to a wire rack to cool completely. They will continue to firm up as they cool.
The Frosting for Our Snow Bears
A simple vanilla buttercream is perfect for these cookies. It’s sweet, creamy, and provides a lovely canvas for the coarse sanding sugar.
Making the Vanilla Frosting
6. Preparing the Frosting:
While the cookies are cooling, prepare the frosting. In a large mixing bowl, beat the 1 cup of softened unsalted butter until smooth and creamy. Add the 1 tablespoon of vanilla extract and the 1/2 teaspoon of fine salt and mix to combine. Gradually add the 3 1/2 cups of powdered sugar, alternating with the 1/4 cup of heavy whipping cream, starting and ending with the powdered sugar. Mix on low speed until just combined, then increase to medium-high speed and beat for 3-5 minutes until the frosting is light, fluffy, and smooth. If the frosting is too thick, add a teaspoon more cream at a time. If it’s too thin, add a tablespoon more powdered sugar.
Decorating the Polar Bear Cookies
This is the final touch that makes our cookies truly special and gives them that characteristic snow-covered look.
7. Decorating the Cookies:
Once the cookies are completely cool, it’s time to frost them. You can use an offset spatula or a butter knife to spread a thin, even layer of the vanilla frosting over the top of each cookie, covering both the body and the head. Don’t aim for perfection; a slightly rustic look is part of their charm. Immediately after frosting each cookie, generously sprinkle the coarse sanding sugar over the wet frosting. The sanding sugar will catch the light and give your polar bear cookies a beautiful, glistening, snowy effect. Let the frosting set completely before stacking or storing your cookies. These are best enjoyed within 3-4 days and can be stored in an airtight container at room temperature.
Conclusion:
These Polar Bear Cookies are a fantastic treat that balances a delightful crisp texture with a sweet, creamy frosting. Their pale, snowy look makes them perfect for winter holidays, baby showers, or any occasion where you want a touch of winter whimsy. The slight tang from the cream cheese in the dough and the satisfying crunch from the sanding sugar set them apart from ordinary sugar cookies. They’re surprisingly straightforward to make, even for beginner bakers, and the results are always impressive. The key is paying attention to ingredient temperatures and baking times to achieve that signature crispness. Don’t be afraid to adjust the frosting consistency to your liking – a little more cream or powdered sugar can make a big difference.
For serving, these cookies are wonderful on their own with a glass of milk or hot cocoa. They also pair nicely with coffee or tea. If you want to get creative, consider making them slightly larger for a more substantial treat, or smaller for a bite-sized option. You could also experiment with adding a tiny bit of peppermint extract to the frosting for a cooling winter flavor, or even a hint of lemon zest to the dough for brightness. Storage is simple: keep them in an airtight container at room temperature for up to 5 days. Ensure they are completely cooled and the frosting is set before storing to prevent sticking.
Frequently Asked Questions
Why are my Polar Bear Cookies not crisp?
If your cookies aren’t crisp, it’s usually due to overmixing the dough, which develops gluten and makes them tough, or overbaking them. Ensure you mix the flour in just until combined and bake until the edges are barely golden but the centers are still pale. Also, make sure your oven temperature is accurate. Cookies continue to crisp up as they cool on the wire rack.
Can I use a different type of sugar for rolling?
Yes, while coarse sanding sugar gives that signature sparkly, crunchy finish, you can use granulated sugar if that’s all you have. The texture will be slightly less pronounced, but they will still taste great. You could also use sparkling sugar for extra shine.
How do I store Polar Bear Cookies?
Store completely cooled Polar Bear Cookies in an airtight container at room temperature. They should stay fresh and crisp for up to 5 days. Avoid refrigerating them, as the moisture can make them soggy. If frosting is very soft, it’s best to place wax paper between layers of cookies to prevent sticking.
Polar Bear Cookies
Delightful sugar cookies shaped and decorated to resemble polar bears, perfect for a winter celebration.
Ingredients
-
3/4 cup (1 1/2 sticks) unsalted butter, room temperature (170g)
-
1/2 cup or 4 oz. full fat cream cheese, room temp (113g)
-
1 1/2 cups granulated sugar (300g)
-
1 large egg, room temperature (56g)
-
2 tsp vanilla extract or vanilla bean paste (8g)
-
3 cups all-purpose flour (375g)
-
1 Tbsp cornstarch (8g)
-
1/2 tsp baking powder (2g)
-
1/2 tsp fine salt (3g)
-
1 cup unsalted butter, room temperature (226g)
-
1 Tbsp vanilla extract or vanilla bean paste (12g)
-
1/2 tsp fine salt (3g)
-
3 1/2 cups powdered sugar (454g or 1 lb. box)
-
1/4 cup heavy whipping cream, room temperature (60g)
-
1 cup coarse sanding sugar
Instructions
-
Step 1
Cream together 3/4 cup butter, cream cheese, and granulated sugar until light and fluffy. -
Step 2
Beat in the egg and 2 tsp vanilla extract. -
Step 3
In a separate bowl, whisk together flour, cornstarch, baking powder, and 1/2 tsp salt. Gradually add to the wet ingredients, mixing until just combined. -
Step 4
Chill dough for at least 30 minutes. Roll out and cut into desired shapes. Bake at 350°F (175°C) for 10-12 minutes, or until edges are lightly golden. Let cool completely. -
Step 5
For the frosting, beat 1 cup butter until creamy. Gradually add powdered sugar, then vanilla extract and 1/2 tsp salt, alternating with heavy whipping cream, until smooth and spreadable. -
Step 6
Decorate cooled cookies with frosting and sanding sugar to resemble polar bears.
Important Information
Nutrition Facts (Per Serving)
It is important to consider this information as approximate and not to use it as definitive health advice.
Allergy Information
Please check ingredients for potential allergens and consult a health professional if in doubt.



Leave a Comment