
Polar Bear Cookies are a delightful treat, especially fun for holiday baking or any time you want a touch of winter whimsy. They get their name from the bright white, slightly crisp cookie base that resembles fresh snow, and the sweet, smooth white frosting that makes them look like miniature snowdrifts. The texture is a lovely contrast: a tender, slightly chewy cookie with a melt-in-your-mouth frosting. They’re simple enough for beginner bakers but impressive enough to share with everyone. Ingredients: 3/4 cup (1 1/2 sticks) unsalted butter, room temperature (170g) 1/2 cup or 4 oz. full fat cream cheese, room temp (113g) 1 1/2 cups granulated sugar (300g) 1 large egg, room temperature (56g) 2 tsp vanilla extract or vanilla bean paste (8g) 3 cups all-purpose flour (375g) 1 Tbsp cornstarch (8g) 1/2 tsp baking powder (2g) 1/2 tsp fine salt (3g) 1 cup unsalted butter, room temperature (226g) 1 Tbsp vanilla extract or vanilla bean paste (12g) 1/2 tsp fine salt (3g) 3 1/2 cups powdered sugar (454g or 1 lb. box) 1/4 cup heavy whipping cream, room temperature (60g) 1 cup coarse sanding sugar Making the Cookie Dough Cream the Butter, Cream Cheese, and Sugar: In a large mixing bowl, beat together the room-temperature unsalted butter (the first amount, 3/4 cup) and the full-fat cream cheese until they are light and fluffy. This usually takes about 3 to 4 minutes with an electric mixer. Make sure the butter and cream cheese are truly at room temperature; if they are too cold, they won’t combine smoothly, and if they’re too warm, the dough might spread too much when baking. Next, gradually add the granulated sugar, beating until the mixture is pale and creamy, scraping down the sides of the bowl as needed. This step is where you incorporate air, which helps with the cookie’s texture. The mixture should look significantly lighter in color and much fluffier than when you started. This creates the base for our tender Polar Bear Cookies, setting them up for a delightful chew. Add the Egg and Vanilla: Beat in the large egg until it’s fully incorporated, then stir in the vanilla extract. Don’t overmix once the egg is added; just mix until it disappears into the batter. The vanilla is key for that classic sweet cookie flavor we love in these Polar Bear Cookies.
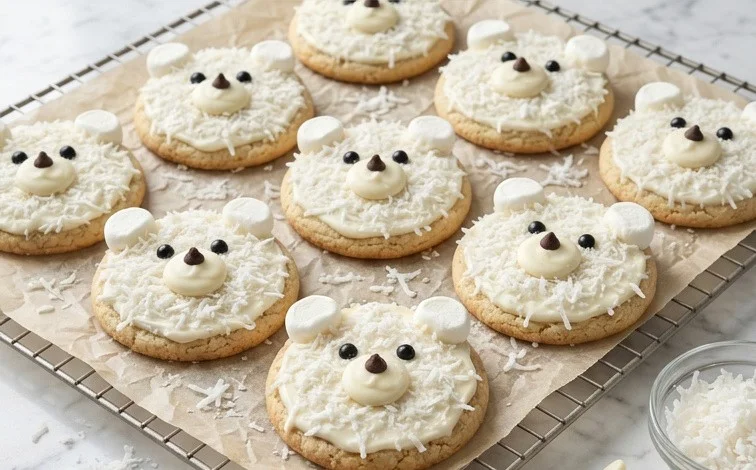
Polar Bear Cookies
These Polar Bear Cookies are a delightful treat, especially fun for holiday baking or any time you want a touch of winter whimsy. They get their name from the bright white, slightly crisp cookie base that resembles fresh snow, and the sweet, smooth white frosting that makes them look like miniature snowdrifts. The texture is a lovely contrast: a tender, slightly chewy cookie with a melt-in-your-mouth frosting. They’re simple enough for beginner bakers but impressive enough to share with everyone.
Ingredients:
- 3/4 cup (1 1/2 sticks) unsalted butter, room temperature (170g)
- 1/2 cup or 4 oz. full fat cream cheese, room temp (113g)
- 1 1/2 cups granulated sugar (300g)
- 1 large egg, room temperature (56g)
- 2 tsp vanilla extract or vanilla bean paste (8g)
- 3 cups all-purpose flour (375g)
- 1 Tbsp cornstarch (8g)
- 1/2 tsp baking powder (2g)
- 1/2 tsp fine salt (3g)
- 1 cup unsalted butter, room temperature (226g)
- 1 Tbsp vanilla extract or vanilla bean paste (12g)
- 1/2 tsp fine salt (3g)
- 3 1/2 cups powdered sugar (454g or 1 lb. box)
- 1/4 cup heavy whipping cream, room temperature (60g)
- 1 cup coarse sanding sugar
Making the Cookie Dough
- Cream the Butter, Cream Cheese, and Sugar: In a large mixing bowl, beat together the room-temperature unsalted butter (the first amount, 3/4 cup) and the full-fat cream cheese until they are light and fluffy. This usually takes about 3 to 4 minutes with an electric mixer. Make sure the butter and cream cheese are truly at room temperature; if they’re cold, they won’t emulsify properly, and your dough might be lumpy. Gradually add the granulated sugar and continue beating until the mixture is very pale and creamy. Scrape down the sides of the bowl as needed to ensure everything is well incorporated. This step is important for creating a tender cookie.
- Add Wet Ingredients: Beat in the large egg and then the vanilla extract or vanilla bean paste. Mix until just combined. Don’t overmix at this stage; we just want the egg and vanilla fully incorporated into the butter mixture.
- Combine Dry Ingredients: In a separate medium bowl, whisk together the all-purpose flour, cornstarch, baking powder, and the first amount of fine salt (1/2 tsp). Whisking them together ensures that the leavening agent (baking powder) and salt are evenly distributed throughout the flour, which prevents pockets of saltiness or uneven rising in your cookies.
- Form the Dough: Gradually add the dry ingredients to the wet ingredients, mixing on low speed until just combined. Be careful not to overmix the dough once the flour is added. Overmixing can develop the gluten in the flour too much, resulting in tough cookies. The dough should be soft but should hold together. If it seems too sticky to handle, you can add another tablespoon or two of flour, but do so sparingly.
- Chill the Dough: Gather the dough into a ball, flatten it into a disc, wrap it tightly in plastic wrap, and refrigerate for at least 2 hours, or preferably overnight. Chilling is a critical step for cookie dough. It allows the fats to firm up, making the dough easier to handle and shape, and it also allows the flavors to meld. For these cookies, a well-chilled dough is essential for getting clean shapes.
Shaping and Baking the Cookies
- Prepare for Baking: Once the dough is well-chilled, preheat your oven to 350°F (175°C). Line baking sheets with parchment paper. This prevents the cookies from sticking and makes cleanup a breeze.
- Shape the Cookies: Take the chilled dough out of the refrigerator. Roll the dough into 1-inch balls. Place the balls about 2 inches apart on the prepared baking sheets. You can gently flatten the tops of the balls with the palm of your hand or the bottom of a glass to help them bake more evenly, but keep them slightly rounded to give that “snowdrift” look. If the dough becomes too soft to handle while you’re shaping, return it to the refrigerator for 10-15 minutes.
- Bake Until Lightly Golden: Bake for 10-12 minutes, or until the edges are lightly golden brown and the centers are set. You don’t want them to get too brown, as we’re aiming for a white, snowy appearance. Rotate the baking sheets halfway through the baking time for even cooking.
- Cool the Cookies: Let the cookies cool on the baking sheets for 5 minutes before transferring them to a wire rack to cool completely. This allows them to firm up slightly before you move them, preventing breakage. Ensure they are completely cool before frosting; warm cookies will melt the frosting.
Making the Polar Bear Frosting
- Cream Butter and Salt: In a large mixing bowl, beat the room-temperature unsalted butter (the second amount, 1 cup) until smooth and creamy. Add the second amount of fine salt (1/2 tsp) and beat again to combine.
- Add Powdered Sugar and Vanilla: Gradually add the powdered sugar, about 1 cup at a time, mixing on low speed until it’s incorporated. Once all the powdered sugar is added and combined, add the second amount of vanilla extract or vanilla bean paste.
- Achieve the Right Consistency: Add the heavy whipping cream, starting with a tablespoon or two, and beat on medium-high speed until the frosting is light, fluffy, and spreadable. You’re looking for a consistency that’s thick enough to hold its shape but still easy to spread smoothly. If the frosting is too thick, add more cream, a teaspoon at a time. If it’s too thin, add more powdered sugar, a tablespoon at a time.
Decorating Your Polar Bear Cookies
- Frost the Cooled Cookies: Once the cookies are completely cool, use an offset spatula or a butter knife to spread a generous layer of the white frosting over the top of each cookie. Aim for a smooth, even coating that covers the cookie entirely, resembling fresh snow.
- Add the Sanding Sugar: While the frosting is still wet, sprinkle the coarse sanding sugar generously over the frosting. The sanding sugar provides a beautiful sparkle and a slight crunch, enhancing the “snowy” look and feel of the cookies. Work quickly so the frosting doesn’t start to set before you add the sugar.
- Allow Frosting to Set: Let the frosted cookies sit at room temperature for at least 30 minutes, or until the frosting has firmed up. You can also store them in an airtight container once the frosting is set.
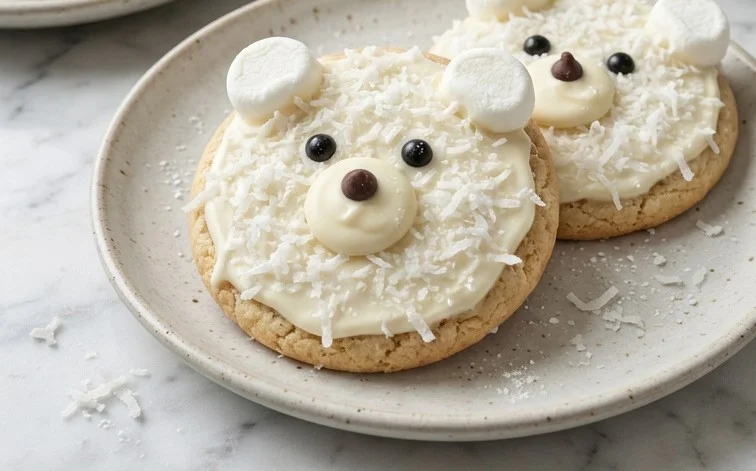
Conclusion:
These Polar Bear Cookies truly are a simple joy to make and share. The combination of the tender, slightly chewy cookie base and the sweet, creamy frosting is something special, reminiscent of freshly fallen snow. They are perfect for adding a touch of winter magic to any occasion, from holiday gatherings to casual get-togethers. Don’t be afraid to get creative with them; they’re a forgiving recipe that welcomes personalization. Making these Polar Bear Cookies is a rewarding baking experience that yields a beautiful and delicious result. They store well, making them a great option for making ahead of time for parties or as thoughtful homemade gifts. Try them soon and enjoy a taste of winter whimsy!
Frequently Asked Questions
Can I make these cookies ahead of time?
Yes, absolutely. The baked cookies, once completely cooled, can be stored in an airtight container at room temperature for up to 3-4 days. The frosting should be applied just before serving or within a day of baking for the best texture. If you need to frost them further in advance, ensure they are stored in a cool place to prevent the frosting from softening.
How should I store the cookies?
Store completely cooled, unfrosted cookies in an airtight container at room temperature for up to 5 days. Once frosted, it’s best to store them in a single layer in a container with a loose lid or place parchment paper between layers if stacking, and keep them in a cool spot for up to 2 days. Refrigeration isn’t recommended as it can affect the cookie’s texture and the frosting’s smoothness.
Can I use different extracts in the frosting?
While vanilla is classic for these Polar Bear Cookies, you can certainly experiment with other extracts for the frosting, keeping in mind they should complement the sweet cookie base. A hint of almond extract or even a touch of peppermint extract can add a festive twist. Use them sparingly, as extracts can be quite potent. Start with 1/2 teaspoon and adjust to your preference.
Polar Bear Cookies
Delightful sugar cookies with a creamy frosting, perfect for any occasion.
Ingredients
-
3/4 cup (1 1/2 sticks) unsalted butter, room temperature (170g)
-
1/2 cup or 4 oz. full fat cream cheese, room temp (113g)
-
1 1/2 cups granulated sugar (300g)
-
1 large egg, room temperature (56g)
-
2 tsp vanilla extract or vanilla bean paste (8g)
-
3 cups all-purpose flour (375g)
-
1 Tbsp cornstarch (8g)
-
1/2 tsp baking powder (2g)
-
1/2 tsp fine salt (3g)
-
1 cup unsalted butter, room temperature (226g)
-
1 Tbsp vanilla extract or vanilla bean paste (12g)
-
1/2 tsp fine salt (3g)
-
3 1/2 cups powdered sugar (454g or 1 lb. box)
-
1/4 cup heavy whipping cream, room temperature (60g)
-
1 cup coarse sanding sugar
Instructions
-
Step 1
In a large bowl, cream together 3/4 cup butter, cream cheese, and granulated sugar until light and fluffy. -
Step 2
Beat in the egg and 2 tsp vanilla extract. -
Step 3
In a separate bowl, whisk together flour, cornstarch, baking powder, and 1/2 tsp salt. Gradually add to the wet ingredients, mixing until just combined. -
Step 4
Chill dough for at least 1 hour. Roll out and cut into desired shapes. Bake at 350°F (175°C) for 10-12 minutes, or until edges are lightly golden. -
Step 5
For the frosting: Cream 1 cup butter with 1 Tbsp vanilla extract and 1/2 tsp salt until smooth. -
Step 6
Gradually add powdered sugar and heavy whipping cream, beating until smooth and spreadable. Add more cream if needed for desired consistency. -
Step 7
Decorate cooled cookies with frosting and sprinkle with coarse sanding sugar.
Important Information
Nutrition Facts (Per Serving)
It is important to consider this information as approximate and not to use it as definitive health advice.
Allergy Information
Please check ingredients for potential allergens and consult a health professional if in doubt.



Leave a Comment