
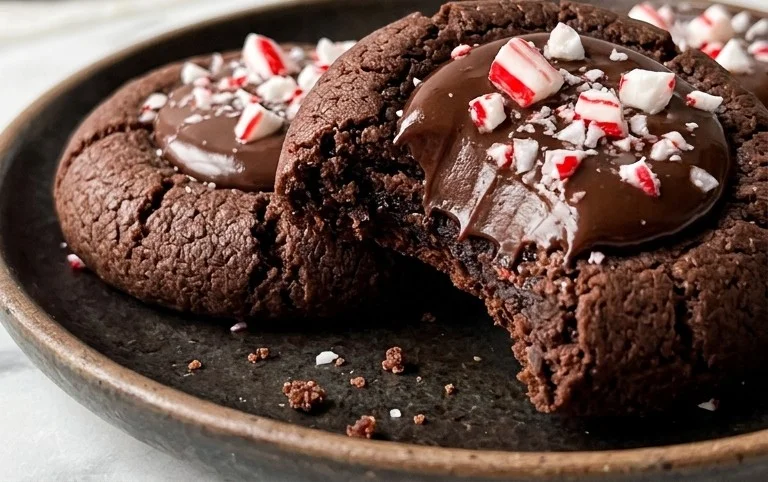
Peppermint Chocolate Thumbprint Cookies start with a tender, chocolate cookie dough that holds a sweet peppermint surprise. I love making these because the cocoa dough has a deep, rich flavor that pairs wonderfully with the cool minty center. The recipe uses everyday pantry staples, but the final cookie feels really special, especially with the shiny, melted Hershey’s Kisses nestled in the dimple. They bake up with a slightly chewy texture and a delicate crispness at the edges. This recipe is perfect for anyone who enjoys the classic combination of chocolate and mint. The contrasting textures and flavors make these thumbprint cookies a favorite during the holidays, but honestly, they’re too good to save for just one season. They disappear quickly from the cookie plate, so I always make at least a double batch when I bake them.

Peppermint Chocolate Thumbprint Cookies
These Peppermint Chocolate Thumbprint Cookies are a festive treat that brings together the classic pairing of chocolate and peppermint in a delightful, bite-sized package. The rich cocoa dough, combined with the cool, refreshing burst of peppermint from the melted Hershey’s Kisses in the center, makes them perfect for holiday gatherings, cookie exchanges, or simply enjoying with a warm mug of tea. The texture is wonderfully tender and slightly chewy, with that satisfying melt-in-your-mouth quality that makes you reach for another. The indentation created for the peppermint filling is not only functional but also adds a charming visual element.
Ingredients:
- 1 cup unsalted butter softened (preferably Land O Lakes)
- ½ cup sugar
- ¼ cup packed light brown sugar
- 2 egg yolks
- 1 teaspoon vanilla extract (or 3/4 teaspoon peppermint extract for a stronger peppermint flavor)
- 1 ½ cups all purpose flour
- ½ cup unsweetened baking cocoa
- ¼ teaspoon salt
- ½ teaspoon baking powder
- ½ teaspoon baking soda
- 28 -30 frozen peppermint kisses (like Hershey’s)
Making the Cookie Dough
The foundation of these cookies is a tender, chocolatey dough that’s easy to work with and bakes beautifully. First, in a large mixing bowl, cream together the softened unsalted butter, granulated sugar, and packed light brown sugar. You want to beat these ingredients until the mixture is light and fluffy. This aeration is key to a tender cookie crumb. Using a stand mixer with a paddle attachment is ideal for this, but you can also achieve this with a hand mixer or by vigorous stirring with a sturdy spoon and some elbow grease. Ensure your butter is truly softened – not melted, but yielding easily to the touch. This will help it incorporate smoothly without leaving lumps.
Next, add the two egg yolks to the creamed butter and sugar mixture. Beat them in until they are fully incorporated. The egg yolks contribute richness and help bind the cookie dough together. Then, stir in your chosen extract. If you’re using vanilla extract, one teaspoon will add a classic warmth. For a more pronounced peppermint experience, swap the vanilla for 3/4 teaspoon of peppermint extract. Be careful not to overdo the peppermint extract, as it can become overpowering quickly.
In a separate medium bowl, whisk together the all-purpose flour, unsweetened baking cocoa, salt, baking powder, and baking soda. Whisking these dry ingredients together ensures that the leavening agents and cocoa are evenly distributed throughout the flour, preventing pockets of bitterness or uneven rising. Once whisked, gradually add these dry ingredients to the wet ingredients in the large bowl. Mix on low speed, or stir by hand, until just combined. Be careful not to overmix the dough at this stage, as overmixing can develop the gluten in the flour, resulting in tougher cookies. Stop mixing as soon as you no longer see streaks of flour. The dough should be thick and rich.
Forming and Baking the Cookies
Now it’s time to shape our cookies. Preheat your oven to 350 degrees Fahrenheit (175 degrees Celsius). Line baking sheets with parchment paper or silicone baking mats. This prevents the cookies from sticking and makes for easier cleanup. Scoop rounded tablespoons of dough and roll them into balls. Place the dough balls about 2 inches apart on the prepared baking sheets. You should get around 28 to 30 cookies from this recipe, depending on your scoop size.
This is where the “thumbprint” part comes in. Gently press your thumb (or the back of a small spoon or even a clean marble) into the center of each dough ball to create an indentation. Be careful not to press all the way through the bottom of the dough. The indentation should be deep enough to hold the peppermint candy but not so deep that the cookie spreads too much during baking. You want a nice little well to hold our melt-in-your-mouth filling.
Before you add the peppermint kisses, it’s often helpful to chill the dough balls for about 15-20 minutes. This extra step helps the cookies hold their shape better in the oven and prevents the indentations from collapsing too much. While the dough is chilling, unwrap your frozen peppermint kisses. They are best added when slightly chilled, as they will melt more evenly.
Once the dough has chilled and you’re ready to bake, carefully place one frozen peppermint kiss into the indentation of each cookie. The cold candy will help create a lovely pool of melted chocolatey peppermint goodness. Bake for 10-12 minutes, or until the edges of the cookies are set and firm, and the centers look just slightly soft. The peppermint kiss should be melted and filling the indentation. Avoid overbaking, as this will result in dry cookies. The centers will continue to set slightly as they cool.
Cooling and Enjoying
Allow the cookies to cool on the baking sheets for 5 minutes. This is a crucial step because the melted peppermint and chocolate are very hot and the cookies are fragile right out of the oven. After 5 minutes, carefully transfer the cookies to a wire rack to cool completely. As they cool, the melted peppermint kiss will set slightly, creating a beautiful glossy center. These cookies are wonderful served at room temperature. Store any leftover cookies in an airtight container at room temperature for up to 3 days. If you plan to store them longer, you can refrigerate them, but let them come back to room temperature before serving for the best texture. Enjoy the delightful combination of chocolate and peppermint!
Conclusion:
These Peppermint Chocolate Thumbprint Cookies are a wonderful addition to any cookie assortment. The rich chocolate cookie paired with the refreshing peppermint filling offers a delightful contrast in both flavor and texture. They bake up tender with a slightly chewy center and crisp edges, making them incredibly satisfying to eat. I find they’re always a hit at cookie exchanges and holiday parties, and they’re surprisingly simple to make, even for beginner bakers. You can easily double the recipe if you know you’ll need more – they go fast!
Serving Suggestions: Enjoy these cookies with a glass of cold milk, a warm cup of coffee, or a mug of hot chocolate for an extra chocolatey treat. They also pair nicely with peppermint tea.
Variations: If you don’t have peppermint kisses, you can use regular chocolate kisses and add a drop or two of peppermint extract to the dough for a minty cookie. For a visual flair, you could lightly dust the tops with powdered sugar before serving, or drizzle with a bit of melted white chocolate.
FAQ
What kind of peppermint candies work best for the filling?
Frozen peppermint Hershey’s Kisses are ideal because they are individually wrapped and melt smoothly into the cookie indentation, creating that perfect gooey center. Other hard peppermint candies might work, but they may not melt as evenly.
Can I make the dough ahead of time?
Yes, you can make the cookie dough a day or two in advance. Store it tightly wrapped in plastic wrap in the refrigerator. Let it sit at room temperature for about 15-20 minutes before scooping and baking to make it easier to handle.
Peppermint Chocolate Thumbprint Cookies
A delightful and festive cookie featuring a rich chocolate base with a cool peppermint center, perfect for the holidays.
Ingredients
-
1 cup unsalted butter, softened
-
½ cup sugar
-
¼ cup packed light brown sugar
-
2 egg yolks
-
1 teaspoon vanilla extract
-
1 ½ cups all purpose flour
-
½ cup unsweetened baking cocoa
-
¼ teaspoon salt
-
½ teaspoon baking powder
-
½ teaspoon baking soda
-
28 – 30 frozen peppermint kisses
Instructions
-
Step 1
In a large bowl, cream together the softened butter, granulated sugar, and light brown sugar until light and fluffy. -
Step 2
Beat in the egg yolks and vanilla extract until well combined. -
Step 3
In a separate bowl, whisk together the all-purpose flour, unsweetened baking cocoa, salt, baking powder, and baking soda. -
Step 4
Gradually add the dry ingredients to the wet ingredients, mixing until just combined to form a dough. -
Step 5
Roll the dough into 1-inch balls and place them on a baking sheet lined with parchment paper. -
Step 6
Gently press your thumb into the center of each cookie to create an indentation. Place one frozen peppermint kiss into each indentation. -
Step 7
Bake in a preheated oven at 350°F (175°C) for 10-12 minutes, or until the edges are set and the peppermint is melted. -
Step 8
Allow the cookies to cool on the baking sheet for a few minutes before transferring them to a wire rack to cool completely.
Important Information
Nutrition Facts (Per Serving)
It is important to consider this information as approximate and not to use it as definitive health advice.
Allergy Information
Please check ingredients for potential allergens and consult a health professional if in doubt.



Leave a Comment