
Snowball cookies are a simple delight, perfect for a snowy day or any time you need a little sweet comfort. They’re melt-in-your-mouth tender, lightly sweet, and have a lovely nutty crunch. The best part is how easy they are to make, with just a few pantry staples. They’re often called Mexican Wedding Cookies or Russian Tea Cakes because of their characteristic powdered sugar coating that resembles freshly fallen snow. I love making a batch when the weather turns cool, and the whole house smells like warm butter and toasted nuts. Ingredients: 2 cups flour (white, spelt, whole wheat pastry, or Bob’s Red Mill gluten-free 1-to-1 baking flour work well) 1/2 cup finely chopped walnuts (or almonds or pecans) 1 cup butter (softened, or coconut oil for a dairy-free option) 1/2 cup powdered sugar (also called confectioners’ sugar or icing sugar) Optional: additional powdered sugar for rolling Making the Dough The process starts with creaming the butter and powdered sugar together. This is where you build the base for a tender cookie. Make sure your butter is softened to room temperature, not melted. This means it should give slightly when you press it with your finger. If it’s too cold, it won’t cream properly, leading to a greasy dough. If it’s too soft, the cookies can spread too much. I like to use an electric mixer for this, starting on a low speed to avoid a sugar cloud, and then increasing to medium speed until the mixture is light and fluffy. This usually takes about 2-3 minutes. You want it to look like pale yellow whipped cream. Next, you’ll add the vanilla extract if you’re using it, and mix that in. Then, gradually add the flour and nuts. Mix on low speed just until everything is combined and a soft dough forms. Be careful not to overmix at this stage, as it can make the cookies tough. The dough will be quite soft and may feel a little sticky. This is exactly what you want for a tender snowball cookie. Chill the Dough Once the dough is made, it needs to chill. This step is really important for a couple of reasons. First, it firms up the butter in the dough, which helps the cookies hold their shape when they bake and prevents them from spreading too much. Second, it makes the dough easier to handle and roll into balls. Cover the bowl with plastic wrap and refrigerate for at least 30 minutes, or up to 2 days. If you chill it for longer than a few hours, you might need to let it sit at room temperature for a few minutes before scooping, just so it’s not too hard to work with. Shaping and Baking the Cookies Preheat your oven to 350°F (175°C). Line baking sheets with parchment paper. Parchment paper makes cleanup a breeze and prevents the cookies from sticking. Scoop the chilled dough into small balls, about 1 inch in diameter. You can use a small cookie scoop or a spoon for this. Roll each ball gently between your palms to smooth them out. Place the balls on the prepared baking sheets, leaving about 1 inch between them as they will spread slightly. Bake for 10-12 minutes, or until the edges are lightly golden brown. They won’t look deeply browned, as this is part of their charm. You want them just set. Let the cookies cool on the baking sheets for about 5 minutes before transferring them to a wire rack to cool completely. This initial cooling on the sheet allows them to firm up enough to be moved without breaking. Rolling in Powdered Sugar Once the cookies are completely cool, it’s time for the signature snowball coating. Pour a generous amount of additional powdered sugar into a shallow bowl or a plate. Gently roll each cooled cookie in the powdered sugar until it’s completely coated. You can do a light dusting or a thicker coating, depending on how snowy you want them to look. Place the powdered sugar-coated cookies back on the wire rack or a serving plate. They are now ready to be enjoyed!
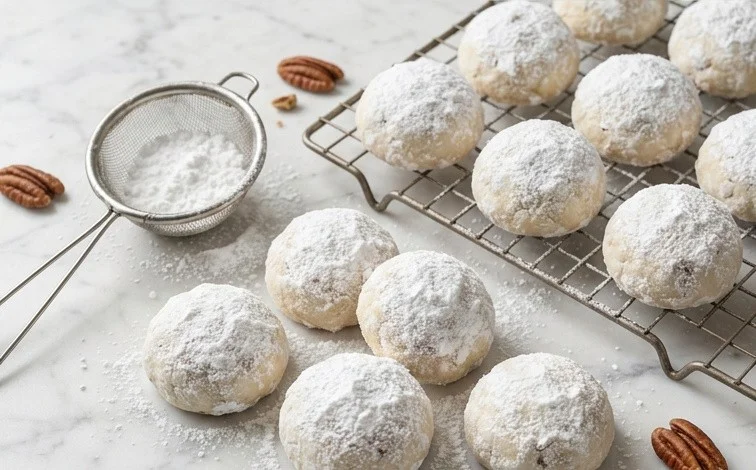
Snowball Cookies
These snowball cookies are a simple delight, perfect for a snowy day or any time you need a little sweet comfort. They’re melt-in-your-mouth tender, lightly sweet, and have a lovely nutty crunch. The best part is how easy they are to make, with just a few pantry staples. They’re often called Mexican Wedding Cookies or Russian Tea Cakes because of their characteristic powdered sugar coating that resembles freshly fallen snow. I love making a batch when the weather turns cool, and the whole house smells like warm butter and toasted nuts.
Ingredients:
- 2 cups flour (white, spelt, whole wheat pastry, or Bob’s Red Mill gluten-free 1-to-1 baking flour work well)
- 1/2 cup finely chopped walnuts (or almonds or pecans)
- 1 cup butter (softened, or coconut oil for a dairy-free option)
- 1/2 cup powdered sugar (also called confectioners’ sugar or icing sugar)
- Optional: additional powdered sugar for rolling
Making the Dough
The process starts with creaming the butter and powdered sugar together. This is where you build the base for a tender cookie. Make sure your butter is softened to room temperature, not melted. This means it should give slightly when you press it with your finger. If it’s too cold, it won’t cream properly, leading to a greasy dough. If it’s too soft, the cookies can spread too much. I like to use an electric mixer for this, starting on a low speed to avoid a sugar cloud, and then increasing to medium speed until the mixture is light and fluffy. This usually takes about 3-5 minutes. The color will change from pale yellow to a creamy white.
Next, you’ll add your dry ingredients. Whisk the flour together in a separate bowl. Some people like to sift their flour, which can make the cookies even lighter, but it’s not strictly necessary for this recipe. Add the flour to the creamed butter and sugar mixture. If you’re using an electric mixer, keep it on low speed. Mix just until the flour is incorporated. Overmixing at this stage can develop the gluten in the flour, making your cookies tough. You want to stop as soon as you no longer see streaks of dry flour.
Finally, it’s time for the nuts. Gently fold in your finely chopped walnuts. You can chop them yourself using a sharp knife or a food processor. If you use a food processor, be careful not to turn them into nut butter; pulse them a few times until they are finely ground but still have some texture. These nuts add a wonderful chew and depth of flavor to the cookies. The dough will be quite soft and a little sticky at this point.
Chilling and Shaping
This dough benefits greatly from a good chill. Cover the bowl tightly with plastic wrap and refrigerate for at least 1 hour, or even overnight. Chilling solidifies the butter, making the dough much easier to handle and preventing the cookies from spreading too much during baking. It also allows the flavors to meld together.
Once the dough is chilled and firm, you can start shaping the cookies. You can either roll the dough into small balls, about 1 inch in diameter, or use a small cookie scoop. If the dough is too hard to roll, let it sit at room temperature for about 10-15 minutes. Place the formed balls onto baking sheets lined with parchment paper. Leave a little space between them, although they won’t spread dramatically.
Baking the Snowballs
Preheat your oven to 350 degrees Fahrenheit (175 degrees Celsius). This is a standard baking temperature that works well for most cookies. Bake the cookies for about 12-15 minutes. You’re looking for them to be lightly golden around the edges, but they should still be quite pale in the center. They won’t look fully “done” like many other cookies; the pale appearance is part of their charm and ensures they stay tender. Keep an eye on them, as ovens can vary. It’s better to underbake slightly than to overbake.
Allow the cookies to cool on the baking sheet for about 5-10 minutes before carefully transferring them to a wire rack to cool completely. This step is important because they are very delicate when hot. If you try to move them too soon, they can fall apart.
The Final Touch: The Snow Coating
This is perhaps the most fun part! Once the cookies are completely cool, prepare your rolling station. Place additional powdered sugar in a shallow bowl or a pie plate. For a different flavor profile, you can mix a tablespoon or two of unsweetened cocoa powder into the powdered sugar before rolling. Gently roll each cookie in the powdered sugar until it’s completely coated. You can do one coat, or for a really snowy effect, give them a second coating. The powdered sugar will adhere to the surface of the cookie, giving them their signature “snowball” look.
Store the finished snowball cookies in an airtight container at room temperature. They are best enjoyed within a few days, but they can also be frozen for longer storage. To freeze, place them in a single layer on a baking sheet until firm, then transfer them to a freezer-safe container or bag. You can also freeze the unbaked dough balls, then bake them from frozen (add a few extra minutes to the baking time).
These cookies are perfect for holiday cookie platters, tea parties, or just a simple afternoon treat with a cup of coffee or tea. Their delicate texture and sweet flavor make them a crowd-pleaser.

Conclusion:
These snowball cookies truly live up to their name, offering a delicate, melt-in-your-mouth experience with a satisfying nutty bite. Their simple charm and ease of preparation make them a go-to treat for holidays, gatherings, or just a quiet moment with a cup of tea. The way they crumble tenderly and then melt away leaves you wanting another. They are a classic for a reason, bringing a touch of sweetness and comfort to any occasion. Don’t be afraid to get creative with them! You can substitute almonds or pecans for the walnuts, or even add a touch of orange zest to the dough for a citrusy twist. If you’re feeling adventurous, a light drizzle of melted chocolate over the cooled, powdered cookies can add an extra layer of indulgence. They store beautifully, making them perfect for making ahead. These snowball cookies are a simple joy that always impresses. Give them a try – you won’t regret adding this comforting classic to your baking repertoire.
Frequently Asked Questions:
Why are my snowball cookies spreading too much?
Spreading is usually caused by butter that is too soft or melted, or overmixing the dough. Ensure your butter is at room temperature but not greasy, and mix the flour in only until just combined. Chilling the dough thoroughly before baking also helps them hold their shape.
Can I make snowball cookies ahead of time?
Absolutely. The dough can be chilled for up to 2 days before baking. Once baked and cooled, they can be stored in an airtight container at room temperature for up to a week. You can also roll them in powdered sugar just before serving for the freshest look.
What kind of nuts are best for snowball cookies?
Traditionally, walnuts are used, and they provide a lovely flavor and texture. However, pecans or almonds are excellent substitutes and offer a slightly different, but equally delicious, nutty note. Finely chopping them ensures they distribute evenly through the cookie.
Snowball Cookies
Delicate, melt-in-your-mouth snowball cookies, also known as Mexican wedding cookies or Russian tea cakes, dusted with powdered sugar for a festive finish.
Ingredients
-
2 cups flour (white, spelt, ww pastry, or Bob’s gf)
-
1/2 cup finely chopped walnuts
-
1 cup butter
-
1/2 cup powdered sugar
-
optional additional powdered sugar
Instructions
-
Step 1
Preheat oven to 350°F (175°C). Line baking sheets with parchment paper. -
Step 2
In a large bowl, cream together the butter and 1/2 cup powdered sugar until light and fluffy. -
Step 3
Beat in the vanilla extract and salt. -
Step 4
Gradually add the flour, mixing until just combined. Stir in the finely chopped walnuts. -
Step 5
Roll the dough into 1-inch balls and place them on the prepared baking sheets. -
Step 6
Bake for 10-12 minutes, or until the edges are lightly golden. Do not overbake. -
Step 7
Let the cookies cool on the baking sheets for a few minutes before transferring them to a wire rack to cool completely. -
Step 8
Once completely cool, roll the cookies in the optional additional powdered sugar until well coated.
Important Information
Nutrition Facts (Per Serving)
It is important to consider this information as approximate and not to use it as definitive health advice.
Allergy Information
Please check ingredients for potential allergens and consult a health professional if in doubt.

Leave a Comment