
Festive Peanut Butter Delights are my go-to for a reason this holiday season. These no bake Christmas treats come together with just a handful of simple ingredients you likely already have in your pantry. The magic happens when creamy peanut butter meets sweet powdered sugar and softened butter, creating a dough that’s rich, smooth, and irresistible. Sifting the powdered sugar is a small step, but it truly makes a difference, ensuring a perfectly uniform texture without any grittiness. The hint of vanilla and salt in the mixture perfectly balances the sweetness, making them so moreish. They’re the kind of treat that tastes like a warm hug on a cold day, perfect for sharing (or not!).
Festive Peanut Butter Delights
This recipe makes about 24 small delights. You’ll need: 1 cup unsalted butter, softened; 1 cup creamy peanut butter; 4 cups powdered sugar, sifted; 1 teaspoon vanilla extract; 1/2 teaspoon salt. For the chocolate coating and decoration, you’ll need: 1 cup semi-sweet chocolate chips; 2 tablespoons vegetable oil or coconut oil; optional: sprinkles, crushed candy canes, chopped nuts.
To start, cream the softened butter and peanut butter together in a large mixing bowl until smooth and well combined. It’s important the butter is softened, not melted, so it incorporates evenly. Next, gradually add the sifted powdered sugar, mixing until a stiff dough forms. This is where the sifting really pays off, preventing lumps. Stir in the vanilla extract and salt. The dough will be quite thick; you can use your hands to finish mixing if it becomes difficult for a spoon or mixer. Roll the dough into small balls, about 1 inch in diameter, and place them on a baking sheet lined with parchment paper. You should get around 24 balls.
Next, prepare the chocolate coating. Melt the semi-sweet chocolate chips with the vegetable oil or coconut oil in a microwave-safe bowl in 30-second intervals, stirring in between, until smooth. Alternatively, use a double boiler. Be careful not to overheat the chocolate. You can also chop the chocolate finely before melting for a smoother consistency. Once melted and smooth, let the chocolate cool slightly so it doesn’t melt the peanut butter balls too quickly. Dip each peanut butter ball into the melted chocolate, ensuring it’s fully coated. A fork works well for dipping and lifting. Place the chocolate-coated balls back onto the parchment-lined baking sheet.
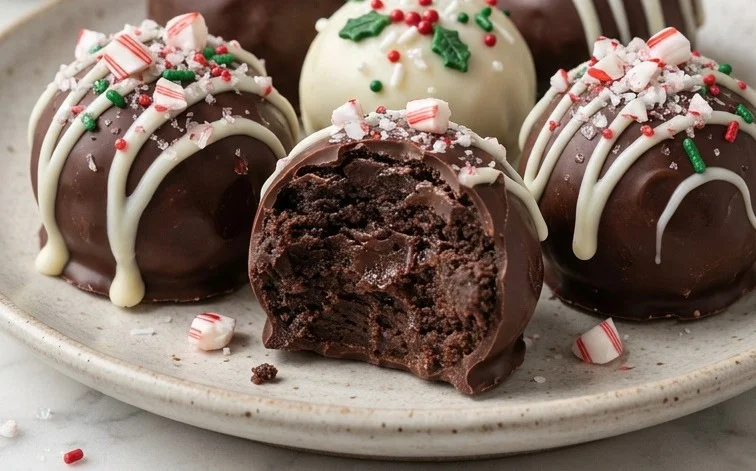
Before the chocolate sets, add your desired decorations. This is the fun part where you can get creative! Sprinkle with festive colored sprinkles, crushed candy canes for a peppermint kick, or some chopped nuts for added crunch. Let the treats set completely at room temperature or in the refrigerator for about 20-30 minutes until the chocolate is firm. These no bake Christmas treats are best stored in an airtight container in the refrigerator.

Easy No Bake Christmas Treats!
This year, I’m all about keeping things simple and delicious for the holidays, and that means no-bake Christmas treats! My kitchen tends to get a little chaotic during December, so anything that bypasses the oven and still tastes like a festive hug is a winner. These recipes are perfect for a last-minute sweet fix, a fun activity with kids, or just for when you need a serious sugar craving satisfied without a ton of fuss. We’re talking rich, decadent, and undeniably Christmassy flavors that come together in minutes.
Ingredients:
- 1 cup unsalted butter, softened
- 1 cup creamy peanut butter (smooth or crunchy, your choice!)
- 4 cups powdered sugar, sifted
- 1 teaspoon vanilla extract
- 1/2 teaspoon salt
- 1 cup semi-sweet chocolate chips
- 2 tablespoons vegetable oil or coconut oil
- Optional: Sprinkles, crushed candy canes, chopped nuts for decoration
Festive Peanut Butter Delights
These little bites are a crowd-pleaser and so easy to whip up. The combination of creamy peanut butter and sweet powdered sugar creates a wonderfully smooth texture that’s incredibly satisfying. I like to use softened butter because it incorporates much more smoothly into the peanut butter, preventing any lumpy surprises. Sifting the powdered sugar is a small step that makes a big difference; it ensures your treats will be lump-free and perfectly uniform in texture. The salt balances the sweetness, so don’t skip it!
- Prepare the Peanut Butter Mixture: In a large mixing bowl, combine the softened unsalted butter and creamy peanut butter. Use an electric mixer or a sturdy spatula to cream them together until the mixture is smooth and well-blended. This should take about 2-3 minutes with a mixer. If you’re doing it by hand, make sure your butter is soft enough that it creams easily without much effort.
- Incorporate Dry Ingredients: Gradually add the sifted powdered sugar to the butter and peanut butter mixture, about one cup at a time, mixing well after each addition. Once all the powdered sugar is incorporated, add the vanilla extract and salt. Continue mixing until everything is thoroughly combined and the dough-like mixture is stiff enough to roll. If the mixture seems a little too soft to handle, you can add another tablespoon or two of powdered sugar.
- Form the Treats: Take small portions of the mixture (about a tablespoon each) and roll them into balls between your palms. Aim for uniform size so they bake (or in this case, set) evenly. Place the rolled balls onto a baking sheet lined with parchment paper or wax paper. You can press them down slightly if you prefer a flatter cookie. If you’re decorating with crushed candy canes or nuts, you can gently press them onto the tops of the balls now, or wait until after dipping them in chocolate.
- Chill the Treats: Once all the balls are rolled and on the baking sheet, place the entire sheet in the refrigerator for at least 30 minutes. This chilling step is crucial for two reasons: it helps the balls firm up, making them easier to dip in chocolate without falling apart, and it also sets the texture of the peanut butter cookie itself, giving it a pleasant, slightly chewy consistency.
- Melt the Chocolate: While the peanut butter balls are chilling, prepare your chocolate coating. In a microwave-safe bowl, combine the semi-sweet chocolate chips and the vegetable oil (or coconut oil). Microwave on 50% power for 30-second intervals, stirring well after each interval, until the chocolate is completely melted and smooth. Be careful not to overheat the chocolate, as it can seize and become difficult to work with. If you don’t have a microwave, you can melt the chocolate gently in a double boiler over simmering water, stirring constantly.
- Dip and Decorate: Remove the chilled peanut butter balls from the refrigerator. Using a fork or a dipping tool, dip each ball into the melted chocolate, ensuring it’s fully coated. Let any excess chocolate drip back into the bowl. Place the dipped balls back onto the parchment-lined baking sheet. If you want to add sprinkles, crushed candy canes, or chopped nuts, do so immediately while the chocolate is still wet so they adhere properly.
- Set the Treats: Once all the peanut butter balls are dipped and decorated, place the baking sheet back into the refrigerator for at least another 15-20 minutes, or until the chocolate coating is completely firm. This ensures your treats are ready to be enjoyed without making a mess.
These are fantastic stored in an airtight container in the refrigerator. They’ll keep well for about a week, though they rarely last that long in my house! They’re perfect for packing in holiday goodie boxes or just enjoying with a warm cup of chai.
Conclusion:
These Festive Peanut Butter Delights are a holiday miracle for busy bakers! They prove you don’t need an oven to create something truly special and festive. With their rich peanut butter flavor, smooth texture, and customizable chocolate coating, they’re a guaranteed hit with everyone. They are incredibly easy to make, making them a perfect activity to do with kids during the holiday break or a simple way to satisfy those sweet cravings without any fuss. Whether you serve them at a holiday party, pack them in cookie boxes, or just enjoy them with a cup of hot cocoa, these no bake Christmas treats add a touch of homemade joy to your celebrations. I love making a big batch and sharing them with neighbors and friends.
Frequently Asked Questions:
Can I use crunchy peanut butter?
Yes, you absolutely can use crunchy peanut butter! It will add a nice texture to the inside of the treats. Just make sure to stir it in well with the other ingredients. The consistency might be slightly different, but the flavor will still be fantastic.
How do I store these treats?
Store your Festive Peanut Butter Delights in an airtight container in the refrigerator. They will keep well for up to a week. The chocolate coating helps to keep them fresh. If you’re taking them to a party, you can transport them in their container and let them sit out for a few minutes before serving if they’ve been chilled.
Can I make these ahead of time?
Definitely! These treats are perfect for making ahead. You can prepare them a few days in advance and store them in the refrigerator. This is a great way to check one more thing off your holiday to-do list early, so you can relax more when the actual holiday week arrives.
Easy No Bake Christmas Treats!
Simple, festive, and no-bake Christmas treats perfect for holiday baking.
Ingredients
-
1 cup butter, melted
-
1 cup powdered sugar
-
1/2 cup smooth peanut butter
-
2 cups graham cracker crumbs
-
1 teaspoon vanilla extract
-
1/2 cup white chocolate chips, melted
-
1/2 cup dark chocolate chips, melted
Instructions
-
Step 1
In a medium bowl, combine melted butter, powdered sugar, and vanilla extract. Mix well. -
Step 2
Stir in the peanut butter until fully incorporated. -
Step 3
Add the graham cracker crumbs and mix until a dough-like consistency forms. -
Step 4
Roll the mixture into small balls, about 1 inch in diameter. -
Step 5
Dip half of each ball into melted white chocolate and the other half into melted dark chocolate. You can use a toothpick for easier dipping. -
Step 6
Place the dipped balls on a parchment-lined baking sheet and refrigerate for at least 30 minutes, or until the chocolate is set.
Important Information
Nutrition Facts (Per Serving)
It is important to consider this information as approximate and not to use it as definitive health advice.
Allergy Information
Please check ingredients for potential allergens and consult a health professional if in doubt.



Leave a Comment