
Meringue Christmas Trees bring a sweet, airy charm to your holiday table. These delicate trees have a satisfyingly crisp shell that cracks open to reveal a slightly chewy center, making them a joy for both children and adults to nibble on. They stand tall and festive, perfect as a dessert centerpiece or even as edible adornments for a larger cake. The process of making them is quite therapeutic; watching the egg whites transform and then holding the finished, delicate trees makes the effort truly rewarding. The beauty of these Meringue Christmas Trees is their simplicity, relying on just a few key ingredients to create something truly magical. They’re a wonderful activity to do with family during the festive season, creating edible decorations that taste as good as they look.
Ingredients:
- 2 large egg whites (room temperature)
- 1/4 teaspoon cream of tartar
- 100 g granulated sugar
- green gel food colouring
- sprinkles
Making the Meringue
The key to perfect meringues is a clean bowl and whisk, and ensuring your egg whites are at room temperature. Cold egg whites won’t whip up as well. Prepare Your Equipment: Before you start whipping, make sure your mixing bowl and whisk attachments are spotlessly clean and completely dry. Even a tiny bit of grease or water can prevent the egg whites from reaching their full volume. I like to give my bowl and whisk a quick wipe with a little vinegar and then dry them thoroughly with a clean tea towel. Also, line two baking sheets with parchment paper. This prevents the meringues from sticking.
Whip the Egg Whites: Pour the room temperature egg whites into your clean, dry mixing bowl. Add the cream of tartar. Cream of tartar acts as a stabiliser, helping the egg whites whip up faster and create a more stable foam. Start whipping on a low speed until the egg whites are foamy, like the head on a non-alcoholic beer. Gradually increase the speed to medium-high. Continue whipping until soft peaks form. This means when you lift the whisk, the egg white peaks will flop over. Then, start adding the granulated sugar, one tablespoon at a time, while the mixer is still running. Make sure each addition of sugar is fully incorporated before adding the next. This gradual addition helps to dissolve the sugar and create a stable, glossy meringue. Continue whipping on high speed for about 8-10 minutes, or until the meringue is thick, stiff, and very glossy. When you rub a little between your fingers, it should feel smooth, not gritty. This indicates all the sugar has dissolved.
Meringue Christmas Trees
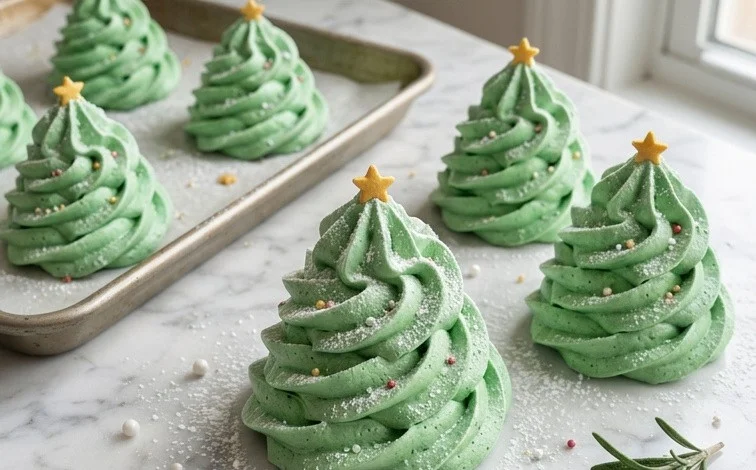
These airy, sweet meringue trees are a delightful way to add a touch of festive magic to your Christmas baking. They have a wonderfully crisp exterior that gives way to a slightly chewy centre, making them a joy to eat. Plus, they look absolutely stunning on a dessert table or even as edible decorations on a larger cake. Making them is a satisfying process, and the results are truly worth it.
Ingredients:
- 2 large egg whites (room temperature)
- 1/4 teaspoon cream of tartar
- 100 g granulated sugar
- green gel food colouring
- sprinkles
Making the Meringue
The key to perfect meringues is a clean bowl and whisk, and ensuring your egg whites are at room temperature. Cold egg whites won’t whip up as well.
- Prepare Your Equipment: Before you start whipping, make sure your mixing bowl and whisk attachments are spotlessly clean and completely dry. Even a tiny bit of grease or water can prevent the egg whites from reaching their full volume. I like to give my bowl and whisk a quick wipe with a little vinegar and then dry them thoroughly with a clean tea towel. Also, line two baking sheets with parchment paper. This prevents the meringues from sticking.
- Whip the Egg Whites: Pour the room temperature egg whites into your clean, dry mixing bowl. Add the cream of tartar. Cream of tartar acts as a stabiliser, helping the egg whites whip up faster and create a more stable foam. Start whipping on a low speed until the egg whites are foamy, like the head on a non-alcoholic beer.
- Gradually Add Sugar: Once you have a good foam, gradually increase the speed to medium-high. Now, start adding the granulated sugar, one tablespoon at a time, while the mixer is still running. It’s important to add the sugar slowly; this allows it to dissolve properly into the egg whites, which prevents a grainy meringue. Continue whipping until the meringue is thick, glossy, and holds stiff peaks. This means that when you lift the whisk, the meringue stands straight up without drooping. You can test if the sugar has dissolved by rubbing a little meringue between your thumb and forefinger; it should feel smooth, not gritty. This stage can take about 8-10 minutes depending on your mixer.
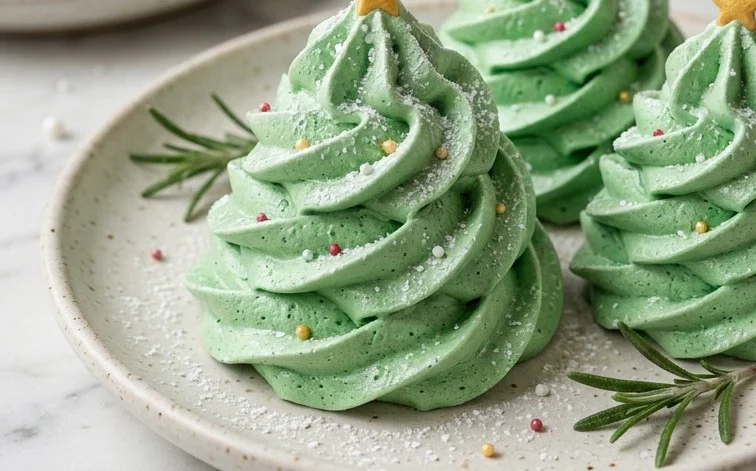
- Colour and Shape the Trees: Once you have achieved stiff, glossy peaks, add a small amount of green gel food colouring. Gel food colouring is best as it’s concentrated and won’t add too much liquid to the meringue. Start with just a tiny drop and mix it in on a low speed until evenly distributed. You can add more if you want a deeper green colour. Transfer the meringue to a piping bag fitted with a large star or round tip. To make the tree shapes, pipe small mounds of meringue for the base of the tree. Then, working upwards, pipe smaller mounds on top, gradually decreasing the size to create a conical tree shape. If you don’t have a piping bag, you can use two spoons to carefully shape the meringue into little mounds. Gently press some sprinkles onto the meringue trees before baking.
- Bake the Meringues: Preheat your oven to 100°C (210°F). Place the baking sheets with the piped meringue trees into the preheated oven. Bake for 1 hour to 1 hour and 15 minutes. The goal is to dry out the meringues, not to brown them. They should feel firm and lift easily off the parchment paper when they’re ready. Once baked, turn off the oven, but leave the meringues inside with the oven door slightly ajar for at least another hour, or even overnight. This slow cooling process helps prevent them from cracking.
Cooling and Storing
Once your meringue trees are completely cool and dry, they are ready to be enjoyed. Store them in an airtight container at room temperature. Meringues are very sensitive to humidity, so avoid storing them in the refrigerator, as this can make them sticky. They will keep well for up to two weeks if stored properly, making them an excellent make-ahead treat for the festive season.
These meringue trees are perfect for a light, sweet treat, or as part of a festive dessert display. You can even use them to top cupcakes or a Yule log. The simple ingredients transform into something magical with a little patience and care. Enjoy the process and the delicious results!
Conclusion:
These Meringue Christmas Trees are a truly special addition to any holiday celebration. They offer a wonderful textural contrast with their crisp exterior and chewy inside, and their charming appearance makes them a talking point on any dessert spread. Making them yourself brings a unique satisfaction, and the results are incredibly photogenic. They look particularly stunning arranged on a platter, perhaps with a few real pine sprigs scattered around. You can also adapt them easily; try adding a tiny drop of peppermint extract to the meringue for a festive flavour boost, or use different coloured sprinkles for a varied look. Don’t be discouraged if your first batch isn’t perfect; meringue can be a little temperamental, but practice definitely makes perfect. The joy of creating these beautiful, edible decorations is well worth the effort, and they embody the festive spirit beautifully.
Frequently Asked Questions:
Why are my meringues weeping?
Meringue weeping, or syneresis, often happens when the sugar hasn’t fully dissolved into the egg whites. Ensure you whip the meringue until it’s very stiff and glossy, and rub a little between your fingers to check for grittiness. Also, baking at the correct temperature and avoiding opening the oven door too often during baking can help.
Can I make Meringue Christmas Trees ahead of time?
Yes, absolutely. Once completely cooled, store your Meringue Christmas Trees in an airtight container at room temperature. Keep them away from humidity, as this can make them sticky. They can be stored for up to two weeks, making them a great make-ahead option for busy holiday schedules.
What is the best way to pipe the Christmas tree shape?
For the tree shape, use a large star tip (like a Wilton 1M or similar) fitted into a piping bag. Pipe a base round, then pipe smaller rounds on top, tapering to a point. Alternatively, you can pipe a spiral upwards from the base, then create a star shape at the top.
Meringue Christmas Trees
Festive and light meringue cookies shaped like Christmas trees, perfect for holiday decorations and sweet treats.
Ingredients
-
2 large egg whites (room temperature)
-
1/4 teaspoon cream of tartar
-
100 g granulated sugar
-
green gel food colouring
-
sprinkles
-
1 teaspoon vanilla extract
-
1 tablespoon cornstarch
Instructions
-
Step 1
Preheat oven to 200°F (95°C) and line baking sheets with parchment paper. -
Step 2
In a clean, dry bowl, whisk egg whites and cream of tartar until soft peaks form. Gradually add granulated sugar, one tablespoon at a time, whisking continuously until stiff, glossy peaks form and the sugar is dissolved. -
Step 3
Beat in vanilla extract and cornstarch. -
Step 4
Add a few drops of green gel food colouring and gently fold until evenly coloured. Be careful not to overmix. -
Step 5
Spoon or pipe the meringue onto the prepared baking sheets in cone shapes, resembling Christmas trees. -
Step 6
Decorate with sprinkles immediately. -
Step 7
Bake for 1.5 to 2 hours, or until the meringues are dry and crisp. Turn off the oven and let the meringues cool completely inside the oven with the door slightly ajar.
Important Information
Nutrition Facts (Per Serving)
It is important to consider this information as approximate and not to use it as definitive health advice.
Allergy Information
Please check ingredients for potential allergens and consult a health professional if in doubt.


Leave a Comment