
Little Debbie Christmas Tree Cakes are a beloved holiday staple, and turning them into delightful cake balls is a game-changer for festive treats. These little bites are pure Christmas magic, transforming those familiar, individually wrapped cakes into delightful, poppable delights. The combination of the cake’s sweet, creamy filling and the crisp outer coating is just fantastic. They’re perfect for cookie platters, holiday parties, or just a special treat for yourself during the festive season. The key to these is starting with cakes that are slightly chilled, which makes them easier to crumble and form. I like to make these a day or two before I need them, as they hold up really well and the flavors meld beautifully. This recipe is straightforward, making it accessible even for beginner bakers looking for a fun holiday project.
Making Christmas Tree Cake Balls
These little bites are pure Christmas magic, turning those beloved Little Debbie Christmas Tree Cakes into delightful, poppable treats. The combination of the cake’s sweet, creamy filling and the crisp outer coating is just fantastic. They’re perfect for cookie platters, holiday parties, or just a special treat for yourself during the festive season.
Crushing the Cakes
The first step is to get our Christmas Tree Cakes ready. You’ll want to take your 10 Little Debbie Christmas Tree Cakes and crumble them. I find the easiest way to do this is to put them into a large bowl and then use my hands to really break them down. Get rid of any large chunks; we want a fine crumble that resembles coarse breadcrumbs. You can also pulse them a few times in a food processor if you have one, but be careful not to over-process them into a paste. The little bits of cake are what give these their signature texture. This process should result in a bowl full of crumbs and any remaining frosting from the cakes will help bind it all together.
Mixing the Base
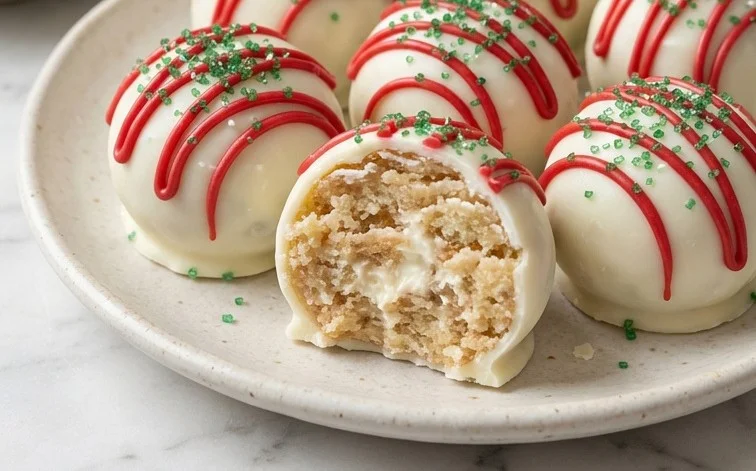
Once your cakes are all crumbled, it’s time to mix in the cream cheese. You’ll need 8 ounces of softened cream cheese. Make sure it’s truly softened; this is important for creating a smooth, cohesive mixture. Add the softened cream cheese directly to the bowl with your cake crumbs. Use a sturdy spoon or your hands (clean hands are best!) to really incorporate the cream cheese into the cake crumbs. You want to mix until everything is well combined and starts to hold together. It should form a dough-like consistency that you can easily press into balls. If the mixture seems too dry, you can add another tablespoon of softened cream cheese. If it seems too wet, add a few more cake crumbs.
Ingredients:
- 10 Little Debbie Christmas Tree Cakes (which typically comes in 2 boxes)
- 8 ounces cream cheese, softened
- 16 ounces vanilla almond bark
- 1 cup red candy melts
- Green sugar sprinkles
Making Christmas Tree Cake Balls
These little bites are pure Christmas magic, turning those beloved Little Debbie Christmas Tree Cakes into delightful, poppable treats. The combination of the cake’s sweet, creamy filling and the crisp outer coating is just fantastic. They’re perfect for cookie platters, holiday parties, or just a special treat for yourself during the festive season. The key to these is starting with cakes that are slightly chilled, which makes them easier to crumble and form. I like to make these a day or two before I need them, as they hold up really well.
Crushing the Cakes
The first step is to get our Christmas Tree Cakes ready. You’ll want to take your 10 Little Debbie Christmas Tree Cakes and crumble them. I find the easiest way to do this is to put them into a large bowl and then use my hands to really break them down. Get rid of any large chunks; we want a fine crumble that resembles coarse breadcrumbs. You can also pulse them a few times in a food processor if you have one, but be careful not to over-process them into a paste. The little bits of cake are what give these their signature texture. This process should result in a bowl full of crumbs and any remaining frosting from the cakes will help bind it all together.
Mixing the Base
Once your cakes are all crumbled, it’s time to add the cream cheese. Make sure your 8 ounces of cream cheese are properly softened. This means it should be spreadable and not cold straight from the fridge. If it’s too cold, it will be hard to mix in evenly and might create lumps in your cake ball mixture. Add the softened cream cheese to the crumbled cakes. Using a sturdy spatula or even your hands (which I often do for this part as it gives me more control), mix the cream cheese into the cake crumbs. You’re aiming for a consistent, dough-like consistency. It should hold together when you squeeze it. This mixture will feel a bit sticky, and that’s perfectly normal. Knead it together until there are no visible streaks of cream cheese and everything is well incorporated.
Forming the Balls
Now comes the fun part: shaping the cake balls. Take small portions of the cake and cream cheese mixture and roll them between your palms to form small, uniform balls. Aim for a size that’s easy to pop into your mouth, perhaps about 1 inch in diameter. Consistency in size is important so they all bake or set evenly. As you roll them, try to make them as smooth as possible. If the mixture feels too sticky to handle, you can lightly dust your hands with a tiny bit of flour or powdered sugar, but usually, the texture is manageable as is. Place the formed balls onto a baking sheet lined with parchment paper. This prevents sticking and makes them easy to transfer. Make sure they aren’t touching each other too much on the sheet.
Melting and Dipping
This next step involves melting the coatings. You’ll need to melt the 16 ounces of vanilla almond bark and the 1 cup of red candy melts separately. The best way to do this is using a double boiler or by melting them in microwave-safe bowls in 30-second intervals, stirring well after each interval. Stirring is key to prevent burning. You want the coatings to be smooth and pourable, but not too hot. Once melted, let them cool slightly. This is important because if the coating is too hot, it can melt the cream cheese inside the cake ball and make them soft and difficult to handle. Dip each cake ball into the melted vanilla almond bark, coating it completely. Use a fork or a toothpick to lift the cake ball out, letting any excess chocolate drip back into the bowl. Place the coated cake ball back onto the parchment-lined baking sheet.
Decorating for the Holidays
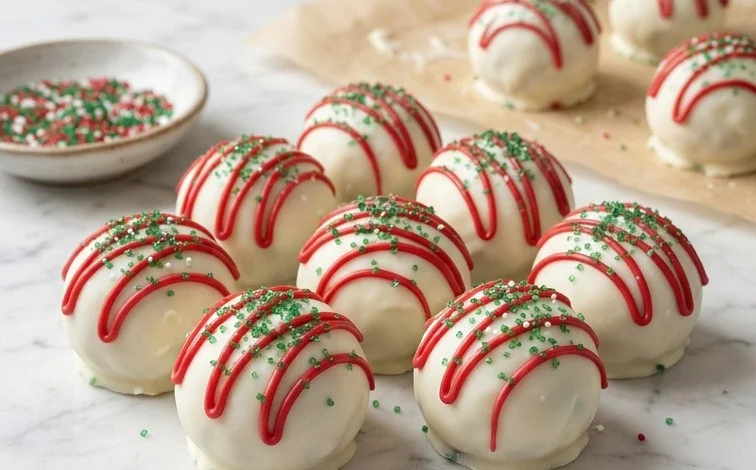
While the vanilla almond bark coating is still wet, it’s time to add the festive touches. This is where the red candy melts and green sugar sprinkles come in. You can either drizzle the melted red candy melts over the vanilla-coated balls using a spoon or a piping bag with a small tip, or you can fully dip some of the balls into the red candy melts for a two-toned effect. For the drizzle, simply melt the red candy melts and then drizzle them artfully over the top of each cake ball. Immediately after drizzling or dipping with the red candy melts, while the coating is still wet, sprinkle them with the green sugar sprinkles. The sprinkles will stick to the wet coating, creating a beautiful Christmas tree effect. Work quickly with the sprinkles so they adhere properly before the coating sets. If the coating starts to harden before you’re done decorating, you can gently reheat it for a few seconds in the microwave.
Setting and Serving
Once all your cake balls are coated and decorated, let them set completely. You can leave them at room temperature for about an hour, or you can speed up the process by placing the baking sheet in the refrigerator for about 15-20 minutes. Be careful not to leave them in the fridge for too long, especially if your kitchen is warm, as condensation can form on the chocolate. They are ready to serve once the coating is firm to the touch. Store any leftover cake balls in an airtight container in the refrigerator for up to a week. They are best served chilled but can be brought to room temperature for a few minutes before eating for optimal texture. Enjoy these easy, delicious holiday treats!
Conclusion:
These Little Debbie Christmas Tree Cake Balls are a fantastic way to elevate a classic holiday treat into something truly special. The simple process turns familiar flavors into delightful, bite-sized morsels that are perfect for sharing. They bring a festive touch to any gathering and are always a hit with both kids and adults. The joy of making them yourself, with their cheerful appearance and sweet taste, is part of the holiday spirit.
For serving, these cake balls look wonderful arranged on a festive platter. They also make thoughtful edible gifts, especially when packaged in small cellophane bags tied with a holiday ribbon. You can also get creative with variations: consider adding a pinch of cinnamon to the cake crumb mixture for a warmer spice note, or topping them with different colored sprinkles for a varied look.
I encourage you to give these Christmas Tree Cake Balls a try this holiday season. They are a fun project that yields impressive results with minimal fuss. Enjoy making and sharing these little gems!
Frequently Asked Questions
How should I store leftover cake balls?
Store any leftover cake balls in an airtight container in the refrigerator. They will keep well for up to a week. Let them sit at room temperature for about 15-20 minutes before serving to allow the coating to soften slightly.
Can I make these cake balls ahead of time?
Absolutely! These cake balls are best made a day or two in advance. This allows the flavors to meld together and ensures the cake balls are firm and easy to handle.
What if my cream cheese is too hard or too soft?
Make sure your cream cheese is softened but not melted. If it’s too hard, it won’t incorporate well into the crumbs. If it’s too soft or melted, the mixture will be too wet and difficult to roll into balls. Leave the cream cheese on the counter for about an hour to reach the right consistency.
Little Debbie Christmas Tree Cake Balls
Festive and easy no-bake treats made from crushed Little Debbie Christmas Tree Cakes, cream cheese, and dipped in vanilla almond bark and red candy melts, finished with green sprinkles.
Ingredients
-
10 Little Debbie Christmas Tree Cakes (2 boxes)
-
8 ounces cream cheese (softened)
-
16 ounces vanilla almond bark
-
1 cup red candy melts
-
green sugar sprinkles
Instructions
-
Step 1
Crumble the Little Debbie Christmas Tree Cakes into fine crumbs in a large bowl. Discard any large chunks. -
Step 2
Add the softened cream cheese to the cake crumbs and mix thoroughly until well combined and a dough-like consistency is formed. -
Step 3
Roll the mixture into small, uniform balls, about 1 inch in diameter. Place them on a baking sheet lined with parchment paper. -
Step 4
Melt the vanilla almond bark according to package directions. Dip each cake ball into the melted almond bark, ensuring it is fully coated. Return to the parchment-lined baking sheet. -
Step 5
Melt the red candy melts according to package directions. Drizzle the melted red candy melts over the almond bark-coated cake balls for a festive design. -
Step 6
While the red candy melts are still wet, sprinkle generously with green sugar sprinkles. Allow the cake balls to set completely.
Important Information
Nutrition Facts (Per Serving)
It is important to consider this information as approximate and not to use it as definitive health advice.
Allergy Information
Please check ingredients for potential allergens and consult a health professional if in doubt.


Leave a Comment