
Ghost Meringue Cookies are a classic for a reason. These airy, sweet ghosts are surprisingly simple and look adorable lined up on a platter. They melt in your mouth and are always a hit with kids and adults. Halloween treats don’t have to be complicated. Many of the best spooky snacks start with simple ingredients you likely already have in your pantry. This collection focuses on fun, achievable recipes that will delight trick-or-treaters and party guests alike. We’ve got everything from creepy crawly cookies to ghoulishly good dips, all designed to add a touch of magic to your Halloween celebrations without requiring hours in the kitchen. Get ready to spook and satisfy with these 40 Easy Halloween Treat Recipes! They prove that creating memorable Halloween moments can be both fun and manageable, even for beginner bakers.

40 Easy Halloween Treat Recipes (Spooky & Fun)
Halloween treats don’t have to be complicated. Many of the best spooky snacks start with simple ingredients you likely already have in your pantry. This collection focuses on fun, achievable recipes that will delight trick-or-treaters and party guests alike. We’ve got everything from creepy crawly cookies to ghoulishly good dips, all designed to add a touch of magic to your Halloween celebrations without requiring hours in the kitchen. Get ready to spook and satisfy!
Ingredients:
- All-purpose flour
- Granulated sugar
- Brown sugar
- Butter, softened
- Eggs
- Vanilla extract
- Baking soda
- Salt
- Cocoa powder
- Powdered sugar
- Milk
- Corn syrup
- Cream cheese, softened
- Heavy cream
- Chocolate chips (dark, milk, white)
- Candy corn
- Pretzel sticks
- Green sprinkles
- Black sprinkles
- Orange sprinkles
- Red food coloring
- Green food coloring
- Black food coloring
- Melted white chocolate
- Graham crackers
- Marshmallows
- Peanut butter
- Oreo cookies
- Cream-filled cookies
- Gummy worms
- Candy eyeballs
- Caramel sauce
- Shortening
- Food-safe edible marker
Ghost Meringue Cookies
These airy, sweet ghosts are surprisingly simple and look adorable lined up on a platter. They melt in your mouth and are always a hit with kids and adults.
Ingredients:
- 2 large egg whites
- 1/2 teaspoon cream of tartar
- 3/4 cup granulated sugar
- 1/2 teaspoon vanilla extract
- Black food coloring
- Black edible marker
Instructions:
- Preheat your oven to 200°F (95°C). Line two baking sheets with parchment paper. This low temperature is key to drying out the meringues without browning them.
- In a clean, dry bowl, beat the egg whites and cream of tartar with an electric mixer on medium speed until soft peaks form. Soft peaks mean that when you lift the beaters, the egg whites form peaks that curl over at the tip.
- Gradually add the granulated sugar, one tablespoon at a time, while continuing to beat on high speed. Keep beating until stiff, glossy peaks form. This can take several minutes. The mixture should be smooth and the sugar should be completely dissolved. You can test this by rubbing a small amount of meringue between your fingers; it shouldn’t feel gritty.
- Beat in the vanilla extract.
- If you want to add a hint of color to your ghosts, you can add a tiny drop of black food coloring and swirl it in gently with a toothpick for a marbled effect, or use it as is for pure white ghosts.
- Spoon or pipe the meringue onto the prepared baking sheets. For ghosts, you can pipe a larger base and a smaller head, or just freehand simple ghost shapes. Aim for about 1.5 to 2 inches in height.
- Bake for 1 hour and 30 minutes to 2 hours, or until the meringues are dry to the touch and lift easily off the parchment paper. They should sound hollow when tapped. Turn off the oven, prop the door open slightly with a wooden spoon, and let the meringues cool completely in the oven. This gradual cooling prevents cracking.
- Once completely cool, use the black edible marker to draw simple ghost faces on each meringue. You can give them dots for eyes and a little smile or a spooky grimace. Store in an airtight container at room temperature for up to a week.
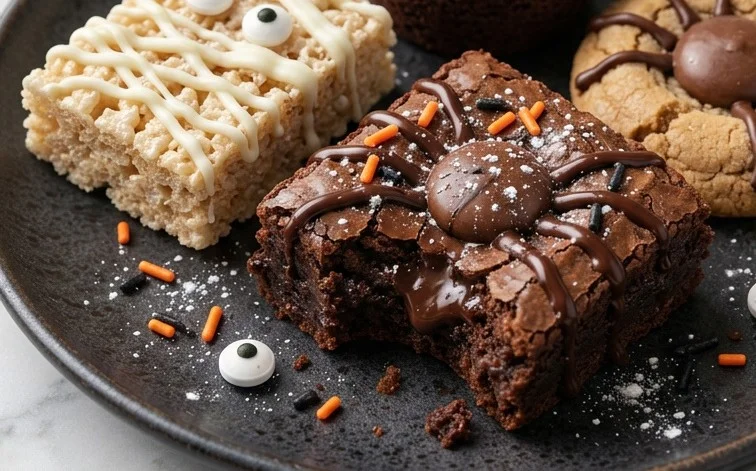
Graveyard Brownies
These are always a crowd-pleaser and incredibly easy to assemble. The rich chocolate base is the perfect canvas for spooky decorations.
Ingredients:
- 1 box (18.25 oz) chocolate cake mix (prepare according to package directions using eggs, oil, and water)
- 1/4 cup vegetable oil
- 2 large eggs
- 1 teaspoon vanilla extract
- 1/4 cup unsweetened cocoa powder
- 1/2 cup chocolate chips
- 1/2 cup powdered sugar
- 2-3 tablespoons milk
- Black food coloring
- Oreo cookies
- Pretzel sticks
Instructions:
- Prepare your favorite brownie batter. For a fudgier brownie, use the measurements listed on the brownie mix box, or use a from-scratch brownie recipe. If using a mix, combine the cake mix, oil, eggs, vanilla extract, and cocoa powder in a large bowl. Mix until just combined. Stir in the chocolate chips.
- Pour the batter into a greased and floured 9×13 inch baking pan.
- Bake according to the brownie mix or recipe directions, typically around 30-35 minutes, or until a toothpick inserted into the center comes out with moist crumbs attached. Let the brownies cool completely in the pan.
- While the brownies are cooling, prepare the “dirt” icing. In a small bowl, whisk together the powdered sugar and milk until you have a smooth, spreadable icing. Add more milk, a teaspoon at a time, if needed to reach the desired consistency.
- Add a few drops of black food coloring to the icing and stir until it’s a dark, soil-like color.
- Once the brownies are completely cooled, spread the black icing evenly over the top.
- To create the gravestones, take Oreo cookies and carefully twist them apart. Scrape off the cream filling. You can use the cookie halves as they are, or cut them into tombstone shapes using a sharp knife.
- Using a food-safe edible marker or a small amount of leftover icing, write “RIP” or other spooky messages on the cookie gravestones.
- Arrange the gravestones on top of the iced brownies, pressing them gently into the icing.
- Break pretzel sticks into various lengths and insert them into the brownies to resemble broken fences or crosses. You can also scatter some green sprinkles around to look like grass. Cut the brownies into squares and serve.
Monster Rice Krispie Treats
These classic treats get a spooky makeover with simple additions. They are incredibly fun to make and customize.
Ingredients:
- 6 cups crispy rice cereal
- 10 oz marshmallows
- 4 tablespoons butter
- Green food coloring
- Black food coloring
- Candy eyeballs
- Green sprinkles
Instructions:
- In a large saucepan, melt the butter over low heat. Add the marshmallows and stir constantly until they are completely melted and smooth. Keep the heat low to prevent scorching.
- Remove the saucepan from the heat. Add a few drops of green food coloring and stir until evenly distributed, creating a vibrant monster green. If you want a more mottled look, add drops of black food coloring as well and swirl them in lightly with a toothpick.
- Add the crispy rice cereal to the melted marshmallow mixture. Stir quickly and gently until the cereal is well coated. Work fast, as the mixture will start to set.
- Grease a 9×13 inch baking pan with butter or cooking spray, or line it with parchment paper. Spoon the Rice Krispie treat mixture into the prepared pan.
- Using a greased spatula or your hands (lightly greased works best), press the mixture evenly into the pan. Don’t press too hard, or the treats will be too dense.
- While the treats are still slightly warm and sticky, press candy eyeballs into the surface to create monster eyes. You can use as many or as few as you like.
- If desired, sprinkle some green sprinkles over the treats to add texture or create a fuzzy monster effect.
- Let the Rice Krispie treats cool completely in the pan. Once firm, cut them into squares or use cookie cutters to create fun shapes like pumpkins or ghosts.
Spider Web Dip
This creamy, cheesy dip is surprisingly easy and looks impressive with its spooky web design. It’s perfect for dipping crackers and vegetables.
Ingredients:
- 2 (8 oz) packages cream cheese, softened
- 1/2 cup sour cream
- 1/4 cup mayonnaise
- 1 clove garlic, minced
- 1/2 teaspoon salt
- 1/4 teaspoon black pepper
- 1/2 cup shredded cheddar cheese
- 1/4 cup salsa
- Black food coloring
- Black olives, chopped (optional, for spiders)
Instructions:
- In a medium bowl, beat together the softened cream cheese, sour cream, mayonnaise, minced garlic, salt, and pepper until smooth and well combined. This creates the creamy base for your dip.
- Stir in the shredded cheddar cheese until evenly distributed.
- Divide the cream cheese mixture into two bowls. Leave one bowl plain.
- In the second bowl, add the salsa and a few drops of black food coloring. Stir until the mixture is a deep, dark color. This will be your “spider web” topping.
- Spread the plain cream cheese mixture evenly into a serving dish. A shallow, round dish works well for a spider web effect.
- Carefully dollop spoonfuls of the dark salsa mixture over the plain cream cheese base. Don’t spread it out too much yet; just place mounds of the dark mixture on top.
- Using a toothpick or the tip of a knife, gently drag the dark mixture from the center outwards in concentric circles, creating the illusion of a spider web. Don’t over-mix, or the colors will blend too much.
- If you like, you can add chopped black olives to form small spider shapes on the web.
- Serve chilled with your favorite crackers, tortilla chips, or vegetable sticks. This dip is best enjoyed the same day it’s made.
Witch Finger Pretzels
These salty-sweet treats are as fun to make as they are to eat. The simple green coating and almond nail are so effective.
Ingredients:
- 1 bag pretzel rods
- 1 bag green candy melts
- 1/4 cup shortening
- Almonds, slivered
Instructions:
- Line a baking sheet with parchment paper.
- Melt the green candy melts in a microwave-safe bowl according to package directions, stirring every 30 seconds until smooth. You can also melt them in a double boiler.
- Add the shortening to the melted candy melts and stir until fully incorporated. The shortening helps to thin the candy melts slightly, making them easier to dip.
- Hold a pretzel rod by the tip and dip the other end into the melted green candy. Rotate the pretzel to coat it evenly, leaving a small section at the top uncoated.
- Allow any excess candy coating to drip back into the bowl.
- Place the coated pretzel rod on the prepared baking sheet.
- While the green coating is still wet, carefully press a slivered almond into the tip of the pretzel to resemble a fingernail.
- Repeat with the remaining pretzel rods and candy melts.
- Let the witch finger pretzels cool and harden completely at room temperature. This usually takes about 15-20 minutes. If your room is warm, you can place them in the refrigerator for a few minutes to speed up the hardening process, but avoid leaving them in the fridge too long as condensation can affect the coating.
- Once hardened, they are ready to be served. Store any leftovers in an airtight container at room temperature.
Conclusion:
These 40 Easy Halloween Treat Recipes offer a delightful way to embrace the spooky season without overwhelming yourself in the kitchen. From the whimsical Ghost Meringue Cookies to countless other creative concoctions, the goal is simple: fun, flavor, and frightful presentation. These recipes are designed to be accessible, using common pantry staples and straightforward techniques. Whether you’re hosting a haunted house party or just want to make the week leading up to Halloween extra special, this collection has something for everyone. Imagine the smiles on the faces of little trick-or-treaters or your party guests as they sample these homemade delights. They are perfect for sharing at school parties, neighborhood get-togethers, or just enjoying as a family. Don’t be afraid to get a little creative; Halloween is the perfect time to experiment!
Frequently Asked Questions:
Can I make these treats ahead of time?
Most of these treats, especially cookies and candies, can be made several days in advance. Store them in airtight containers at room temperature to maintain freshness. Items like dips or no-bake bars are best made closer to serving time to ensure optimal texture and flavor.
What if I don’t have a specific food coloring color?
For many recipes, especially those where the color is purely for Halloween aesthetics, you can often skip the food coloring or use a different color that you have on hand. For instance, orange sprinkles can be substituted with purple, or green food coloring can be omitted if it doesn’t significantly alter the core flavor or function of the recipe.
Are these recipes suitable for very young children to help with?
Absolutely. Many of the recipes are perfect for involving kids. Simple tasks like stirring, decorating, or pressing cookie cutters can be done by younger children. Always supervise children in the kitchen, especially around ovens or sharp utensils.
40 Easy Halloween Treat Recipes (Spooky & Fun)
A curated collection of 40 simple and exciting Halloween treat recipes perfect for spooky parties and fun family activities. From creepy cookies to ghoulish goodies, find your next favorite frightfully delicious creation.
Ingredients
-
1 cup all-purpose flour
-
1/2 cup granulated sugar
-
1/4 cup unsalted butter, softened
-
1 large egg
-
1 teaspoon vanilla extract
-
1/2 teaspoon baking soda
-
1/4 teaspoon salt
-
Food coloring (orange, black, green)
-
Candy eyes
-
Chocolate chips
Instructions
-
Step 1
Preheat oven to 350°F (175°C). Line baking sheets with parchment paper. -
Step 2
In a large bowl, cream together the softened butter and sugar until light and fluffy. -
Step 3
Beat in the egg and vanilla extract until well combined. -
Step 4
In a separate bowl, whisk together the flour, baking soda, and salt. -
Step 5
Gradually add the dry ingredients to the wet ingredients, mixing until just combined. Divide dough and tint with desired food coloring for Halloween themes. -
Step 6
Drop rounded spoonfuls of dough onto prepared baking sheets. Decorate with candy eyes, chocolate chips, or other Halloween-themed sprinkles. -
Step 7
Bake for 10-12 minutes, or until edges are lightly golden. Let cool on baking sheets for a few minutes before transferring to wire racks to cool completely.
Important Information
Nutrition Facts (Per Serving)
It is important to consider this information as approximate and not to use it as definitive health advice.
Allergy Information
Please check ingredients for potential allergens and consult a health professional if in doubt.


Leave a Comment