
Little Debbie Christmas Tree Cake Balls transform a beloved holiday snack into a delightful, poppable treat perfect for any festive occasion. These aren’t just any cake balls; they capture the specific, nostalgic vanilla-almond flavor of the iconic Christmas Tree Cakes, complete with that distinctive red and green frosting. Making them is a simple process that results in a wonderfully creamy, melt-in-your-mouth texture. They’re ideal for adding to cookie platters, giving as thoughtful edible gifts, or simply enjoying with a cup of hot cocoa on a chilly afternoon. The magic begins by crumbling the cakes, which gives you a base ready to be bound together. The key to achieving the perfect consistency lies in the cream cheese; it must be softened to room temperature. If it’s too cold, it won’t blend smoothly into the cake crumbs, leading to a lumpy dough. Aim for cream cheese that yields gently when pressed. This step is crucial for creating a dough that rolls easily into uniform balls without being overly sticky or dry, ensuring your Little Debbie Christmas Tree Cake Balls turn out just right.
Preparing the Cake Base
Start by carefully unwrapping all 10 Little Debbie Christmas Tree Cakes. It is usually easiest to remove them from their individual plastic packaging and place them onto a clean work surface or a lined baking sheet. The next step involves finely crumbling the cakes. You can achieve this by hand, using your fingers to break them down into small pieces, or you can pulse them briefly in a food processor. Ensure there are no large chunks remaining, as this will affect the texture of the final cake balls. Once crumbled, you should have a texture resembling coarse breadcrumbs.
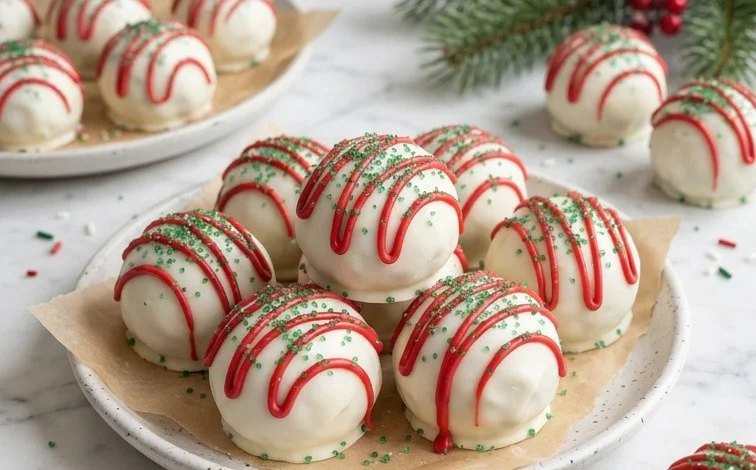
Ingredients:
- 10 Little Debbie Christmas Tree Cakes (this is typically 2 boxes, as they come in packs of 5)
- 8 ounces cream cheese, softened to room temperature
- 16 ounces vanilla almond bark
- 1 cup red candy melts
- Green sugar sprinkles for decorating
Christmas Tree Cake Balls
Transforming those iconic Little Debbie Christmas Tree Cakes into bite-sized, festive cake balls is a simple and joyful way to add some homemade charm to your holiday celebrations. These little treats capture the familiar vanilla cake and creamy frosting flavor of the original, but in a wonderfully poppable form. They are perfect for cookie platters, white elephant gifts, or just a sweet afternoon snack. The magic happens when you combine the cake with cream cheese to create a dough that’s easy to roll and holds its shape beautifully.
The key to getting the texture just right is ensuring your cream cheese is properly softened. If it’s too cold, it won’t incorporate smoothly into the crumbled cake, and you’ll end up with lumps. Leave it on the counter for about an hour, or until it’s yielding to the touch. This will make rolling the cake balls a breeze, preventing them from being too sticky or too dry.
Preparing the Cake Base
- Start by unwrapping all 10 Little Debbie Christmas Tree Cakes. It’s easiest to remove them from their plastic packaging and place them on a clean work surface or a baking sheet.
- Next, you’ll want to finely crumble the cakes. You can do this by hand, using your fingers to break them down into small pieces. Alternatively, you can place them in a food processor and pulse a few times until you have fine crumbs. Be sure to get rid of any large chunks of cake or frosting. The goal is a uniform crumb consistency, similar to what you’d use for a cheesecake crust. This ensures that when mixed with the cream cheese, you get a cohesive dough. Make sure to get all the frosting that might stick to the packaging as well; it’s part of the flavor!
- Add the softened cream cheese to the bowl of crumbled Christmas Tree Cakes. Using a spatula or a sturdy spoon, mix the cream cheese into the cake crumbs. Continue mixing and mashing until the cream cheese is completely incorporated and you have a thick, pliable dough. It should be moist enough to hold together when pressed, but not overly sticky. If it feels a little too sticky to handle, you can pop the bowl in the refrigerator for about 15-20 minutes to firm it up slightly. This dough is the foundation of your cake balls, so getting this mixture right is important for easy shaping.
- Once your dough is ready, it’s time to form the cake balls. Roll the mixture into uniform balls, about 1 inch in diameter. You can use your hands to roll them between your palms. Try to make them as consistent in size as possible so they all melt and set evenly. Place the rolled cake balls onto a parchment-lined baking sheet. Parchment paper is your friend here, preventing any sticking and making cleanup a breeze. You should get around 20-25 cake balls, depending on how large you make them.
Melting and Coating the Cake Balls
- Now it’s time to melt the vanilla almond bark and red candy melts. For the vanilla almond bark, you can do this either in a microwave-safe bowl in 30-second intervals, stirring well after each interval, or use a double boiler. The goal is a smooth, fully melted consistency. Once melted, keep it warm. Similarly, melt the red candy melts. You can use the same method for the candy melts. It’s important to melt them gently to avoid scorching, which can make them seize up and become unusable. If the almond bark or candy melts become too thick as you work, you can add a very small amount of coconut oil or vegetable oil (about a teaspoon at a time) to thin them out, but be cautious not to add too much.
- Dip each cake ball into the melted vanilla almond bark, ensuring it’s fully coated. Use a fork or a toothpick to help coat them evenly. Lift the coated cake ball out of the almond bark and tap gently on the side of the bowl to let any excess coating drip off. Return the coated cake ball to the parchment-lined baking sheet. Repeat this process for all the cake balls. You can choose to coat all of them in vanilla almond bark, or alternate between vanilla and red candy melts for variety.
- While the vanilla almond bark coating is still wet, drizzle or artfully place melted red candy melts over the cake balls. This is where you can get creative with the festive colors! You can use a spoon to drizzle thin lines of red candy melts over the vanilla-coated balls. Alternatively, if you coated some balls entirely in red candy melts, you can drizzle them with the vanilla almond bark. The key is to do this while the base coating is still soft so the drizzles adhere nicely.
- Immediately after drizzling with red candy melts, sprinkle the green sugar sprinkles onto the wet candy melt drizzles. The sprinkles will stick best when the candy melt is still melted. Be generous with the sprinkles to really capture that Christmas Tree Cake aesthetic. You can also add sprinkles directly onto the vanilla almond bark coating if you prefer. Work relatively quickly, as the candy melts will start to set. Once all the cake balls are dipped, drizzled, and sprinkled, let them sit at room temperature for about 30 minutes to an hour, or until the coating is completely set. For a quicker set, you can place the baking sheet in the refrigerator for about 10-15 minutes, but be mindful that condensation can form on the coating if they are chilled for too long.
These Christmas Tree Cake Balls are best enjoyed within a few days. Store them in an airtight container at room temperature. If your kitchen tends to be warm, you might want to store them in the refrigerator, but let them come to room temperature before serving for the best texture and flavor. They are a delightful way to bring a bit of holiday nostalgia and homemade joy to any gathering.
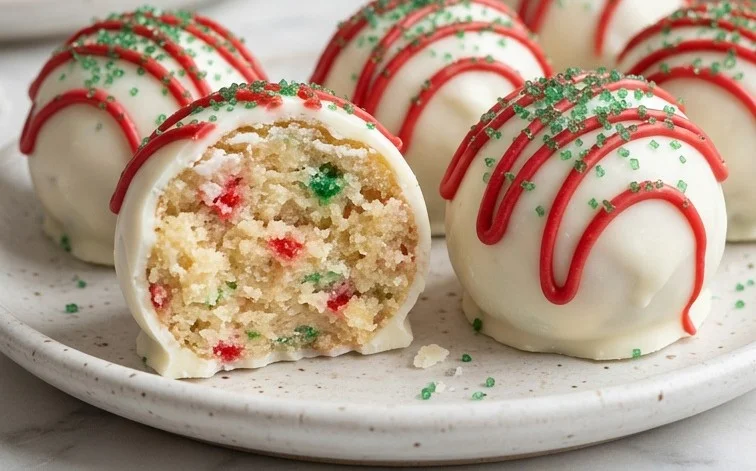
Conclusion:
These Little Debbie Christmas Tree Cake Balls are a fantastic way to bring a unique, homemade touch to your holiday festivities. They take a familiar, cherished treat and turn it into something new and exciting, perfect for sharing. The delightful vanilla-almond flavor combined with a creamy center and a crisp candy coating makes them irresistible. They are a wonderful addition to any holiday cookie box or a thoughtful, edible gift for friends, neighbors, or colleagues. Consider them for your next holiday party or as a fun baking project with kids.
Serving Suggestions: Serve these cake balls chilled for the best texture, perhaps alongside a warm beverage like coffee or tea. They look especially festive arranged on a holiday platter with other Christmas cookies.
Variations: For a different look, you can dip some of the cake balls entirely in the vanilla almond bark and others partially. You could also experiment with different colored candy melts for a unique color scheme. If you don’t have red candy melts, pink or white can work well for decorating.
Frequently Asked Questions:
Can I make these ahead of time?
Yes, you can definitely make these Little Debbie Christmas Tree Cake Balls ahead of time. Once the cake balls are fully set and decorated, store them in an airtight container in the refrigerator for up to a week. They might become slightly firmer when chilled, but they will soften at room temperature.
What if my cake mixture is too sticky?
If your cake and cream cheese mixture is too sticky to roll, try chilling it in the refrigerator for about 15-30 minutes. This will help firm up the cream cheese and make the dough easier to handle. You can also lightly dust your hands with powdered sugar or a bit of flour, but be careful not to add too much, as it can dry out the balls.
How should I store leftover cake balls?
Store any leftover cake balls in a single layer in an airtight container in the refrigerator. Placing parchment paper between layers if you stack them will prevent them from sticking together. They are best enjoyed within a week of making them.
Little Debbie Christmas Tree Cake Balls
Festive and easy no-bake treats inspired by the classic Little Debbie Christmas Tree Cakes, perfect for holiday gatherings.
Ingredients
-
10 Little Debbie Christmas Tree Cakes (2 boxes)
-
8 ounces cream cheese, softened
-
16 ounces vanilla almond bark
-
1 cup red candy melts
-
Green sugar sprinkles
Instructions
-
Step 1
Crumble the Little Debbie Christmas Tree Cakes into a large bowl, including the frosting and sprinkles. -
Step 2
Add the softened cream cheese to the crumbled cake mixture and mix until well combined and a dough-like consistency is formed. -
Step 3
Roll the mixture into small balls, about 1-inch in diameter, and place them on a parchment-lined baking sheet. -
Step 4
Melt the vanilla almond bark according to package directions. Dip each cake ball into the melted almond bark, ensuring it is fully coated. Return to the parchment-lined sheet. -
Step 5
Melt the red candy melts. Drizzle the melted red candy over the coated cake balls for festive decoration. Immediately sprinkle with green sugar sprinkles before the candy sets. -
Step 6
Allow the cake balls to set completely in the refrigerator for at least 30 minutes before serving.
Important Information
Nutrition Facts (Per Serving)
It is important to consider this information as approximate and not to use it as definitive health advice.
Allergy Information
Please check ingredients for potential allergens and consult a health professional if in doubt.



Leave a Comment