
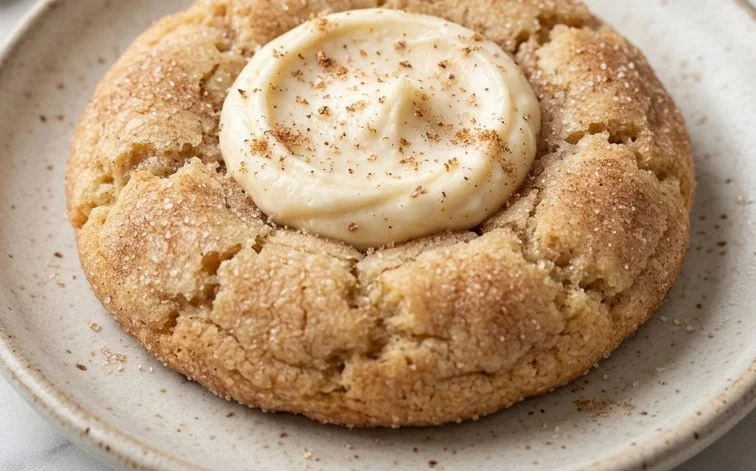
The aroma of warm spices and sweet dough is one of my favorite things about the holiday season, and these Eggnog Snickerdoodle Thumbprint Cookies capture it perfectly. They combine the familiar comfort of a snickerdoodle with the festive, creamy notes of eggnog and a surprise white chocolate center. The textured exterior from the cinnamon-sugar coating gives way to a soft, chewy cookie with a luscious, melted white chocolate pool. They’re a delightful twist on a classic and always a hit at cookie platters.
Ingredients:
- 4 ounces (1 stick) unsalted butter, softened to room temperature
- ½ cup light brown sugar, gently packed
- ¼ cup white granulated sugar
- 1 medium egg (about 50 grams), at room temperature
- 1 teaspoon vanilla extract
- 245 grams all-purpose flour (about 2 cups if measured by volume – see notes)
- 1/4 teaspoon kosher salt
- 1/4 teaspoon baking soda
- 1/2 teaspoon cream of tartar
- 1/3 cup sugar mixed with 2 tablespoons cinnamon (for rolling)
- 4 ounces white chocolate, chopped or broken into small pieces
- 2 tablespoons eggnog
- 1 tablespoon dark apple juice or 1/4 teaspoon vanilla extract (optional – see notes)
- 1/4 teaspoon freshly grated nutmeg
Cookie Dough Preparation
Cream Butter and Sugars
In a large mixing bowl, cream together the softened unsalted butter, light brown sugar, and white granulated sugar. Use an electric mixer on medium speed until the mixture is light and fluffy, about 3-4 minutes. This step is important for incorporating air into the dough, which helps with the cookie’s texture. Don’t rush this part.
Add Wet Ingredients
Beat in the room temperature egg and vanilla extract until well combined. Scrape down the sides of the bowl as needed to ensure everything is incorporated evenly. Adding the egg at room temperature helps it emulsify better with the butter and sugar mixture, preventing a greasy dough.
Combine Dry Ingredients
In a separate medium bowl, whisk together the all-purpose flour, kosher salt, baking soda, and cream of tartar. The cream of tartar is what gives snickerdoodles their signature tangy flavor and chewy texture. Whisking these ingredients separately ensures they are evenly distributed before adding them to the wet ingredients, which prevents pockets of leavening agents.
Form the Dough
Gradually add the dry ingredients to the wet ingredients, mixing on low speed just until the flour is incorporated. Be careful not to overmix at this stage; overmixing can develop the gluten in the flour too much, resulting in tough cookies. The dough should be soft but not sticky.
Chill the Dough
Turn the dough out onto a piece of plastic wrap, form it into a disc, wrap tightly, and refrigerate for at least 1 hour, or up to 2 days. Chilling the dough is essential. It firms up the butter, making the dough easier to handle and scoop, and it also allows the flavors to meld together. This step is critical for preventing the cookies from spreading too much during baking.
Assembling and Baking
Preheat Oven and Prepare Baking Sheets
When you’re ready to bake, preheat your oven to 350°F (175°C). Line two baking sheets with parchment paper or silicone baking mats. This prevents the cookies from sticking and helps them bake evenly.
Prepare Cinnamon-Sugar Coating
In a shallow bowl, combine the 1/3 cup sugar and 2 tablespoons cinnamon. Stir well to make sure the cinnamon is evenly distributed throughout the sugar.
Form and Roll Cookies
Scoop rounded tablespoons of the chilled dough and roll them into balls. Then, roll each ball generously in the cinnamon-sugar mixture, coating all sides. Place the coated balls about 2 inches apart on the prepared baking sheets.
Create Thumbprints and Add Filling
Using your thumb or the back of a small spoon, create an indentation in the center of each cookie ball. Make sure the indentation is deep enough to hold the filling but not so deep that it goes all the way through the cookie. In a small bowl, whisk together the chopped white chocolate, eggnog, and optional dark apple juice or vanilla extract until smooth. This creates a simple, luscious filling that complements the cookie.
Bake
Bake for 10-12 minutes, or until the edges are set and lightly golden, and the centers are still slightly soft. They will continue to bake a bit on the hot baking sheet after you remove them from the oven. The white chocolate filling should be melted and slightly gooey.
Cool and Enjoy
Let the cookies cool on the baking sheets for 5 minutes before transferring them to a wire rack to cool completely. This allows them to set properly. Once cooled, the white chocolate filling will have firmed up slightly but will still be wonderfully smooth.
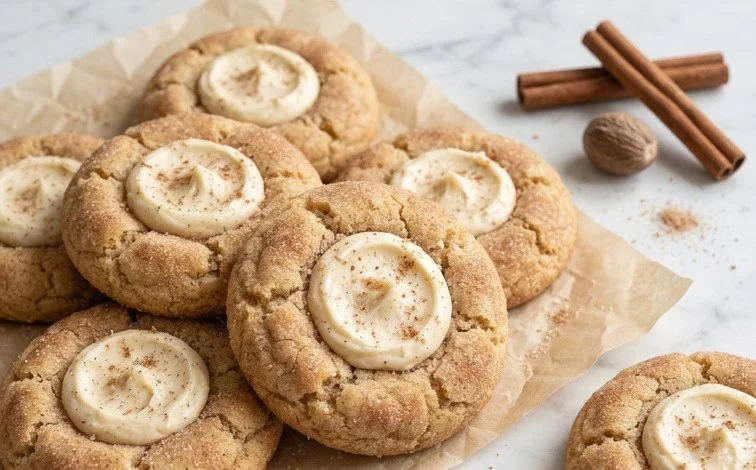
Eggnog Snickerdoodle Thumbprint Cookies
The aroma of warm spices and sweet dough is one of my favorite things about the holiday season, and these Eggnog Snickerdoodle Thumbprint Cookies capture it perfectly. They combine the familiar comfort of a snickerdoodle with the festive, creamy notes of eggnog and a surprise white chocolate center. The textured exterior from the cinnamon-sugar coating gives way to a soft, chewy cookie with a luscious, melted white chocolate pool. They’re a delightful twist on a classic and always a hit at cookie platters.
Ingredients:
- 4 ounces (1 stick) unsalted butter, softened to room temperature
- ½ cup light brown sugar, gently packed
- ¼ cup white granulated sugar
- 1 medium egg (about 50 grams), at room temperature
- 1 teaspoon vanilla extract
- 245 grams all-purpose flour (about 2 cups if measured by volume – see notes)
- 1/4 teaspoon kosher salt
- 1/4 teaspoon baking soda
- 1/2 teaspoon cream of tartar
- 1/3 cup sugar mixed with 2 tablespoons cinnamon (for rolling)
- 4 ounces white chocolate, chopped or broken into small pieces
- 2 tablespoons eggnog
- 1 tablespoon dark apple juice or 1/4 teaspoon vanilla extract (optional – see notes)
- 1/4 teaspoon freshly grated nutmeg
Cookie Dough Preparation
- Cream Butter and Sugars: In a large mixing bowl, cream together the softened unsalted butter, light brown sugar, and white granulated sugar. Use an electric mixer on medium speed until the mixture is light and fluffy, about 3-4 minutes. This step is important for incorporating air into the dough, which will contribute to the cookie’s texture. Make sure your butter is truly at room temperature; if it’s too cold, it won’t cream properly, and if it’s melted, the cookies will spread too much. Scrape down the sides of the bowl occasionally to ensure everything is evenly incorporated.
- Add Wet Ingredients: Beat in the room temperature egg and vanilla extract until well combined. The egg should be fully incorporated, and the mixture should look smooth. If your egg is cold, it can cause the butter mixture to curdle slightly, but don’t worry too much if this happens; it should still come together once the dry ingredients are added. Add the 2 tablespoons of eggnog and the optional dark apple juice or additional vanilla extract. Mix just until combined. The eggnog adds a subtle creaminess and characteristic flavor.
- Combine Dry Ingredients: In a separate medium bowl, whisk together the all-purpose flour, kosher salt, baking soda, cream of tartar, and freshly grated nutmeg. Whisking the dry ingredients together helps to distribute the leavening agents and salt evenly, preventing pockets of bitterness or uneven rising in your cookies. The cream of tartar is key for that classic snickerdoodle chewiness and its slight tang.
- Mix Dough: Gradually add the dry ingredients to the wet ingredients, mixing on low speed until just combined. Be careful not to overmix at this stage; overmixing can develop the gluten in the flour too much, resulting in tough cookies. Stop mixing as soon as you no longer see streaks of dry flour. The dough will be soft and slightly sticky.
Assembly and Baking
- Prepare for Shaping: Place the cinnamon-sugar mixture into a shallow bowl or plate. Take small portions of the cookie dough, about 1 to 1.5 tablespoons each, and roll them into smooth balls between your palms. You want them to be roughly uniform in size so they bake evenly.
- Roll and Indent: Generously roll each dough ball in the cinnamon-sugar mixture, ensuring it’s coated on all sides. Place the coated balls onto a baking sheet lined with parchment paper, leaving about 2 inches of space between each cookie. Once the balls are on the baking sheet, use your thumb or the back of a small spoon to create a deep indentation in the center of each cookie. This is where the white chocolate filling will go. Make sure the indentation is deep enough to hold a good amount of the filling, but not so deep that you break through the bottom of the cookie.
- Add White Chocolate Filling: Fill each indentation generously with the chopped white chocolate pieces. Don’t be afraid to really pack them in there, as they will melt and spread. The white chocolate will form a gooey, delicious center.
- Bake the Cookies: Bake in a preheated oven at 375°F (190°C) for 9 to 12 minutes, or until the edges are lightly golden brown and the centers are still slightly soft. The white chocolate should be melted and bubbly. Baking time can vary depending on your oven, so keep a close eye on them, especially the first batch. You want them to be set but not overbaked, which would make them dry.
- Cool and Set: Let the cookies cool on the baking sheet for 5 minutes. This allows them to firm up slightly before you move them. Then, carefully transfer the cookies to a wire rack to cool completely. As they cool, the melted white chocolate will continue to set slightly, creating that wonderful molten center. If you try to move them too soon, they might break apart. The remaining warmth will also help any residual melted chocolate to settle.
Notes and Tips:
Measuring flour by weight (grams) is always more accurate than by volume (cups), as different flours can pack differently. If you don’t have a kitchen scale, be sure to spoon the flour into your measuring cup and level it off with a straight edge without packing it down.
For the optional apple juice or extra vanilla, the apple juice adds a subtle fruity note that complements the spices and white chocolate. If you don’t have it or prefer not to use it, an additional 1/4 teaspoon of vanilla extract is a good substitute.
These cookies are best enjoyed within a few days of baking. Store them in an airtight container at room temperature. If the white chocolate center becomes too hard, you can gently warm a cookie for a few seconds in the microwave to soften it.
If you want a slightly richer flavor, you can use half milk chocolate and half white chocolate for the filling. For a smoother filling, you could also melt the white chocolate with a teaspoon of cream before adding it to the cookies, but this will require a slightly different assembly process.
Conclusion:
These Eggnog Snickerdoodle Thumbprint Cookies are a fantastic way to bring the cozy flavors of the holidays into your kitchen. The combination of classic snickerdoodle tang and sweetness with the rich, warm notes of eggnog, all centered around a melted white chocolate surprise, makes them a truly special treat. They have a delightful chewy texture, a crisp cinnamon-sugar coating, and a gooey, comforting center that everyone will love. They are simple enough for a weeknight bake but impressive enough for any holiday gathering.
For serving, these cookies are wonderful on their own with a glass of milk or a warm cup of tea. They also pair beautifully with coffee after a holiday meal. To add a little extra festivity, you could drizzle them with a little melted white chocolate or dust them lightly with powdered sugar. If you’re feeling creative, consider adding a pinch of ground cloves or ginger to the cinnamon-sugar coating for an even warmer spice profile.
Frequently Asked Questions:
Can I make the dough ahead of time?
Yes, absolutely! The dough for these Eggnog Snickerdoodle Thumbprint Cookies can be made up to 2 days in advance and stored in the refrigerator. Just make sure it’s tightly wrapped in plastic wrap. You might need to let it sit at room temperature for a few minutes before scooping if it’s very firm.
What if I don’t have eggnog?
If you can’t find eggnog or want to make these cookies without it, you can substitute the eggnog in the filling with an equal amount of milk or half-and-half. You can also add an extra ¼ teaspoon of vanilla extract to the filling to boost the flavor. While it won’t have the distinct eggnog taste, the cookies will still be delicious.
How should I store these cookies?
Store the cooled Eggnog Snickerdoodle Thumbprint Cookies in an airtight container at room temperature for up to 3-4 days. If you live in a warm climate or it’s very humid, you might want to place a small piece of parchment paper between layers of cookies to prevent sticking. They can also be frozen for longer storage; wrap them well.
Eggnog Snickerdoodle Thumbprint Cookies
A festive twist on classic snickerdoodles, these thumbprint cookies are infused with eggnog and a hint of nutmeg, filled with white chocolate, and rolled in a cinnamon-sugar coating.
Ingredients
-
4 ounces unsalted butter, room temperature
-
½ cup light brown sugar, gently packed
-
¼ cup white granulated sugar
-
1 medium egg
-
1 teaspoon vanilla extract
-
245 grams all purpose flour
-
1/4 teaspoon kosher salt
-
1/4 teaspoon baking soda
-
1/2 teaspoon cream of tartar
-
1/3 cup sugar mixed with 2 tablespoons cinnamon
-
4 ounces white chocolate, chopped or broken into small pieces
-
2 tablespoons eggnog
-
1/4 teaspoon freshly grated nutmeg
Instructions
-
Step 1
In a large bowl, cream together the room temperature butter, light brown sugar, and granulated sugar until light and fluffy. Beat in the egg and vanilla extract until well combined. -
Step 2
In a separate bowl, whisk together the all-purpose flour, kosher salt, baking soda, and cream of tartar. -
Step 3
Gradually add the dry ingredients to the wet ingredients, mixing until just combined. Stir in the eggnog and freshly grated nutmeg. -
Step 4
Chill the dough for at least 30 minutes. Preheat your oven to 350°F (175°C). Line baking sheets with parchment paper. -
Step 5
Roll the dough into 1-inch balls and then roll each ball in the cinnamon-sugar mixture. Place the balls on the prepared baking sheets. -
Step 6
Using your thumb or the back of a small spoon, make an indentation in the center of each cookie. Fill the indentations with chopped white chocolate. -
Step 7
Bake for 9-11 minutes, or until the edges are lightly golden and the centers are still slightly soft. Let cool on the baking sheets for a few minutes before transferring to a wire rack to cool completely.
Important Information
Nutrition Facts (Per Serving)
It is important to consider this information as approximate and not to use it as definitive health advice.
Allergy Information
Please check ingredients for potential allergens and consult a health professional if in doubt.


Leave a Comment