
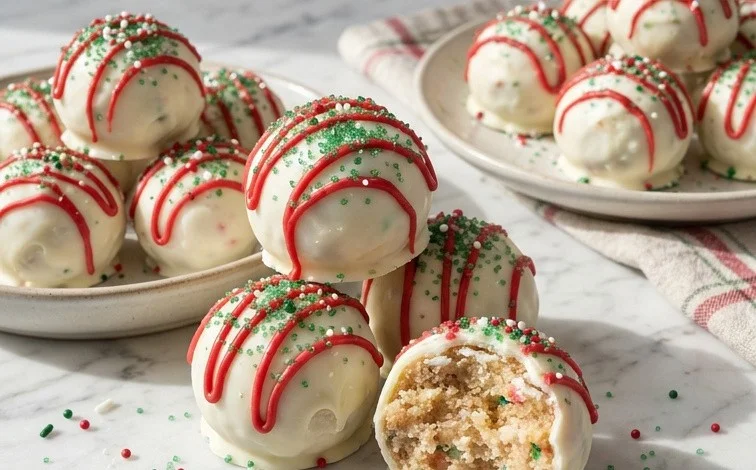
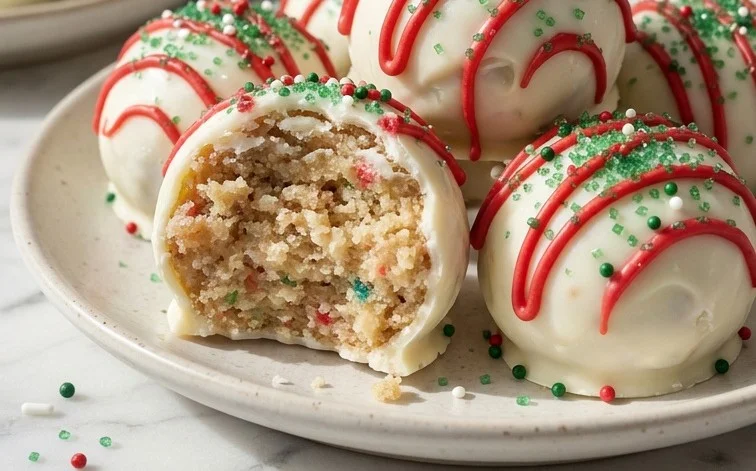
These Little Debbie Christmas Tree Cake Balls are a delightful way to remix a beloved holiday treat into a bite-sized indulgence. They capture the exact festive flavor of the iconic Little Debbie Christmas Tree Cakes, but in a fun, spherical shape that’s perfect for popping. I love making these because they’re surprisingly straightforward and always disappear fast at any holiday gathering or cookie exchange. The magic is in the creamy, sweet interior, created from the crushed cakes mixed with cream cheese, all enrobed in a smooth vanilla coating and finished with a festive touch of red and green. It’s a simple, joyful way to add serious holiday spirit to your dessert spread without spending all day in the kitchen.
Why You’ll Love Them:
- Nostalgic Flavor: Tastes just like the Christmas Tree Cakes you grew up with.
- Bite-Sized Fun: Easy to eat and perfect for parties.
- Quick to Make: Minimal effort for maximum holiday cheer.
- Festive Appearance: Red and green sprinkles make them instantly recognizable holiday treats.
Making Christmas Tree Cake Balls
These little treats capture the festive spirit of Little Debbie’s iconic Christmas Tree Cakes but in a fun, bite-sized ball. They are surprisingly easy to make and always a hit at holiday gatherings. The creamy interior, made from the cake itself and cream cheese, is coated in a sweet vanilla shell and then decorated with a pop of red and green. It’s a simple way to bring a lot of holiday cheer to your dessert table without spending hours in the kitchen.
Preparing the Cake Mixture
The first step is to transform those beloved Christmas Tree Cakes into a moldable mixture. You’ll want to start with the cakes at room temperature. If they’ve been in a cool pantry, let them sit on the counter for about 30 minutes to an hour so they are easier to crumble. Take your 10 Little Debbie Christmas Tree Cakes and remove them from their packaging. You can either crumble them by hand or place them in a food processor. If you’re using a food processor, pulse them until they form fine crumbs. It’s okay if there are a few slightly larger pieces, as this adds texture. The key is to get them to a point where they can be easily bound together. You’re essentially creating a very moist cake crumb. Once the cakes are crumbled, add the 8 ounces of softened cre
Ingredients:
- 10 Little Debbie Christmas Tree Cakes (these come in 2 boxes, so you’ll have 5 cakes per box)
- 8 ounces cream cheese, softened
- 16 ounces vanilla almond bark
- 1 cup red candy melts
- Green sugar sprinkles
Making Christmas Tree Cake Balls
These little treats capture the festive spirit of Little Debbie’s iconic Christmas Tree Cakes but in a fun, bite-sized ball. They are surprisingly easy to make and always a hit at holiday gatherings. The creamy interior, made from the cake itself and cream cheese, is coated in a sweet vanilla shell and then decorated with a pop of red and green. It’s a simple way to bring a lot of holiday cheer to your dessert table without spending hours in the kitchen.
Preparing the Cake Mixture
The first step is to transform those beloved Christmas Tree Cakes into a moldable mixture. You’ll want to start with the cakes at room temperature. If they’ve been in a cool pantry, let them sit on the counter for about 30 minutes to an hour so they are easier to crumble.
- Take your 10 Little Debbie Christmas Tree Cakes and remove them from their packaging. You can either crumble them by hand or place them in a food processor. If you’re using a food processor, pulse them until they form fine crumbs. It’s okay if there are a few slightly larger pieces, as this adds texture. The key is to get them to a point where they can be easily bound together. You’re essentially creating a very moist cake crumb.
- Once the cakes are crumbled, add the 8 ounces of softened cream cheese directly to the bowl with the cake crumbs. If your cream cheese isn’t softened enough, it can be difficult to incorporate evenly, leading to pockets of unmixed cream cheese in your cake balls. You can soften cream cheese quickly by cutting it into smaller cubes and letting it sit at room temperature for about 30 minutes, or by microwaving it in very short bursts (10-15 seconds) until just softened, being careful not to melt it.
- Now, it’s time to mix everything together. Using your hands is the most effective way to ensure the cream cheese is fully incorporated into the cake crumbs. Knead the mixture gently until it forms a cohesive dough. It should feel somewhat like play-doh – sticky, but firm enough to hold its shape. If the mixture feels too wet or sticky to handle, you can add a tablespoon or two of extra crumbled cake or a tiny bit of extra cream cheese if it feels too dry. You’re aiming for a consistency that you can easily roll into balls without it falling apart.
Shaping and Chilling the Cake Balls
Once you have your uniform cake and cream cheese mixture, it’s time to shape them and give them a chance to firm up. This chilling step is essential for the next stage of coating.
- Roll the cake mixture into small balls, about 1 inch in diameter. Aim for consistency in size so they all cook and coat evenly. As you roll each ball, place it on a baking sheet lined with parchment paper or wax paper. Having a clean surface prevents sticking. Once all the mixture has been rolled into balls, place the entire baking sheet into the freezer for at least 30 minutes, or into the refrigerator for about 1 hour. This chilling process is crucial because it firms up the cake balls, making them much easier to dip in melted candy without losing their shape or becoming too soft to handle. You want them to be firm enough that they don’t smudge when you dip them.
Melting and Coating
This is where the magic happens, transforming your humble cake balls into festive treats. It’s important to melt your candy coatings properly to ensure a smooth, even finish.
- While the cake balls are chilling, prepare your candy melts. In separate microwave-safe bowls, melt the 16 ounces of vanilla almond bark and the 1 cup of red candy melts. Microwave them in 30-second intervals, stirring well after each interval, until smooth and fully melted. Be patient, as overheating can cause the candy to seize up and become unusable. You want a smooth, flowing consistency. You can also use a double boiler method if you prefer. Once melted, keep them warm – you can place the bowls over simmering water (not touching the water) to keep them from hardening too quickly.
- Once the cake balls are well-chilled and firm, it’s time for dipping. Remove the baking sheet from the freezer or refrigerator. Take one cake ball at a time and dip it into the melted vanilla almond bark, ensuring it’s fully coated. You can use a fork or a toothpick to help coat them evenly. Gently tap the fork or toothpick on the edge of the bowl to let any excess coating drip off. Place the coated cake ball back onto the parchment-lined baking sheet. Repeat this process with all the cake balls, using the vanilla almond bark.
- After you’ve coated all the cake balls in vanilla almond bark and they’ve had a chance to set slightly (about 5-10 minutes in a cool room), you can start decorating. Melt your red candy melts if they have hardened. Using a spoon or a piping bag with a small tip, drizzle the red candy melts over the vanilla-coated cake balls. You want to create a festive, decorative pattern. Immediately after drizzling, while the red candy melts are still wet, sprinkle them generously with the green sugar sprinkles. The sprinkles will stick to the wet candy. Work quickly so the candy doesn’t set before you add the sprinkles.
Allow the cake balls to set completely at room temperature or in the refrigerator for about 15-20 minutes until the coating is firm. Once they are fully set, they are ready to be enjoyed! Store any leftovers in an airtight container at room temperature for a few days, or in the refrigerator if your home is particularly warm.
Conclusion:
These Little Debbie Christmas Tree Cake Balls are a fantastic shortcut to holiday deliciousness. They bring together the familiar, comforting taste of the classic snack cakes in a fun, new format that’s perfect for sharing. The combination of the moist, crumbly cake center and the sweet vanilla coating is incredibly satisfying, and they look so festive with their colorful sprinkles. Whether you’re looking for a quick dessert for a party, a sweet treat to enjoy with hot chocolate, or a fun activity to do with kids, these cake balls deliver big on holiday cheer with minimal fuss. Give them a try this season; you won’t regret adding this simple yet spectacular treat to your holiday baking repertoire.
Serving Suggestions:
Serve these cake balls chilled or at room temperature. They are wonderful on their own, or you can arrange them on a festive platter alongside other holiday cookies and candies. They also make a thoughtful homemade gift for friends, neighbors, or colleagues. Consider packaging them in small treat bags or decorative boxes tied with a ribbon.
Variations:
For a different flavor profile, you could try using a different flavor of Little Debbie snack cakes (if available seasonally) as the base. You could also experiment with different colored candy melts for the coating, or add a tiny bit of edible glitter to the sprinkles for extra sparkle.
Frequently Asked Questions:
Can I make these ahead of time?
Yes, you can definitely make these Little Debbie Christmas Tree Cake Balls ahead of time. Store them in an airtight container in the refrigerator for up to a week. This actually makes them firmer and easier to handle, which is a bonus. Just let them sit out for about 10-15 minutes before serving if you prefer them not to be too cold.
What if I don’t have vanilla almond bark?
If vanilla almond bark is unavailable, you can substitute it with white chocolate chips or good quality white baking wafers. You may need to add a teaspoon or two of vegetable shortening or coconut oil to help them melt smoothly and achieve the right consistency for dipping. Ensure whatever you use is designed for melting and coating.
How do I get a smooth coating?
To get the smoothest coating, make sure your candy melts or almond bark are heated gently and stirred until completely smooth. Avoid overheating, as this can cause them to seize up. Using a microwave-safe bowl and heating in short intervals (20-30 seconds), stirring in between, is usually best. A tall, narrow container or mug can also make dipping the cake balls easier.
Little Debbie Christmas Tree Cake Balls
Festive and fun no-bake cake balls made from crushed Little Debbie Christmas Tree Cakes, cream cheese, and coated in vanilla almond bark and red candy melts.
Ingredients
-
10 Little Debbie Christmas Tree Cakes (2 boxes)
-
8 ounces cream cheese, softened
-
16 ounces vanilla almond bark
-
1 cup red candy melts
-
green sugar sprinkles
Instructions
-
Step 1
Crumble the Little Debbie Christmas Tree Cakes into a large bowl, removing any excess frosting if desired. -
Step 2
Add the softened cream cheese to the crumbled cake and mix until well combined and a dough forms. -
Step 3
Roll the mixture into 1-inch balls and place them on a parchment-lined baking sheet. -
Step 4
Melt the vanilla almond bark according to package directions and dip each cake ball, allowing excess to drip off. Return to the parchment-lined sheet. -
Step 5
Melt the red candy melts according to package directions. Drizzle the melted red candy over the almond bark-coated cake balls. -
Step 6
Immediately sprinkle the green sugar sprinkles over the wet candy melts before they set.
Important Information
Nutrition Facts (Per Serving)
It is important to consider this information as approximate and not to use it as definitive health advice.
Allergy Information
Please check ingredients for potential allergens and consult a health professional if in doubt.

Leave a Comment