
Fall leaves are one of my favorite things about this time of year. The way they change colors and drift down from the trees always makes me feel a sense of cozy wonder. I wanted to capture that feeling in a treat, and what better way than with a classic Rice Krispie treat? These fall leaf shaped Rice Krispie treats are not only fun to make but also a delicious way to celebrate the season. They’re simple enough for kids to help with and impressive enough to serve at a fall gathering. The magic really happens with the color. Using food coloring, we’ll create those gorgeous autumn hues – fiery reds, warm oranges, sunny yellows, and rich browns. Then, the leaf cookie cutters transform them into festive shapes. It’s a sweet and playful take on seasonal baking that everyone will enjoy.
Ingredients:
- 12 cups Rice Krispies Cereal
- 12 cups Mini Marshmallows
- 12 tablespoons Butter (Sweet Cream, Salted)
- Wilton Color Right Food Coloring (Red, Orange, Yellow, Brown recommended for fall colors)
- Leaf Cookie Cutter (various sizes work well)
Preparing Your Workspace and Tools
Before you even start melting butter, it’s a good idea to get your workspace ready. This mixture can get sticky, and you want to be able to work quickly once everything is combined. Have your 9×13 inch baking pan greased or lined with parchment paper. I prefer to use parchment paper with an overhang, making it easier to lift the entire slab out later. You’ll also want a large mixing bowl, a large spoon or spatula for stirring, and a place for your colored cereal mixture to cool slightly.
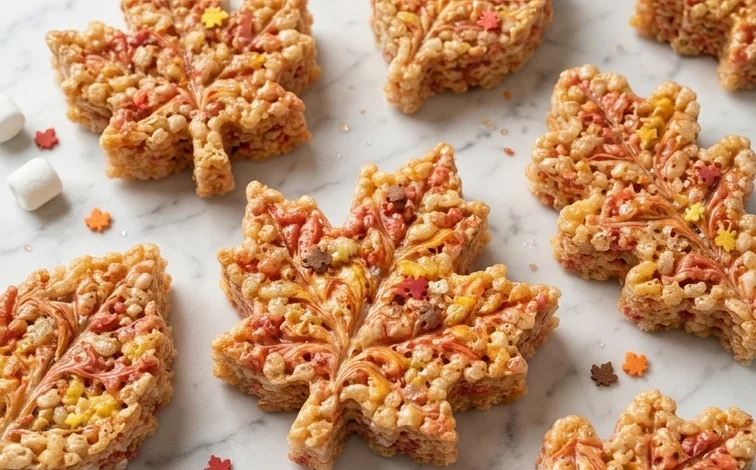
Fall Leaves Rice Krispie Treats
Fall leaves are one of my favorite things about this time of year. The way they change colors and drift down from the trees always makes me feel a sense of cozy wonder. I wanted to capture that feeling in a treat, and what better way than with a classic Rice Krispie treat? These fall leaf shaped Rice Krispie treats are not only fun to make but also a delicious way to celebrate the season. They’re simple enough for kids to help with and impressive enough to serve at a fall gathering.
The magic really happens with the color. Using food coloring, we’ll create those gorgeous autumn hues – fiery reds, warm oranges, sunny yellows, and rich browns. Then, the leaf cookie cutters transform them into festive shapes. It’s a sweet and playful take on seasonal baking that everyone will enjoy.
Ingredients:
- 12 cups Rice Krispies Cereal
- 12 cups Mini Marshmallows
- 12 tablespoons Butter (Sweet Cream, Salted)
- Wilton Color Right Food Coloring (Red, Orange, Yellow, Brown recommended for fall colors)
- Leaf Cookie Cutter (various sizes work well)
Preparing Your Workspace and Tools
Before you even start melting butter, it’s a good idea to get your workspace ready. This mixture can get sticky, and you want to be able to work quickly once everything is combined. Have your 9×13 inch baking pan greased or lined with parchment paper. I prefer to use parchment paper with an overhang, making it easier to lift the entire slab out later. You’ll also want a large mixing bowl, a sturdy spoon or spatula for stirring, and a smaller bowl for mixing colors if you choose to do multiple colors at once. Having your Rice Krispies cereal measured out and ready to go is also helpful, as is having your marshmallows and butter ready to be melted.
Melting the Marshmallow Mixture
This is where the sticky magic begins. In your large mixing bowl, add the 12 tablespoons of butter. You can do this in a large pot over low heat on the stovetop, or in a microwave-safe bowl. If using the stovetop, make sure the heat is on low to prevent the butter from burning. Once the butter is completely melted, add the 12 cups of mini marshmallows. Stir constantly until the marshmallows are fully melted and smooth. It’s important to keep stirring so you don’t scorch the marshmallows on the bottom. The mixture should be gooey and uniform. If you’re microwaving, heat in 30-second intervals, stirring in between, until smooth. Be careful not to overheat, as this can make the treats hard.
Adding the Cereal and Coloring
Once your marshmallow mixture is smooth and creamy, it’s time to add the Rice Krispies cereal. Pour the 12 cups of cereal into the melted marshmallow mixture. Stir gently but thoroughly until all the cereal is coated. Work relatively quickly here, as the mixture starts to set as it cools.
Now for the fun part – the colors! If you’re making multiple colors, divide the Rice Krispie mixture into separate bowls before adding the cereal. This way, you can color each batch individually. For a classic fall look, I like to make a few batches: one for reds, one for oranges, and one for yellows. You can also add a touch of brown for a deeper, woodsy tone. Add a few drops of Wilton Color Right food coloring to each bowl. Start with a small amount – you can always add more. Stir the color in until it’s evenly distributed. The key with Color Right is that a little goes a long way, and you get really concentrated, true colors. If you decide to make a single color, add the food coloring directly to the melted marshmallow and butter mixture before adding the cereal, and stir until the color is uniform.
Forming and Cutting the Treats
After coloring and mixing in the cereal for each batch, carefully transfer the mixture into your prepared baking pan. If you’ve made multiple colors, you can layer them or swirl them together for a marbled effect. Gently press the mixture into the pan using a greased spatula or your hands. Be sure to press it down evenly. Avoid packing it too tightly, as this can lead to dense treats. The goal is a uniform thickness, about ½ to ¾ inch.
Let the mixture cool for about 10-15 minutes. It needs to be firm enough to cut but still pliable. This cooling time is important; if you try to cut too soon, the treats will fall apart. If you wait too long, they’ll be too hard to cut cleanly. Once slightly cooled and firm, dust your leaf cookie cutters lightly with cooking spray or a little bit of melted butter to prevent sticking. Press the cookie cutters firmly into the Rice Krispie slab to create your fall leaf shapes. You can cut out as many as you can from the slab, re-pressing the scraps as needed. The edges might be a little rough, but that’s part of the charm of homemade treats.
Finishing Touches and Serving
Once you have cut out all your fall leaf shapes, let them cool completely in the pan. This usually takes another 30 minutes to an hour. Trying to move them too early can cause them to break. Once they are completely set and cool to the touch, you can carefully lift the entire slab (if you used parchment paper) or gently remove the individual shapes. These are perfect for an autumn party, a school lunchbox surprise, or just a fun afternoon snack. They store well in an airtight container at room temperature for up to 3 days. If you want to add a little extra flair, you could even pipe on some veins with a little bit of melted chocolate or edible marker once they’ve fully cooled. Enjoy the taste and look of fall!
Conclusion:
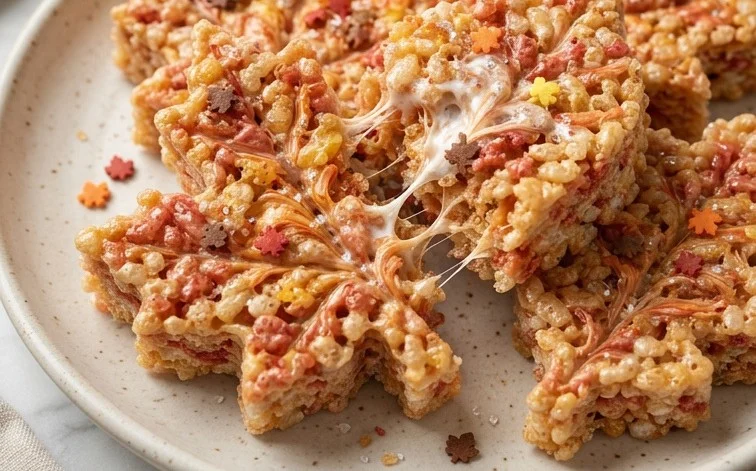
These Fall Leaves Rice Krispie Treats are a delightful way to bring a bit of autumn’s beauty indoors. They capture that cozy feeling of the season with their festive colors and shapes, making them a hit with both kids and adults. The simple process means you can easily get everyone involved in the kitchen, creating sweet memories alongside the treats. The way the light catches the colors is really lovely, and they taste just as good as they look. Serve them at a Halloween party, a Thanksgiving gathering, or just as a special after-school snack.
Serving Suggestions: These treats are wonderful on their own. For a bit of extra fun, you could arrange them on a platter like fallen leaves. They also pair nicely with a glass of cold milk or a warm cup of apple cider. Because they are individually shaped, they make great favors for parties.
Variations: If you can’t find leaf cookie cutters, any fall-themed shapes like pumpkins or acorns would also work beautifully. You can also add a sprinkle of edible glitter for extra sparkle, or even some chopped nuts if you like a bit of crunch, though be mindful of allergies. For a different flavor profile, a tiny bit of cinnamon mixed into the marshmallow mixture adds a warm spice.
Frequently Asked Questions:
How do I get the colors to be so bright?
Using a good quality gel food coloring, like the Wilton Color Right system recommended, is key. Add the coloring to the melted butter and marshmallows mixture gradually, stirring well after each addition until you achieve your desired shade of red, orange, yellow, or brown. Don’t be afraid to mix colors to get those deep fall tones.
Can I make these treats ahead of time?
Yes, you can. Once the treats are fully cooled and cut into shapes, store them in an airtight container at room temperature. They are best enjoyed within 2-3 days to maintain their fresh, chewy texture. Placing parchment paper between layers can prevent sticking.
My Rice Krispie treats are too hard, what did I do wrong?
This usually happens if the marshmallows are cooked for too long or at too high of a heat, causing them to harden. Make sure to melt the marshmallows and butter over low to medium heat, stirring constantly until just melted and smooth. Also, avoid pressing the mixture down too firmly into the pan; a gentle press is all that’s needed.
Fall Leaves Rice Krispie Treats
Festive Rice Krispie Treats shaped like fall leaves using colorful food coloring and a cookie cutter.
Ingredients
-
12 cups Rice Krispies Cereal
-
12 cups Mini Marshmallows
-
12 tablespoons Butter (Sweet Cream, Salted)
-
Wilton Color Right Food Coloring (various fall colors like red, orange, yellow, brown)
-
Non-stick cooking spray or butter for greasing
-
Leaf cookie cutter
Instructions
-
Step 1
Grease a 13×9 inch pan with non-stick cooking spray or butter. -
Step 2
In a large pot, melt butter over low heat. Add mini marshmallows and stir until completely melted and smooth. -
Step 3
Remove from heat. Stir in Rice Krispies cereal until well coated. Divide the mixture into separate bowls based on the number of colors you want to use. -
Step 4
Add a few drops of Wilton Color Right food coloring to each bowl of cereal mixture and stir quickly until evenly colored. Work in small batches to prevent the mixture from hardening. -
Step 5
Lightly grease your hands or a spatula and press the colored cereal mixture evenly into the prepared pan. For leaf shapes, you can also spread the mixture thinly on a greased surface and use the leaf cookie cutter once slightly cooled but still pliable. -
Step 6
Allow the treats to set completely before cutting into squares or using the cookie cutter to shape them into leaves. Cut or shape while still warm but firm enough to hold its shape.
Important Information
Nutrition Facts (Per Serving)
It is important to consider this information as approximate and not to use it as definitive health advice.
Allergy Information
Please check ingredients for potential allergens and consult a health professional if in doubt.



Leave a Comment