
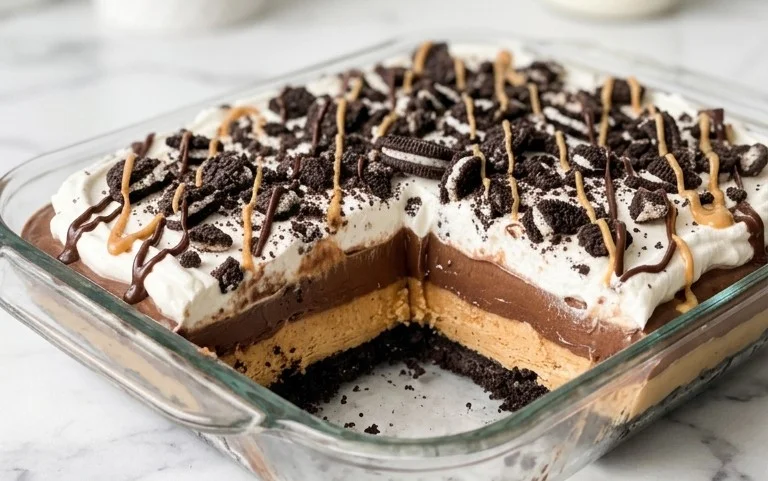
This No Bake Chocolate Peanut Butter Oreo Dessert is a layered dream that requires absolutely no oven time. It starts with a crunchy, crumbly base made from crushed Oreos, which gives it that satisfying texture from the very first bite. Then comes a smooth, creamy layer of peanut butter and vanilla pudding that perfectly balances the sweetness. Finally, it’s crowned with a rich chocolate pudding and fluffy whipped topping. People adore this dessert because it hits all the right notes: chocolate, peanut butter, and the unmistakable crunch of Oreos. It’s a crowd-pleaser for a reason, bringing together familiar, beloved flavors in a format that’s surprisingly simple to assemble, making it a go-to for busy cooks who want to impress. The combination is decadent without being overly complicated, ensuring everyone asks for the recipe.
What makes this dessert special:
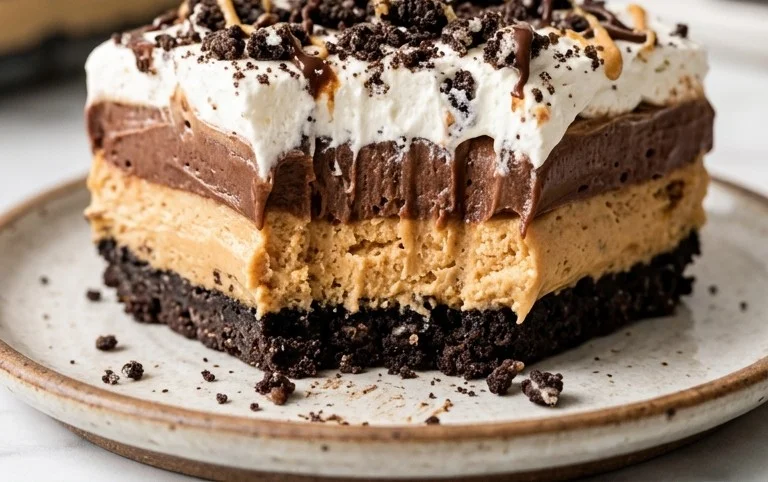
The magic of this No Bake Chocolate Peanut Butter Oreo Dessert lies in its effortless assembly and the nostalgic flavors it brings. The distinct layers offer a delightful contrast in textures and tastes. The crushed Oreos provide a chocolatey foundation, the peanut butter and vanilla pudding layer adds a creamy, nutty depth, and the chocolate pudding topping finishes it off with pure decadence. It’s the kind of dessert that looks as good as it tastes, with visible layers that promise a delightful experience with every spoonful. Plus, its no-bake nature makes it ideal for any occasion, especially when your oven is already in use or on a hot day.
No Bake Chocolate Peanut Butter Oreo Dessert
This no-bake dessert starts with a rich chocolatey crust made from crushed Oreos, layered with a creamy peanut butter and vanilla pudding mixture, and topped with a decadent chocolate pudding and whipped topping layer. It’s a simple yet incredibly satisfying treat that’s perfect for potlucks, family gatherings, or just a quiet night in. The combination of chocolate and peanut butter is always a winner, and the Oreos add that extra special touch that makes this dessert irresistible.
Ingredients:
- 12 oz milk chocolate chips, divided
- 3 1/2 cups milk
- 1 pkg Oreos (14.3 oz package, chocolate cream variety)
- 16 oz cream cheese, divided (room temperature)
- 1 box Instant Vanilla Pudding (3.4 oz box)
- 1 cup creamy peanut butter
- 1 box Instant Chocolate Pudding (3.4 oz box)
- 12 oz whipped topping
Instructions:
Step 1: Prepare the Oreo Crust
The first step is to create our delicious Oreo crust. Take your entire package of Oreos (the 14.3 oz package, which usually contains about 36 cookies) and crush them into fine crumbs. You can do this by pulsing them in a food processor until they are very fine, almost like flour. If you don’t have a food processor, you can place the Oreos in a sturdy zip-top bag, seal it tightly, and then crush them using a rolling pin or the bottom of a heavy pan. The finer the crumbs, the more cohesive your crust will be. Once crushed, you’ll want to reserve about 1/2 cup of these crumbs for topping later. The remaining crumbs will form the base of our dessert. In a medium bowl, combine the majority of the Oreo crumbs with 4 tablespoons of melted milk chocolate chips (melt about 2 ounces of the total 12 ounces for this). Stir until the crumbs are evenly moistened and clump together. This melted chocolate acts as a binder. Press this mixture firmly into the bottom of a 9×13 inch baking dish. Make sure to get an even layer, pressing it up the sides slightly if you like. You can use the bottom of a glass or a measuring cup to help press it down firmly. Place the dish in the freezer for about 10-15 minutes while you prepare the next layer. This helps the crust set up.
Step 2: Make the Creamy Peanut Butter Filling
Now for the luscious peanut butter layer. In a large bowl, beat the softened cream cheese until it’s smooth and free of lumps. It’s important that the cream cheese is at room temperature for this step; cold cream cheese will be difficult to mix and may result in a lumpy filling. Next, add the creamy peanut butter to the softened cream cheese and beat them together until well combined and creamy. In a separate, larger bowl, whisk together the 3 1/2 cups of milk and both boxes of instant pudding – the vanilla and the chocolate. Whisk until the pudding starts to thicken, which should only take a minute or two. Let this pudding mixture sit for about 5 minutes to allow it to fully set up and thicken. Once the pudding has thickened, gently fold it into the cream cheese and peanut butter mixture. It might seem like a lot of pudding, but it will incorporate beautifully. Be careful not to overmix at this stage; you want to keep the filling light and airy. Finally, gently fold in half of the whipped topping (6 ounces) into the peanut butter and pudding mixture. Again, fold gently to maintain the airiness. Spoon this peanut butter filling evenly over the chilled Oreo crust. Smooth the top with a spatula.
Step 3: Create the Chocolate Pudding Layer
This layer adds another dimension of chocolatey goodness. In a medium bowl, combine the remaining 3 1/2 cups of milk with the remaining box of instant chocolate pudding. Whisk vigorously until the pudding begins to thicken, which should take about 1-2 minutes. Let this chocolate pudding mixture stand for about 5 minutes to set up. Once it has thickened, gently spread this chocolate pudding evenly over the peanut butter filling. Use a spatula to create a smooth, even layer. Be sure to cover the entire surface.
Step 4: Top with Whipped Topping and Chocolate Drizzle
The final touches are key to making this dessert look as good as it tastes. Take the remaining 6 ounces of whipped topping and spread it gently over the chocolate pudding layer. You can create decorative swirls or just ensure an even coat. It’s best to do this gently so you don’t disturb the pudding layer underneath. Once the whipped topping is spread, melt the remaining 10 ounces of milk chocolate chips. You can do this in a microwave-safe bowl in 30-second intervals, stirring between each interval, or use a double boiler. Once the chocolate is smooth and melted, drizzle it over the whipped topping. You can use a spoon or a piping bag with a small tip for a more controlled drizzle. Immediately after drizzling the melted chocolate, sprinkle the reserved 1/2 cup of crushed Oreos over the top. This adds a lovely textural contrast and a final visual appeal.
Step 5: Chill and Serve
Now, the hardest part: waiting! Cover the 9×13 inch dish tightly with plastic wrap or a lid. Refrigerate the dessert for at least 4 hours, or preferably overnight. This chilling time is essential for all the layers to set properly and for the flavors to meld together beautifully. The longer it chills, the easier it will be to slice and serve. When you’re ready to serve, cut the dessert into squares. A sharp knife dipped in hot water and dried between cuts will give you cleaner slices. This no-bake chocolate peanut butter Oreo dessert is best served cold. You can even add an extra dollop of whipped topping or a sprinkle of chocolate shavings on individual servings for a restaurant-style presentation. Enjoy this incredibly easy and delicious dessert!
Conclusion:
This No Bake Chocolate Peanut Butter Oreo Dessert truly is a testament to how simple ingredients can create something incredibly special. Its appeal lies in the satisfying layers of chocolate, peanut butter, and Oreo crunch, all brought together without needing to turn on the oven. It’s a reliable treat that consistently delights, whether you’re serving it at a family dinner, a neighborhood potluck, or just because. You can easily adapt it to suit your preferences, perhaps by adding a sprinkle of chopped peanuts on top for extra crunch or even a drizzle of melted chocolate. The key is that it always delivers a rich, creamy, and satisfying experience that’s hard to resist. Give this No Bake Chocolate Peanut Butter Oreo Dessert a try; you might find it becomes your new favorite go-to dessert!
Frequently Asked Questions:
Can I make this dessert ahead of time?
Absolutely. This dessert is best made at least 4-6 hours ahead of serving, or even the day before. This allows the layers to set properly and the flavors to meld together. Store it covered in the refrigerator.
What kind of peanut butter should I use?
Creamy peanut butter works best for a smooth, even layer. Make sure it’s the standard processed kind (like Jif or Skippy), not natural peanut butter where the oil separates, as this can affect the texture and consistency of the pudding layer.
Can I use different cookies for the crust?
While Oreos are classic, you could experiment with other chocolate sandwich cookies for the crust. However, be aware that their flavor and texture might change the overall taste of the dessert.
No Bake Chocolate Peanut Butter Oreo Dessert
A decadent no-bake dessert featuring layers of Oreos, creamy peanut butter, chocolate, and vanilla pudding.
Ingredients
-
12 oz milk chocolate chips, divided
-
3 1/2 cups milk
-
1 pkg Oreos (14.3 oz package, chocolate cream)
-
16 oz cream cheese, room temperature, divided
-
1 box Instant Vanilla Pudding (3.4 oz box)
-
1 cup creamy peanut butter
-
1 box Instant Chocolate Pudding (3.4 oz box)
-
12 oz whipped topping
Instructions
-
Step 1
Crush Oreos to fine crumbs. Mix 1/2 cup melted milk chocolate chips with 1/4 cup melted butter (optional) and press into the bottom of a 9×13 inch baking dish. -
Step 2
In a large bowl, beat softened cream cheese until smooth. Gradually beat in 1/2 cup peanut butter and 1 cup whipped topping until well combined. -
Step 3
In a separate bowl, whisk together milk, instant vanilla pudding mix, and the remaining 1/2 cup peanut butter until thickened. -
Step 4
Gently fold the pudding mixture into the cream cheese mixture. Spread this filling evenly over the Oreo crust. -
Step 5
Prepare the chocolate pudding layer by whisking together milk and instant chocolate pudding mix until thickened. Spread this over the cream cheese layer. -
Step 6
Top with the remaining whipped topping. Melt the remaining milk chocolate chips and drizzle over the top. Chill for at least 4 hours or until firm.
Important Information
Nutrition Facts (Per Serving)
It is important to consider this information as approximate and not to use it as definitive health advice.
Allergy Information
Please check ingredients for potential allergens and consult a health professional if in doubt.



Leave a Comment