
No Bake Eggnog Pie This no-bake eggnog pie is my go-to for holiday gatherings and anytime I crave that comforting, creamy, spiced flavor of eggnog in a dessert. It’s incredibly simple to put together, requiring no oven time at all, which is a lifesaver during busy seasons. The texture is wonderfully smooth and rich, with just a hint of spice from the nutmeg. It feels special enough for company but is easy enough for a weeknight treat. The best part is that it uses readily available ingredients, and the whole process takes very little active time. Ingredients: 1 graham cracker crust (store-bought or homemade) 1 package (153g) vanilla instant pudding mix 1 1/2 cups eggnog 2 cups Cool Whip or your favorite whipped cream, thawed if frozen 1/2 teaspoon ground nutmeg, plus more for garnish Cooking Instructions: Prepare the Pudding Base: In a large mixing bowl, combine the contents of the vanilla instant pudding mix package with the 1 1/2 cups of eggnog. Whisk these together thoroughly. You want to make sure there are no dry pockets of pudding mix. Continue whisking for about 2 to 3 minutes. The mixture will start to thicken as you whisk. It’s important to whisk consistently during this stage to ensure a smooth, lump-free pudding. If the pudding seems too thick too quickly, you can add another tablespoon or two of eggnog, but be cautious not to make it too thin. The goal is a consistency that holds its shape but is still pliable. Incorporate the Whipped Cream: Once the pudding mixture has reached the desired consistency, gently fold in the 2 cups of Cool Whip or whipped cream. Use a spatula for this, folding from the bottom up. Be careful not to overmix, as this can deflate the whipped cream and result in a less airy pie. The aim is to incorporate the whipped cream evenly, creating a light and fluffy filling that’s smooth with no streaks of pudding or cream. The mixture should be a uniform pale yellow color. Add the Nutmeg: Sprinkle the 1/2 teaspoon of ground nutmeg over the filling and gently fold it in until just combined. This spice is key to that authentic eggnog flavor. Make sure it’s distributed well so every bite has that warm, spicy note. Chill the Pie: Spoon the filling into the prepared graham cracker crust. Smooth the top with your spatula. Cover the pie loosely with plastic wrap, making sure the wrap doesn’t touch the surface of the filling if possible. Refrigerate for at least 4 hours, or preferably overnight, to allow the pie to set completely. This chilling time is essential for achieving the perfect sliceable texture. The longer it chills, the firmer it will become.
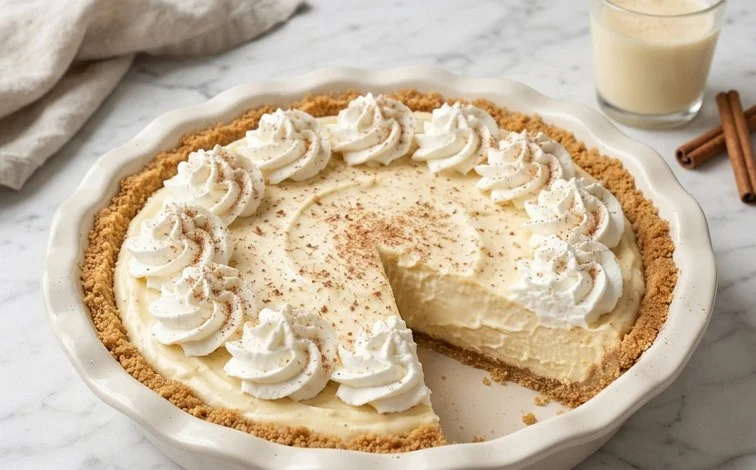
No Bake Eggnog Pie
This no-bake eggnog pie is my go-to for holiday gatherings and anytime I crave that comforting, creamy, spiced flavor of eggnog in a dessert. It’s incredibly simple to put together, requiring no oven time at all, which is a lifesaver during busy seasons. The texture is wonderfully smooth and rich, with just a hint of spice from the nutmeg. It feels special enough for company but is easy enough for a weeknight treat. The best part is that it uses readily available ingredients, and the whole process takes very little active time.
Ingredients:
- 1 graham cracker crust (store-bought or homemade)
- 1 package (153g) vanilla instant pudding mix
- 1 1/2 cups eggnog
- 2 cups Cool Whip or your favorite whipped cream, thawed if frozen
- 1/2 teaspoon ground nutmeg, plus more for garnish
Cooking Instructions:
- Prepare the Pudding Base: In a large mixing bowl, combine the contents of the vanilla instant pudding mix package with the 1 1/2 cups of eggnog. Whisk these together thoroughly. You want to make sure there are no dry pockets of pudding mix. Continue whisking for about 2 to 3 minutes. The mixture will start to thicken as you whisk. It’s important to whisk consistently during this stage to ensure a smooth, lump-free pudding. If the pudding seems too thick too quickly, you can add another tablespoon or two of eggnog, but be cautious not to make it too thin. The goal is a consistency that holds its shape but is still pliable.
- Incorporate the Whipped Cream: Once the pudding mixture has thickened to your desired consistency, gently fold in the 2 cups of Cool Whip or whipped cream. Use a spatula and a folding motion to incorporate the whipped cream without deflating it too much. You want to mix until it’s just combined and you no longer see streaks of plain pudding or whipped cream. Overmixing at this stage can result in a denser, less airy pie. The mixture should be light and fluffy. This step is what gives the pie its characteristic light and airy texture, making it melt-in-your-mouth delicious.
- Add the Spices: Now it’s time to add the warmth and aroma of nutmeg. Sprinkle the 1/2 teaspoon of ground nutmeg over the pudding and whipped cream mixture. Gently fold it in until it’s evenly distributed. You want the spice to be present in every bite, but not so overpowering that it masks the creamy, sweet flavor of the eggnog and vanilla. Taste a small spoonful (if you can resist!) and adjust the nutmeg if you prefer a stronger or milder spice note. Remember, you’ll also be garnishing with more nutmeg, so don’t go too heavy here.
- Fill the Crust: Spoon the creamy eggnog mixture into your graham cracker crust. Use your spatula to spread the filling evenly, ensuring it reaches all the edges of the crust and is smooth on top. You can create a slightly decorative finish by making swirls with the back of your spatula, or simply aim for a flat, uniform surface. Work gently to keep the filling as airy as possible. Some people like to press down lightly on the edges to make sure the filling is well-seated in the crust, but be careful not to compact the filling too much.
- Chill to Perfection: Cover the pie loosely with plastic wrap or foil. It’s important to not let the plastic wrap touch the surface of the filling if possible, as it can create condensation that might make the topping wet. Place the pie in the refrigerator to chill for at least 4 hours, or preferably until it’s completely set. This chilling time is essential for the pie to firm up properly. If you try to slice it too soon, it will be too soft and messy. The longer it chills, the firmer and easier it will be to slice cleanly. Overnight chilling is also perfectly fine and often results in the best texture.
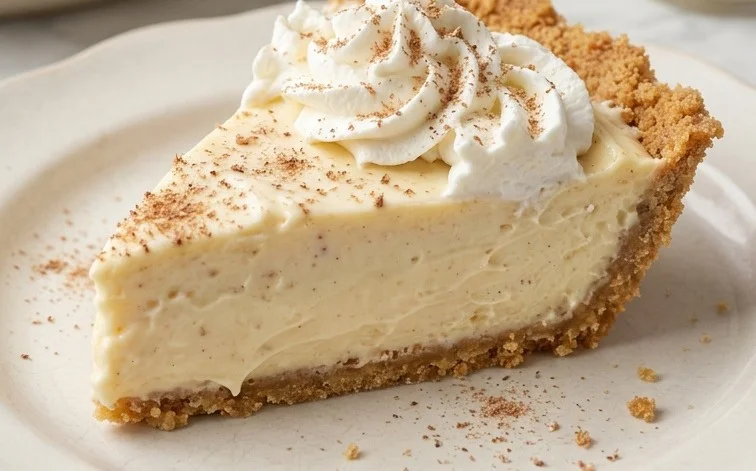
- Garnish and Serve: Once the pie is firmly set, remove it from the refrigerator. Just before serving, sprinkle a little more ground nutmeg over the top for an extra burst of fragrance and a beautiful presentation. You can also add a dollop of extra whipped cream to each slice if desired. Slice the pie using a sharp knife, wiping the blade clean between cuts for the neatest slices. This pie is best served cold, directly from the refrigerator. It’s a wonderful dessert to enjoy on its own or alongside a cup of coffee or tea.
This no-bake eggnog pie is a delightful treat that captures the essence of the holidays in every creamy spoonful. The simplicity of the recipe makes it accessible for bakers of all skill levels, and the rich, spiced flavor is sure to be a crowd-pleaser. Enjoy this easy and delicious dessert!
Conclusion:
This No Bake Eggnog Pie truly is a holiday marvel that simplifies dessert making without sacrificing flavor. It brings together the beloved taste of eggnog in a cool, creamy, and perfectly spiced treat that requires no oven time whatsoever. The result is a smooth, rich, and satisfying pie that impresses guests and comforts family alike. For serving, a dollop of extra whipped cream and a final dusting of nutmeg make it look picture-perfect. You can also add a sprinkle of cinnamon or even some crushed peppermint candies on top for a festive twist. If you don’t have eggnog on hand, you can try a pinch of cinnamon and a splash of milk with a touch of vanilla extract, though the true eggnog flavor is best. For storage, keep any leftovers covered in the refrigerator for up to 3 days; the crust might soften slightly over time. Remember, the key to this pie is allowing ample chilling time for it to set properly. Give this wonderfully easy eggnog pie a try this season; you won’t regret it!
FAQ: Can I make this pie ahead of time?
Yes, this No Bake Eggnog Pie is perfect for making ahead. It actually benefits from chilling time, so making it a day in advance will ensure it’s fully set and flavors have melded beautifully.
FAQ: What can I use instead of Cool Whip?
You can use homemade whipped cream. Whip 2 cups of heavy cream with 1/4 cup of powdered sugar and 1 teaspoon of vanilla extract until stiff peaks form. Fold this gently into the pudding mixture just like you would Cool Whip.
FAQ: How do I get a firmer pie?
Ensure you are using a good quality instant pudding mix and that you whisk it sufficiently with the eggnog to achieve thickness before folding in the whipped cream. Also, chilling it for at least 4-6 hours, or ideally overnight, is crucial for it to set properly.
No Bake Eggnog Pie
A festive and easy no-bake pie featuring the classic flavors of eggnog and nutmeg in a creamy, chilled filling.
Ingredients
-
1 graham cracker crust
-
1 (153g) box vanilla instant pudding mix
-
1 1/2 cups eggnog
-
2 cups cool whip or whipped cream
-
1/2 teaspoon ground nutmeg
Instructions
-
Step 1
In a large bowl, whisk together the vanilla instant pudding mix and eggnog until smooth and well combined. Allow to thicken for about 5 minutes. -
Step 2
Gently fold in the cool whip or whipped cream into the pudding mixture until no white streaks remain. Be careful not to overmix. -
Step 3
Sprinkle in the ground nutmeg and stir until evenly distributed throughout the filling. -
Step 4
Pour the eggnog filling into the prepared graham cracker crust, spreading it evenly to the edges. -
Step 5
Cover the pie loosely with plastic wrap and refrigerate for at least 4 hours, or until firm. -
Step 6
Before serving, sprinkle with additional nutmeg if desired.
Important Information
Nutrition Facts (Per Serving)
It is important to consider this information as approximate and not to use it as definitive health advice.
Allergy Information
Please check ingredients for potential allergens and consult a health professional if in doubt.


Leave a Comment