
Meringue Christmas Trees are a delightful addition to any holiday spread, bringing a touch of whimsical charm to your festive table. These delicate confections are surprisingly simple to make, and their crisp, airy texture is always a hit. The beautiful green colour, reminiscent of a festive fir, coupled with sparkly sprinkles, makes them as visually appealing as they are tasty. I find making these Meringue Christmas Trees with my family during the festive season truly special; the kitchen fills with the sweet scent of sugar and a sense of joyful anticipation, creating memories that last. They are perfect for decorating your dessert table or even as edible gifts for friends and neighbors. The lightness of the meringue contrasts wonderfully with richer holiday desserts, offering a balanced sweetness that everyone can enjoy. Plus, their unique tree shape makes them a conversation starter at any gathering.
Getting Started: Prepare Your Meringue Base
The foundation of perfect meringues lies in having the right equipment and ingredients. First, ensure your egg whites are at room temperature. This is essential because they whip up to a much greater volume than cold egg whites. To separate them, crack your eggs carefully and let the whites fall into a clean, dry bowl. Any trace of yolk will prevent your meringues from forming stiff peaks. A tiny speck of fat can ruin the whole batch, so be precise. I usually separate my eggs into a small bowl first, then add them to the main mixing bowl, one at a time, checking for any yolk before combining. Next, you’ll need a clean, grease-free mixing bowl and whisk attachment. Even a tiny bit of grease can inhibit the egg whites from whipping properly. I often give my bowl and whisk a quick wipe with a little vinegar and then rinse.
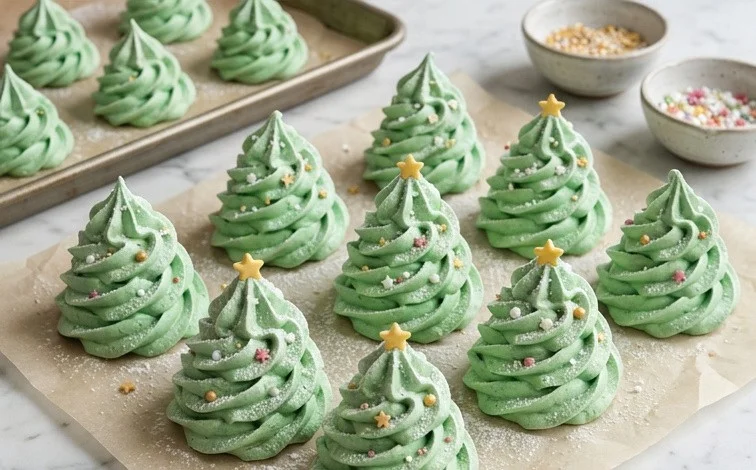
Meringue Christmas Trees
These delicate meringue Christmas trees are a charming addition to any holiday spread. They’re surprisingly simple to make, and the crisp, airy texture of the meringue is always a crowd-pleaser. The beautiful green colour, reminiscent of a festive fir, and the sparkly sprinkles make them look as good as they taste. I love making these with my family during the festive season; the kitchen fills with the sweet scent of sugar and a sense of joyful anticipation.
Ingredients:
- 2 large egg whites (room temperature)
- 1/4 teaspoon cream of tartar
- 100 g granulated sugar
- green gel food colouring
- sprinkles
Getting Started: Prepare Your Meringue Base
The foundation of perfect meringues lies in having the right equipment and ingredients. First, ensure your egg whites are at room temperature. This is essential because they whip up to a much greater volume than cold egg whites. To separate them, crack your eggs carefully and let the whites fall into a clean, dry bowl. Any trace of yolk will prevent your meringues from forming stiff peaks. A tiny speck of fat can ruin the whole batch, so be precise. I usually separate my eggs into a small bowl first, then add them to the main mixing bowl, one at a time, checking for any yolk before combining.
Next, you’ll need a clean, grease-free mixing bowl and whisk attachment. Even a tiny bit of grease can inhibit the egg whites from whipping properly. I often give my bowl and whisk a quick wipe with a little vinegar and then rinse and dry them thoroughly, just to be absolutely sure. Add your room-temperature egg whites to this bowl. Then, add the 1/4 teaspoon of cream of tartar. Cream of tartar is an acid that helps to stabilize the egg whites, making them more robust and less likely to collapse. It also contributes to a whiter, glossier meringue.
Whipping the Meringue
Begin whisking the egg whites on a medium-low speed. You’re looking for them to start becoming frothy and bubbly, like the top of a non-alcoholic beer. Once you see this foamy texture, gradually increase the speed to medium-high. Continue whisking until the egg whites form soft peaks. This means when you lift the whisk, the peaks will curl over at the tip.
Now, it’s time to add the sugar. This is a critical step for achieving a stable meringue. You need to add the 100 g of granulated sugar very slowly, a tablespoon at a time, while the mixer is still running on medium-high speed. This gradual addition allows the sugar crystals to dissolve fully into the egg whites. If you add the sugar too quickly, it won’t dissolve properly, and your meringues can end up grainy and may weep liquid later. Keep whisking continuously as you add the sugar.
Continue to whisk for another 5-10 minutes after you’ve added all the sugar. You are aiming for stiff, glossy peaks. When you lift the whisk, the peaks should stand straight up, and the meringue should look smooth and shiny. You can test if the sugar has dissolved by rubbing a small amount of the meringue between your fingertips. If it feels smooth, the sugar is dissolved. If you feel any grit, continue whisking for a few more minutes.
Adding Colour and Shaping the Trees
Once your meringue is beautifully stiff and glossy, it’s time to add colour. For these Christmas trees, we’ll be using green gel food colouring. Gel colours are concentrated and work best in meringues, as they won’t add excess liquid like liquid food colouring might. Add a small amount of the green gel food colouring to the meringue. Start with just a drop or two and gently fold it in using a spatula. Be careful not to overmix, as this can deflate the meringue. Continue adding colour and folding until you achieve your desired shade of green. A lovely forest green or emerald green looks very festive.
Now, prepare your baking sheets. Line two baking sheets with parchment paper. This prevents the meringues from sticking and makes for easy cleanup. Spoon the green meringue into a piping bag fitted with a star tip (or a plain round tip if you don’t have a star tip). If you don’t have a piping bag, you can simply use two spoons to shape mounds of meringue onto the baking sheets, but a piping bag gives you more control for creating the tree shape.
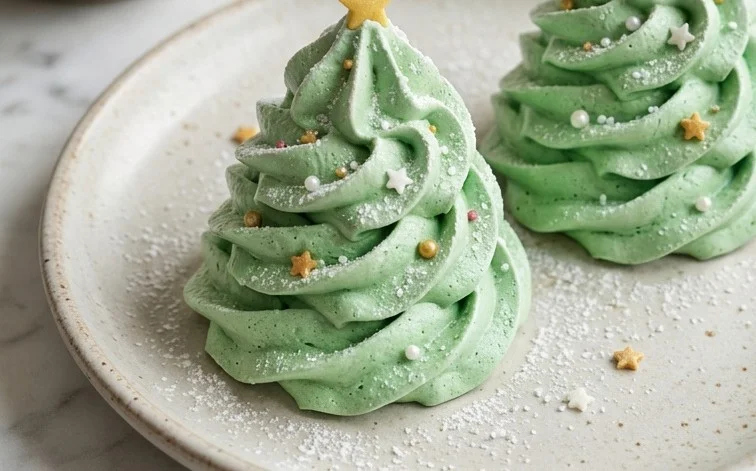
To create the tree shape, hold the piping bag at a slight angle and pipe a base circle. Then, pipe smaller circles directly on top, layering them to create a conical shape resembling a Christmas tree. Aim for about 3-4 layers per tree, getting progressively smaller towards the top. As you pipe, don’t worry if they aren’t perfectly identical; the slight variations add to their homemade charm.
Baking and Decorating
Preheat your oven to a low temperature, around 100°C (210°F). Low and slow is the key to drying out meringues without browning them too much. Place the prepared baking sheets into the preheated oven. The baking time will vary depending on the size of your meringue trees and your oven, but generally, they will need 1 to 1.5 hours. You want them to be crisp and dry to the touch, and they should lift easily off the parchment paper.
Once they are baked, turn off the oven and leave the meringues inside with the oven door slightly ajar. This allows them to cool down gradually and prevents them from cracking due to a sudden temperature change. You can prop the oven door open with a wooden spoon. Let them cool completely in the oven. This process helps to ensure they remain crisp.
After the meringue trees have completely cooled, it’s time for the fun part: decorating! Have your sprinkles ready. You can use a variety of colours and shapes for a festive look. You can either lightly brush the tops of the meringue trees with a tiny bit of water and gently press the sprinkles on, or if you have some leftover meringue, you can pipe a tiny dot of it on top and stick the sprinkles into that. Alternatively, a small amount of edible glue can also be used to attach sprinkles. Tiny edible silver or gold balls also look like little baubles on the trees. Be creative and have fun with it!
These meringue Christmas trees are best stored in an airtight container at room temperature once they are fully cooled and decorated. They can be made several days in advance, making them a convenient treat for your holiday gatherings. Enjoy their sweet, crunchy goodness!
Conclusion:
Making these Meringue Christmas Trees is a rewarding experience that adds a beautiful, edible decoration to your holiday celebrations. Their delicate crispness and airy sweetness are sure to be a hit with family and friends, and the process itself can be a fun activity for all ages. They offer a lighter alternative to heavier festive sweets, providing a delightful balance on your dessert spread. Whether you’re decorating your tree, filling cookie tins, or simply enjoying a sweet treat, these festive trees are a wonderful choice. Don’t be intimidated by meringues; with a little care and attention to detail, you’ll create a stunning and delicious result that perfectly captures the spirit of the season. Get creative with colours and sprinkles to make them uniquely yours!
What are the best tips for making meringues?
Ensure all your equipment is spotlessly clean and free of grease. Room temperature egg whites are key for maximum volume. Slowly adding sugar, a tablespoon at a time, while whipping helps create a stable, glossy meringue. Bake at a low temperature for a longer time to dry them out completely without browning too much.
Can I make Meringue Christmas Trees ahead of time?
Yes, absolutely. Meringues can be stored in an airtight container at room temperature for up to two weeks. Make sure they are completely cooled before storing to prevent condensation, which can make them sticky.
How can I prevent my meringues from cracking?
Cracking often happens due to rapid temperature changes or over-baking. Letting the meringues cool down slowly in the oven after baking, with the oven door slightly ajar, can help. Also, ensure your oven temperature is consistent and not too high.
Meringue Christmas Trees
Festive and airy meringue cookies shaped like Christmas trees, perfect for holiday decorating.
Ingredients
-
2 large egg whites (room temperature)
-
1/4 teaspoon cream of tartar
-
100 g granulated sugar
-
green gel food colouring
-
sprinkles
-
1 pinch salt
Instructions
-
Step 1
Preheat your oven to 200°F (95°C). Line baking sheets with parchment paper. -
Step 2
In a clean, dry bowl, whip the egg whites with the cream of tartar and salt until soft peaks form. -
Step 3
Gradually add the granulated sugar, one tablespoon at a time, beating until stiff, glossy peaks form and the sugar is fully dissolved. -
Step 4
Add a few drops of green gel food colouring and gently fold it in until the meringue is evenly coloured. Be careful not to overmix. -
Step 5
Transfer the meringue to a piping bag fitted with a star tip. Pipe cone shapes onto the prepared baking sheets, layering them to create tree shapes. -
Step 6
Immediately sprinkle the meringue trees with your desired sprinkles. -
Step 7
Bake for 60 minutes, or until the meringues are crisp and dry. Turn off the oven and let the meringues cool completely inside the oven with the door ajar.
Important Information
Nutrition Facts (Per Serving)
It is important to consider this information as approximate and not to use it as definitive health advice.
Allergy Information
Please check ingredients for potential allergens and consult a health professional if in doubt.

Leave a Comment